Better Interoception Equals Better Health
 How’s your interoception? In case you’re not familiar with that word, it’s the inner felt sense of the body, including being warm or cold, hungry or full, tired or energized, stiff or flexible. Interoception is increasingly seen as a crucial component of health by twenty-first century researchers, especially in how it bridges the gap between physical and emotional experience. Recent research shows that well-developed interoception can lessen our experience of pain, which might surprise you. In other words, the more we are in touch with our inner world of sensation, the more we can adapt our behaviors to lessen the causes of pain. When our interoception is faulty and we are disconnected from the body, we are more vulnerable to anxiety and depression.
One way to check in with our interoception – our inner sense of subjective presence in the body – is with an inner dialogue. Think for a moment about whether you have an inner dialogue, a way of checking in with yourself throughout your day. If you do, what are its contours and themes? Do you talk to yourself with judgment, criticism, or disapproval? Or are you an encouraging coach for yourself? Does your body have a voice in the conversation? If your neck hurts and you are short-tempered, can you see the connection between those two states? Do you see your body as an ally, or as an adversary? A burden that you carry around, or your very own self?
I believe that we develop our inner dialogue over our lifetime. It is influenced by our family and by the culture we live in, the education we receive, the work that we do, and our goals for ourselves. I often ask students what they were taught about self-care while growing up. For many of us, it’s the usual short list: eat healthy food, get exercise, get enough sleep. Rarely is anything taught about the value of interoception or embodied self-awareness – the ongoing process of dialogue between your mental and physical selves. Being embodied with awareness requires practice and continuous renewal.
Bodymind Ballwork is a great way to develop your interoception and gradually build a more authentic and self-supporting inner dialogue. If you haven’t tried it, now is a good time. I am offering several workshops this summer and fall to teach the full spectrum of this empowering and healing work. Check out the Bodymind Ballwork page and the workshop page of my website for more information. If you are already a practitioner, tell your friends about it!
Adapted and excerpted from The Bodymind Ballwork Method, pp 35-36.

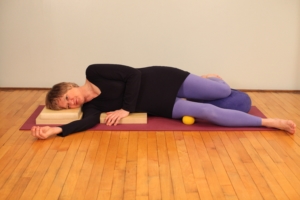 3. Lying on your side with one 3-4” hollow ball: Start by arranging props to support your upper body well while lying on your side. In this photo I have one pad under my ribs, two under my head, and a space between them for my shoulder.
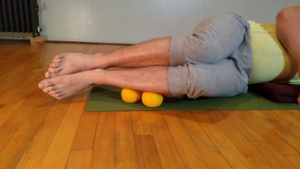 4. Lying on your side with two small solid balls under the side of your lower leg: Support your upper body in the same way as in #3 above.
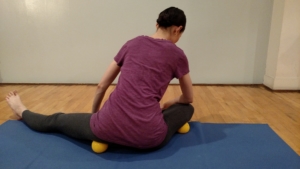
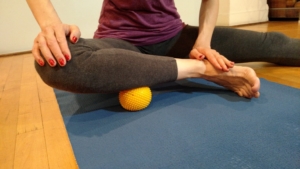
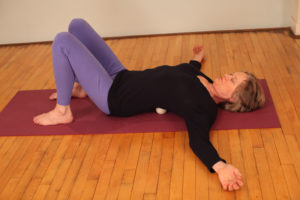 What do you do to take a break from daily stress, body aches, worry and fatigue? Maybe it’s a cup of tea, a phone call with a friend, or a few minutes of yoga. I recommend that you add this to your choices: a Bodymind Ballwork technique for the spine which will de-stress you, lengthen your back, and refresh your breath and your mind. I do it every day, as do many of my students.
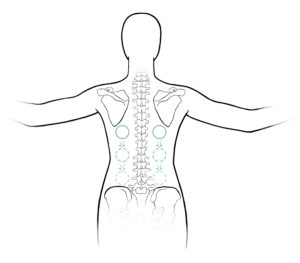 Now move your back very slowly to one side, just an inch or two. Try to move only that segment of your back where you feel the balls. Breathe as you go, and notice any sensations, strong or subtle. The balls are massaging your spinal muscles, of which there are many, and all the surrounding fascia which is richly innervated. Some areas will probably be sore, others not. Think of it as an exploration of your own self, your back body which you can never actually see, but you can deeply feel.