Balance: It’s Not Just Tree Pose

“The reason we think balance is associated with longevity is because it requires keeping your brain and nervous system’s integration circuitry intact.” —Danine Fruge, MD, family-practice physician

 Practicing specifically for better balance is important for us at any age, but it is essential for those of us over 50 or 60, when so many changes happen in our bodies. To work on balance with yoga, Tree pose is a common choice. Although Tree Pose is iconic, often representative of yoga in general, there are many other diverse and entertaining ways to improve balance.  With better balance, we avoid falls, which can lead to injuries and a serious decline in overall health. In this post I’ll describe to you some of my top choices for practicing basic balance skills that will help you in daily life and in your Tree pose.

To get the bad news out right away, here are the most common changes that happen gradually as we age:

  • Less acuity in the nervous system (which could manifest as slower response time reduced coordination, reduced sensory and motor efficiency, and cognitive decline)
  • Blood pressure deviations from normal levels
  • BPPV: benign paroxysmal positional vertigo, in which small stones in inner ear become dislodged, is common in over 60
  • Reduced circulatory efficiency and reduced elasticity of blood vessels
  • Peripheral neuropathy (poor nerve conduction in the hands and feet)
  • Loss of muscle strength (called sarcopenia) and stiffening of the connective tissues
  • Loss of bone density (osteopenia or osteoporosis)
  • Degeneration and stiffness of joints due to wear and tear (osteoarthritis)
  • Poor balance, resulting from all of the above

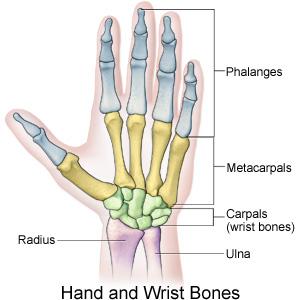
We need balance skills to avoid falling. According to the National Council on Aging, falling is the leading cause of fatal and nonfatal injuries among older adults. The most common locations for these fractures are the hip, pelvis, ankle, wrist, and upper arm bone near the shoulder.

To catch ourselves when we might fall, we need flexibility and coordination to suddenly regain our balance. If we do fall, we need strength to catch ourselves. Fall prevention must include all of these elements of balancing: strength, flexibility, and coordination. And the bonus is that when we develop these skills, we contribute to our agility in daily life. Doesn’t that also sound like the same list as the benefits of a good yoga practice?

Our Three Balance Mechanisms

We have three mechanisms in the body that work simultaneously, moment to moment, to help us maintain balance. As the opening quote says, we need the brain and body to be talking to each other.

First, our proprioception sends neural signals from our muscles and joints to the brain that indicate what position we are in. For this to work well, we need sufficient body awareness and focus to receive those signals and make adjustments when needed. Many older adults have reduced proprioception and possibly also peripheral neuropathy, which is a lack of sensation and motor control in the feet. Our feet may feel numb or unable to move in the ways their design allows. Another common aging issue related to proprioception is a general slowing of perceptual and cognitive function. We may not perceive an impending loss of balance soon enough to prevent a fall. But evidence shows that these conditions can be at least partially reversed by regular exercise. The brain can keep learning!

Secondly, the delicate structures in the inner ear respond to changes of position (particularly of the head) and communicate with the brain. This is called the vestibular system, and it changes with the aging process.

Thirdly, our visual sense gives us a feeling-sense of orientation to gravity and the environment around us. We need to remember to maintain our attention and our visual focus (both direct and peripheral), whether walking on the street or doing any kind of exercise. This may seem obvious, but you can ask yourself: how often do I become involved with an internal reverie while doing my daily activities or while walking outside, either in the city or in the country? If that inattention becomes a persistent habit, it can increase your risk of falling.

If you suddenly develop a balance issue, such as dizziness or light-headedness when going from lying down to standing up, or if you have reduced sensation in your feet, I recommend that you seek medical help to consider inner ear, problems, neuropathy, medication side effects, or cardiovascular issues. However, a gradual development of balance problems is most likely to be caused by our normal aging process. This is where yoga can help.

With yoga, you improve your proprioception, you strengthen your muscles, and you increase your flexibility. I’ve mentioned why proprioception and muscle strength are important. But why flexibility? When you sense that your balance is off, the natural tendency is to adjust your position to regain your balance. This could be catching yourself with one foot after tripping over an obstacle or widening your stance while walking down the aisle of a fast-moving train. In order to do that, you need fast responses, but also hip and leg mobility. Flexibility allows you a greater range of adaptive moves to steady yourself and prevent a fall. For this reason, your yoga practice must include exercises for dynamic balancing, which I believe is just as important as learning to balance on one foot in stillness.

Alignment matters. What is your personal optimal posture, given all the variations that exist in humanity? How do you tend to arrange your body when standing, walking, and doing all your daily activities? I’ve seen some common non-optimal tendencies in my years of teaching, such as turning the knees inward or the feet outward, pushing the pelvis forward, sinking in the lower or upper back, rolling the shoulders forward, and carrying the head forward with the neck shortening. Each of these deviations from optimal alignment can predispose us to losing our balance.

I recommend that you consult a trained teacher to help you evaluate your posture. But here are some basic guidelines:

  • Your weight is well balanced on your feet. You place your feet with the center line of one foot parallel to the center line of the other foot. If your habit is to turn your feet inward or outward, gradually work to become more familiar with this neutral position of parallel feet. (See the Four Corners exercise below.)
  • Your knees face toward your middle toes, whether your legs are bent or straight. (See the Knee Tracking exercise below.)
  • The tilt of your pelvis is appropriate for your body and the pose you are doing. Find the midpoint between an excessive lumbar (lower back) arch, and the opposite pattern of excessively tucking your tailbone.
  • You maintain abdominal support, without losing the slight arch inward in your lower back.
  • Your front chest is lifted and broad, with the muscles around your shoulder blades supporting your upper back.
  • Your head aligns over your spine as much as possible. If you tend to carry your head forward, move your head back, first with the base of your ears moving back, then lifting your chin to recover the slight arch in your neck.
  • You enliven your whole body with the energy from your breath and your highest intention for your well-being. Be fully present in your body.

What is “The Core” and Why is it Important?

The prevailing definition of “core” is your abdominal muscles. Within the fitness and medical community, there is a tendency to overemphasize abdominal strengthening through sit-ups, crunches, or some variation of those common exercises. For anyone with low bone density, this type of exercise is dangerous, because it puts excess pressure on the front part of the vertebrae as you curve your spine.

But there is another way to understand the core—to see it as including the muscles of the spine, hips, pelvic floor, thighs, and the abdominal wall. These core muscles stabilize the middle of our body on all sides, creating a source and center for the movements of the rest of the body. With a weak core, your body will find other, less efficient strategies for stability, such as tensing your shoulders. With a strong core, you’ll have much more stability and support for any situation, especially vigorous activities—but also for daily chores or extensive sitting at work. And most of all, you’ll have better balance.

One action that may be unfamiliar to many people is the lift of the pelvic floor. This is a muscular network at the base of your pelvis that we use to stabilize our center in the yoga poses. Right now, as you’re reading, squeeze the muscles there and see how it feels. Notice that you can continue to breathe while firming those muscles. You can squeeze toward the center, and then gently lift that floor upward. Practice this for 15 seconds at a time at first, and then gradually integrate it into your practice.

Here are some exercises that you can do as a warmup for your usual practice, with special attention to balance improvement.

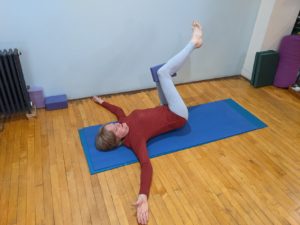
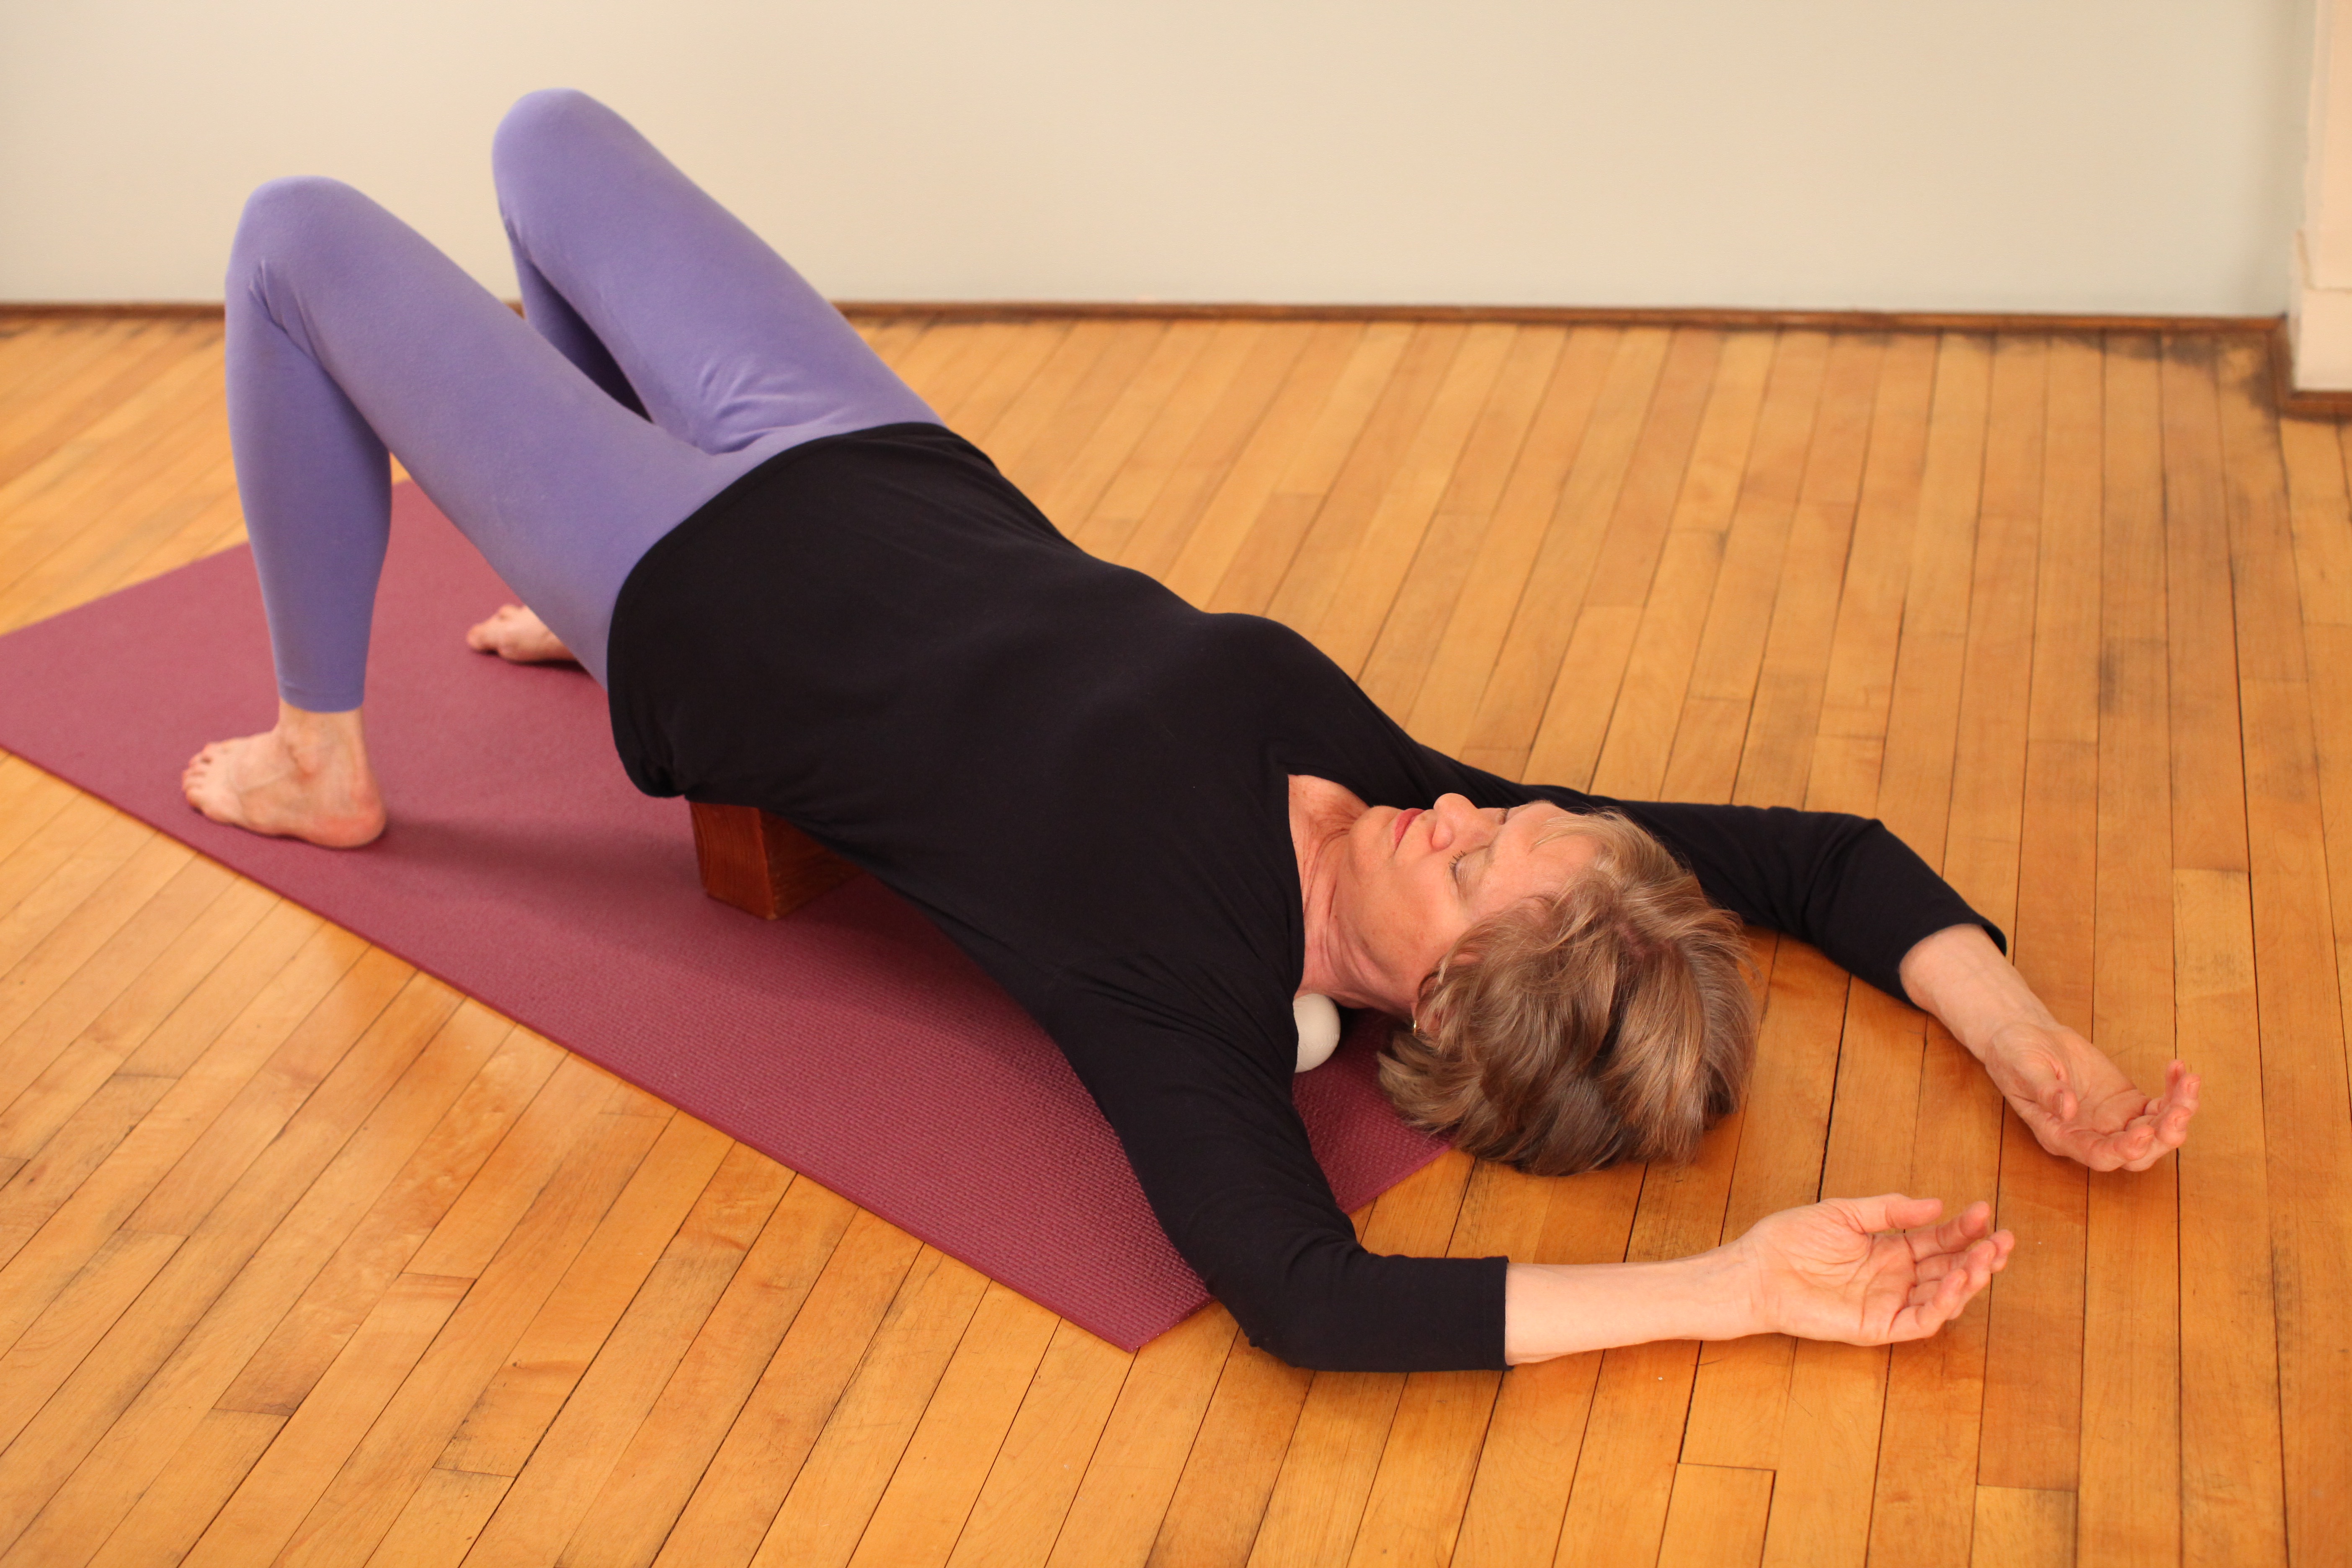
My favorite core strengthening yoga pose is a dynamic supine twist, a variation of Jathara Parivartanasana. I like it because people or any age can do it, and all the core muscles are strengthened without spinal flexion.


Supine Twist (Jathara Parivartanasana)


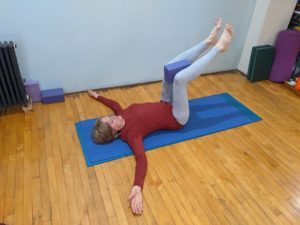
Purpose: To strengthen the core muscles of the spine and torso, and learn to twist with a long spine

Props: Yoga mat and optional blanket under your pelvis or head and neck for comfort

Body position: On your back, knees bent, arms stretched to the sides, palms facing up

Instructions:

  1. Bend your knees and place a block between them (narrow, medium, or wide setting, your choice), keeping your feet at least as high as your knees, or higher. Squeeze the block.
  2. Flex your ankles and spread your toes.
  3. Press your arms and shoulders down into the mat to stabilize your upper torso.
  4. Move your legs at a moderate pace from right to left, breathing smoothly. Begin by moving a small amount and increase how far you twist as you feel ready.
  5. When you are tired, come back to center, remove the block, place your feet flat, and rest.

Things to watch for: 

  1. Keep your shoulders on the floor and notice the strengthening actions in your twisting muscles (spine and abdomen). This is very good core work, because you are working dynamically through a range of movement, while stabilizing.
  2. Notice that the floor helps you to maintain a long spine.
  3. Keep your neck neutral: not pressing it down or lifting it up.

These three exercises prepare our knees, ankles, and feet to have the coordination and strength to support us.

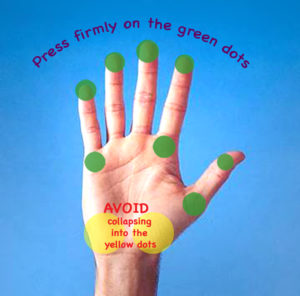
The Four Corners of the Feet    


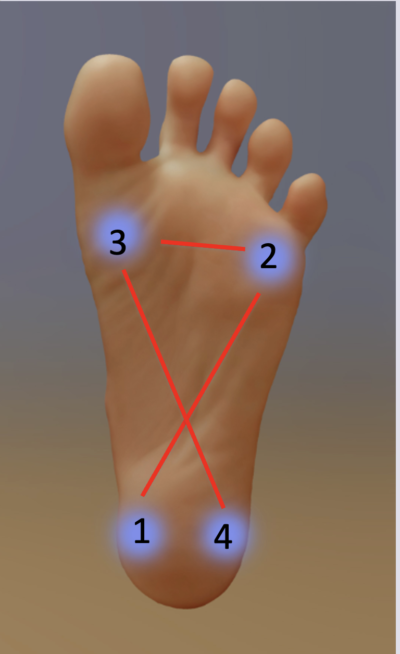
Purpose: To balance your weight well on your feet and strengthen the intrinsic foot muscles.

Props: The floor

Body position:  Standing

Instructions:

Begin by standing in a “normal” way and feel the balance of weight on your feet. Do you tend to place more weight on one foot in comparison to the other? More weight in one part of the foot?

Next, work with one foot at a time in the following way:

  1. Put most of your weight on one foot. With the other one, tilt your foot so that the inner heel is the only part touching the floor.
  2. Then keep that part down and put the base of your little toe down (at the joint at its base). Notice how various muscles in the sole of your foot (called intrinsic muscles) are working as you do these steps.
  3. Keeping those two points down, widen across the forefoot to bring the base of your big toe down. Notice how it feels to widen your foot in this way.
  4. With those three points staying down, press your outer heel down.
  5. Feel how the weight balances on these four corners. You might play with the four corners, moving through the sequence like a dance. Experiment with balancing on that foot.
  6. Repeat this sequence with your other foot.

Things to watch for:

  1. How do your feet feel different after doing this?
  2. Which corners are easiest for you to find and press down? Which are less easy?
  3. What does this tell you about your usual posture on your feet?
  4. What do you feel in your knees and hips as you do this?
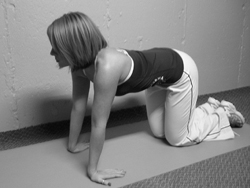
Knee Tracking   

Purpose: To align your knees well as they bend, for safety, balance, and strength in the poses

Props:  The floor

Body position:  Standing

Instructions:

  1. Stand with your feet balanced on their four corners and place them hip-width apart.
  2. Bend your knees and look down to see where the kneecaps are pointing. Adjust them so that they point toward the second or third toe.
  3. Practice this several times, observing the knees as they bend.

Things to watch for:

  1. For many people, the knees may turn in toward the midline. What is your habitual pattern?
  2. What do you have to do differently than usual to align your knees in this way?
  3. Where in your body do you feel the actions that are needed?
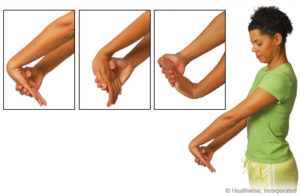
Heel Lift   

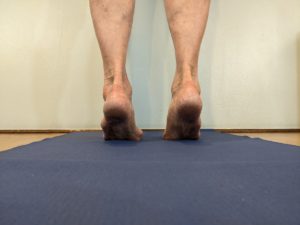
Purpose: To strengthen the sides of the ankles for better balance

Props:  A wall or some other surface you can touch for balance support

Body position: Stand facing the wall, touching it lightly with your fingertips, or stand next to another support (a chair or table)

Instructions: 

  1. Touching your support lightly for balance, lift your heels, coming onto your toes, especially the first three toes. Feel the supportive action of your ankle muscles on both sides, as you lift the heels straight up.
  2. Bring your heels back to the floor and repeat this action several times until your muscles fatigue.
  3. Once you are comfortable with this heel lift, also spread your toes.

Things to watch for:

  1. Keep your weight mostly on your first three toes. If the weight moves to the outer toes, the ankles will wing out, and you will lose the purpose of the exercise.

The last exercise is a playful one, giving you the coordination you need to recover your balance before you fall.
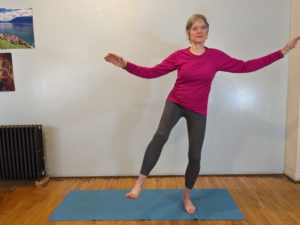
Dynamic Balancing  

Purpose:  To simulate balance challenges in daily life

Props: A wall or chair back

Body position: Standing

Instructions for Part 1: 

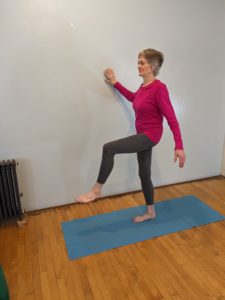
You can do this exercise while touching a wall or a chair, or free standing.

  1. From standing on two feet, bring your weight to one leg and swing the other leg gently forward and back. Try different speeds.
  2. Focus your gaze strongly on one spot in front of you and engage your core to stabilize your balance.
  3. Bring the lifted leg down and repeat on the other side.

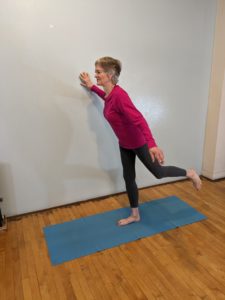
Instructions for Part 2:


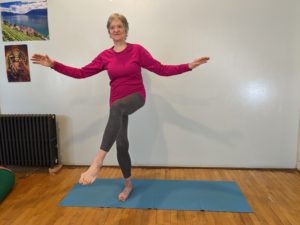
  1. Move away from the wall, and stand facing out into the room, with feet several inches apart so that you can easily move side to side.
  2. Start by lifting your right foot and take a wide sideward step to the right, placing your right foot down and shifting your weight on the right foot so your left foot is in the air. Leaving your left foot in the air, balance there for a few seconds.
  3. Then bring the left foot down into another wide side-step, this time to the left. Once you place your left foot down and shift your weight onto your left foot, hold your right foot in the air for a few seconds. Then bring the right foot down.
  4. Repeat this pattern, varying the distance and the speed. Focus on how you find and sustain your balance on one leg.
  5. Continue for as long as you wish.

Things to watch for:

  1. Concentrate on the strength of your standing leg, and don’t worry about your appearance. The important thing is building your skill to recover your balance when it begins to go off center. Be playful!

This post is excerpted from my book titled “Empowered Yoga: Everyday Yoga Practices for Bone Health, Strength and Balance,” published by Emerald Lake Books in fall of 2023.

Note: This post was originally published on Nina Zolotow’s blog, “Yoga for Times of Change.”


Shoulder and Neck Release in 10 to 15 minutes

Do nagging pains in the shoulders and neck impact your everyday life, perhaps even causing mental stress or headaches? Relief is possible, in as little as 10-15 minutes a day.

The good news: Our shoulders and neck have a complex array of muscles and joints to give us amazing range of motion. The bad news: those muscles and joints can be locked into inefficient and even harmful patterns. More good news: you can re-establish beneficial patterns so that your body knows how to return to “neutral” after any activity or stress that builds up tension.

Here are five simple and relatively quick fixes for shoulder and neck pain.

1. Shoulder circles   (2 min)

Standing or sitting, move your shoulders forward, up, back and down. Do this slowly and with close attention to what you feel. Don’t just rush through it – “I already know this one, it’s easy”……but really feel the process and note the tight areas, crackling noises, areas of ease. Do it 5 times in each direction. Then stop and do a few deep breaths.

2. Massage of the trapezius muscles with rubber balls   (5-10 min)

You’ll need two matching balls, ideally with a firm texture. Tennis balls are about the right size, but their fabric skin is not ideal because they will slip around. A grippy rubber surface is best. See the links below for the online resource, or check your local sporting goods and toy stores.

Lie on your back with a yoga block nearby. Place the balls under your upper trapezius muscles, one on each side. Readjust the exact position until it feels right: find the tight spots without causing extreme discomfort.

Place the block under your hips, so you’re in a supported Bridge Pose. Bring your hands to rest on your forehead and point your elbows upward.

There are two choices of movement:

  1. Remain still with your torso and move your arms slowly in the air. You can straighten your elbows, or keep them bent as you move. Explore different directions and notice how the pressure from the balls changes. Move very slowly. Frequently go back to a “home base” position in which your arms are as relaxed as possible.
  2. With your arms resting on the floor encircling your head, move your torso very slowly from side to side.

In both options, the movement adds to the effect of the balls as they encourage release of tension.

Do this for 5-10 minutes or so.

3. Shoulder stretch and strengthener (3 min)

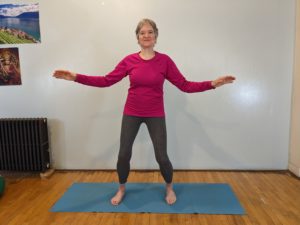
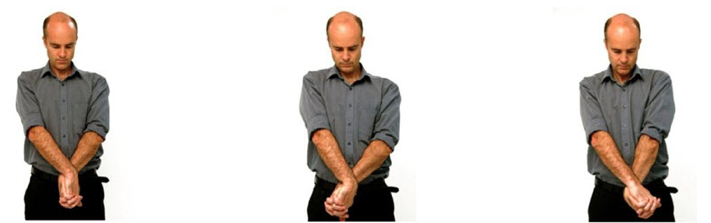
Because most of our activities involve the arms moving forward, we need to balance that with strong support from the upper back muscles, for the spine, the shoulders and the neck.

Clasp your hands behind your back, inhaling lift your shoulders just an inch or two up toward your ears, then pull them back, squeezing your shoulder blades together on your back. Keep the upper trapezius (where you had the balls) as wide and soft as possible. Do the squeeze with the muscles further down your back (upper and lower trapezius and rhomboids). Hold this for 3-5 breaths, then release. Repeat once more.


4. Side neck stretch (3 min)

Standing tall, broaden your front chest. Wrap your right hand behind your waist, and grasp your left arm. If this arm position is not possible, you can sit on the floor and reach your right hand to the side, touching the floor or a block.

Tilt your head toward your left shoulder, looking forward. Stay there for several breaths. Then still tilting your head, look down and hold that for several breaths. Then turn to look up, and hold for several breaths. Then return to center, release, and repeat on the other side.

5.Massaging the back of the neck with a ball   (5-10 min)

Use one inflatable ball that’s about 5-6” in diameter, the size of a common playground ball. Place it under the top of your neck, just below the base of your skull. Pause there to feel the sensations created by the pressure of the ball. Then very slowly turn your head to one side, progressing across toward your ear. Then return to center, and go to the other side slowly. Repeat again if you wish. Then remove the ball and gently roll your head to each side to feel the result.

Practice this series daily and enjoy more freedom and ease in your shoulders and neck!

For more information about Bodymind Ballwork and upcoming courses, visit www.ellensaltonstall.com.

To purchase balls go to www.lifesaball.org.

Protection and Relief for Your Wrists and Hands

Human hands have many skills: using tools, typing, playing musical instruments, giving massages, or using sign language, just to name a few. But in many yoga poses we make a special demand of our hands, expecting them to function like feet, holding all or most of the weight of the body. Examples of these poses include Downward-Facing Dog pose, Upward-Facing Dog pose, Plank pose, Handstand, and all the “bird poses” when we balance on our hands. Yet we don’t always prepare the wrists for this special demand, and injury can result. Looking at the structure of our wrists can help you understand why some preparation is important.
The wrist is made up of eight small bones, which form the transition between the two large bones of the lower arm (the radius and ulna) and the long bones of the palms (the metacarpals).

The second illustration above shows the fascia in the wrist area, including tendons of muscles that go all the way up beyond the elbow, and the annular ligament across the wrist. You also see the palmar aponeurosis (analogous to the plantar fascia in the feet), which is tougher fibrous connective tissue protecting the palm of the hand.

When we use our hands to bear our body weight as if they were feet, the wrists are in the extreme position of extension (as in the gesture when you extend your hand forward to say “stop” ). This puts extreme pressure on those eight small bones, and all the soft tissue around them. Without adequate preparation for flexibility and strength in the biomechanics of the arms as a whole, chronic or acute injuries may result.

One particular location to be aware of is the carpal tunnel in the wrist area.

This is the structure formed the carpal bones, which are arranged like a curved roof over a tunnel, whose floor is a broad connective structure called the flexor retinaculum, which is also known as the transverse carpal ligament. When we put excessive pressure on the wrist as in the poses listed above, and the surrounding area is tight or misaligned, the pressure irritates the median nerve inside the tunnel, possibly causing pain, numbness, or dysfunction in the hand.

There are four good ways to avoid this danger that I’ll be covering in this post:

  1. Loosen the soft tissues of the hands and forearms so there is enough range of motion in the wrists.
  2. Press down with the fingers to effectively take weight off of the wrists.
  3. Use supportive pads if necessary.
  4. Maintain good shoulder alignment.


  1. Loosening the Soft Tissues of the Hands and Forearms

There are many small muscles of the hands that we use to grasp objects, which are protected by the strong span of connective tissue (shown above) that in itself can be restrictive. Hands that are strong for grasping may not be able to spread enough to become support us in yoga poses. Specific stretching and massage will help to prepare the hands by loosening this soft tissue. Here are examples of some wrist stretches and of massage of the hand with a rubber ball:


  1. Pressing Down with the Fingers

When we press the fingers down—all the way to the tips—we transfer weight forward on the hands and reduce the amount of weight on the wrists. Try it right now at your desk:  press your fingers down and feel your palms and wrists begin to lift. You can experiment to determine the right amount of this action for you. Use this image with the green and yellow dots as a guide:


  1. Using Supportive Pads

You can buy foam wedges to bring the weight forward on the fingers, but I prefer this:  Cut up an old sticky mat to make a small roll, as shown here with the pencil as a size comparison.

Put that roll under the center of your wrist, pointing it toward and away from your fingertips. It will take pressure off the carpal tunnel and encourage small muscles in your hands to do their work. It’s best to use one under each hand for symmetry, even if only one wrist needs it.

  1. Aligning Your Shoulders: Upper Back Strengthener and Pectoral Stretch

Shoulder alignment can help to protect the wrists as well. Shoulders that are rounded forward put more weight into the hands. I recommend the pectoral stretch pictured below, plus a strengthening pose to bring your shoulder blades in toward the spine and away from your head. These actions will not only help prevent wrist strain, but it will support your upper spine and your breathing – and also lift your spirits! 


Breath is Food for the Body and Soul

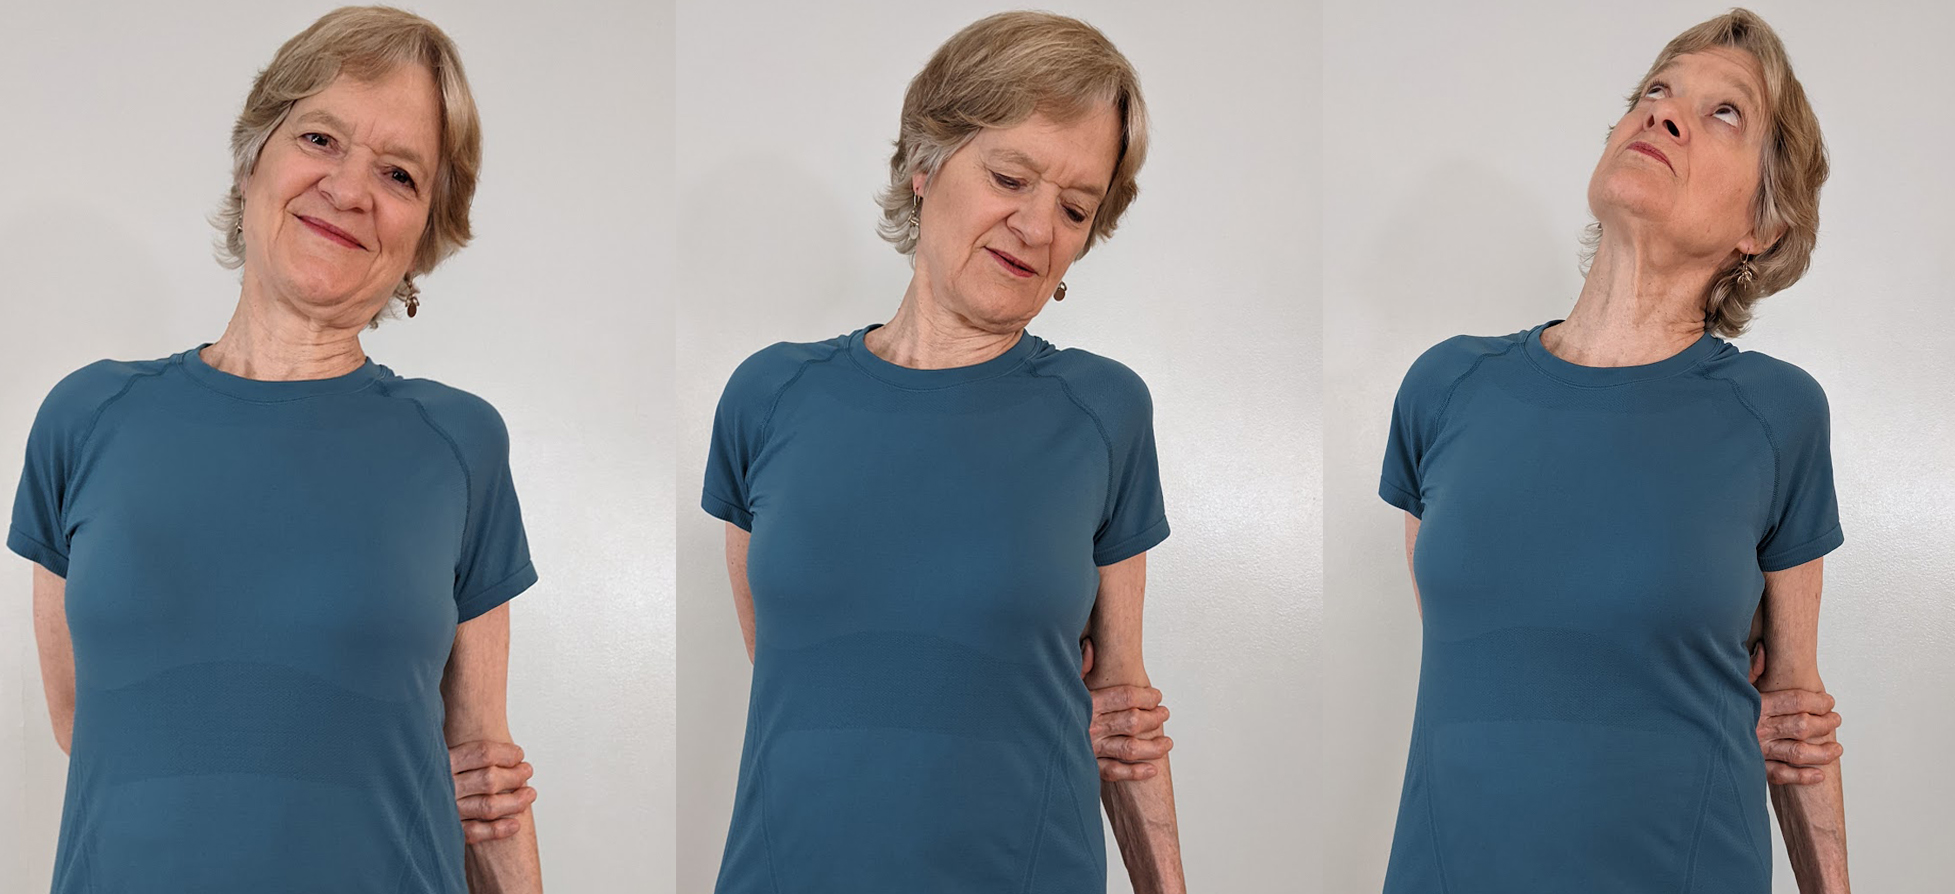
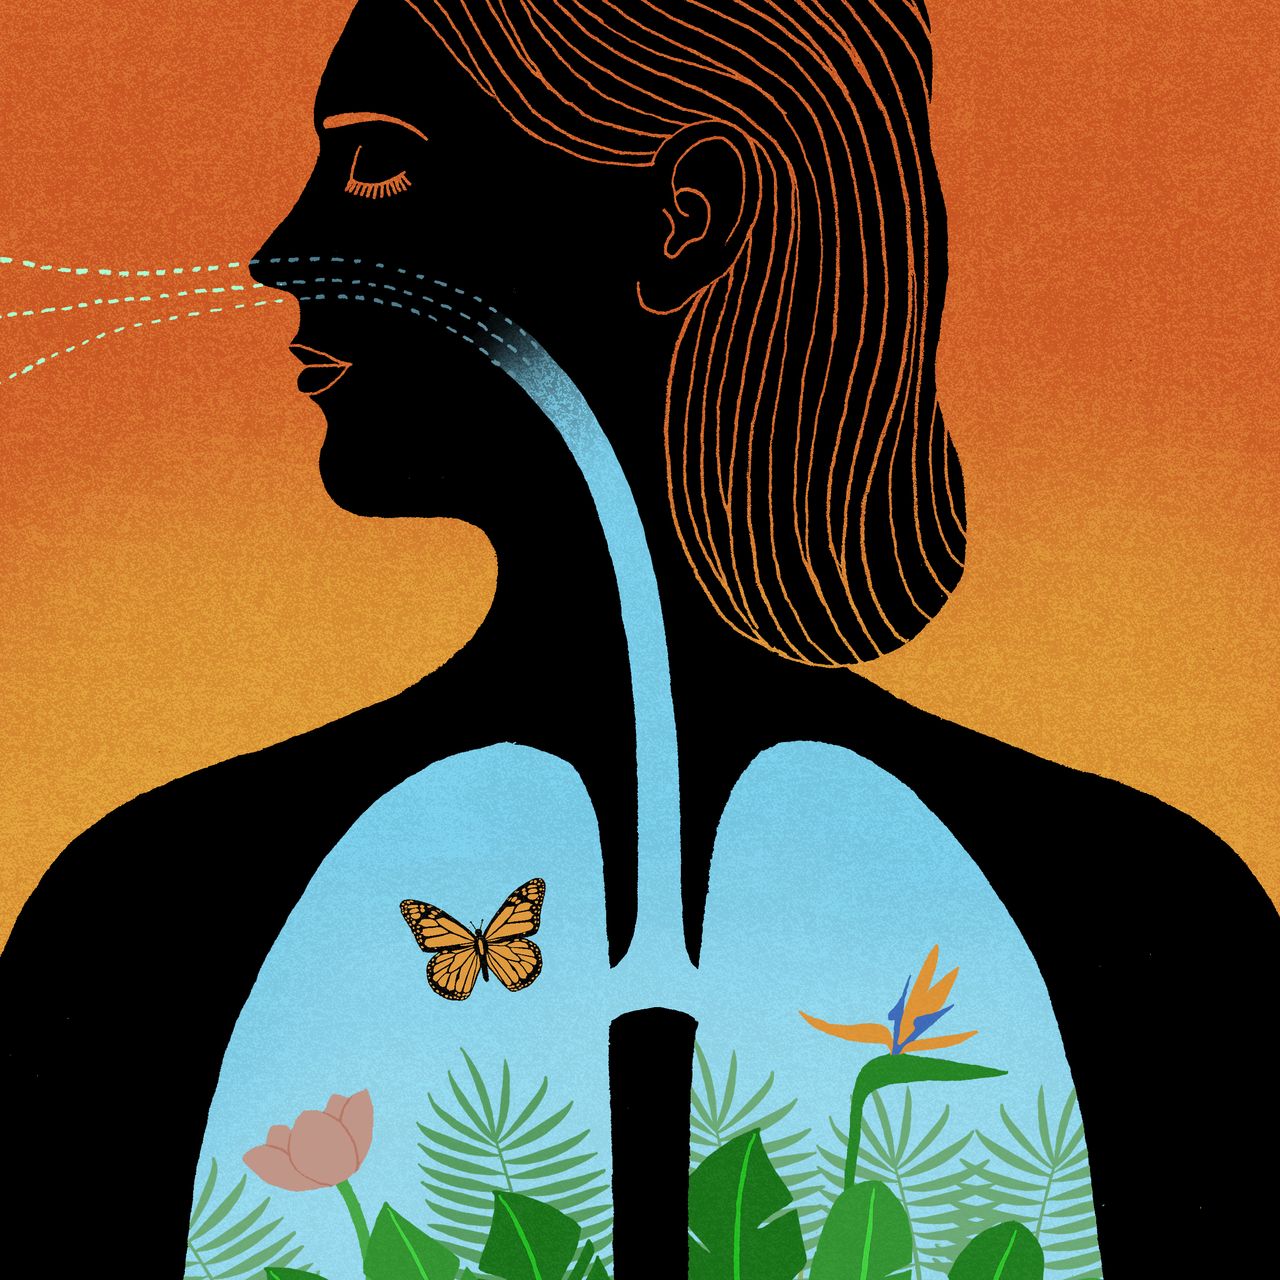
How has your awareness of your breathing changed in this year of COVID? Perhaps some reactions to wearing masks, avoiding closed-in spaces, or being especially sensitive to any respiratory distress? With the pandemic dominating the world for an entire year, we are forced to the realization that we can’t take breathing for granted.

Each day we breathe about 25,000 times, and in our lifetime, that number might be 670 million. The body is programed to keep the breath going, and for much of the time we don’t think about it. But how we breathe is in our control, and is worth noticing and improving. Yogis know this, and it is the basis of pranayama practice. Dancers and athletes know this, and have developed strategies to improve and sustain enough breath for their energy output.

I’ve recently read Breath, by journalist James Nestor. His book condenses the story of his ten-year journey of exploration and research into breathing, fueled by the need to improve his health. He offers readers a wealth of evolutionary history, physiology, and cultural /spiritual traditions relating to breathing, all told in a conversational, easy-to-read tone. He travels the world, meeting what he calls “pulmonauts”, people from all walks of life who study breathing. In a nutshell (sorry, James) the message is: breathe slowly, exhaling fully, through your nose not your mouth as much as possible. This is definitely something I learned as a dancer many decades ago – it really helps to sustain energy and mental calm.

The word “Prana” is usually translated as “life force”, and it is the subtle energy that permeates, animates and sustains the body from our time in the womb until the moment we die. We are born with it, and we can nurture and expand it, or not. The suffix “ayama” means to regulate, extend, enhance the prana. Prana flows through nadis, which are subtle channels throughout the body, comparable to the meridians in Traditional Chinese Medicine. The practice of yoga asana loosens the body to create a more receptive “field” for the flow of Prana.

Pranayama practice doesn’t just help your breathing; it helps to stabilize your blood pressure, enhance heart rate variability, and calm the mind. If fact, one of my teachers said: “Asana changes your body, pranayama changes your personality.” Doesn’t that sound like a worthwhile pursuit?

Did you know?….
– The root words for “spirit” and “breath “are the same in many languages.
– In the upper lungs there is a predominance of nerves that prepare you for alert action (the sympathetic nervous system). In the lower lungs, the predominant nerves are those that bring calmness and relaxation (the parasympathetic nervous system). Therefore, we can regulate our mood and energy level by the way we fill our lungs. When we chest breathe, we rev up. When we allow the belly to expand so that the lower lungs can fill, we calm down.
– The nostrils take turns being dominant. It’s called nasal cycles, and each period of dominance can last anywhere from 20 minutes to 4 hours. Breathing through the right nostril, the “sun” channel, is stimulating. Breathing through the left nostril, the “moon” channel, is calming.

Here are some tips and basic techniques, if you’ve never practiced pranayama, or want to revive your practice:

General tips:
For all techniques, a few moments of basic breath awareness is a good preparation. Allow the breath to become slower, deeper, and more steady on its own. Observe the rhythm, texture and all sensations associated with the movement of the breath. Feel how the breath nourishes you.
Keep your eyes soft and feel the three-dimensional shape of your lungs, which fill the rib cage from top to bottom and side to side. We often don’t feel the back part. If any anxiety arises, stop doing the technique and breathe normally until you feel calm, then resume.

Basic Techniques:

1. The 3-directions breath
It’s in four parts, and increases the elasticity of the ribs, breathing muscles, and lungs.
a. Picture your lungs filling from top to bottom with each inhalation. Exhale normally.
b. Picture your lungs filling from front to back with each inhalation. Exhale normally.
c. Picture your lungs filling from side to side with each inhalation. Exhale normally.
d. Picture your lungs filling in all directions at once.

2. Ujjayi = “upward moving and victorious”, can be done in any position
Ujjayi is characterized by the soft whisper-like sound made on both inhalation and exhalation. It’s often called the “ocean breath” or the “Darth Vader breath”.
Preparation:
Breathe slowly with your mouth closed, making a soft humming sound on your exhalation. The sound allows you to become more aware of the flow of the breath, and gradually bring it to a steady rhythm. Notice the slight constriction of your upper throat and the back of your tongue as you hum. Now, instead of a voiced hum, shift to a whisper, and make the sound on both the inhale and exhale. Another way to find the whisper sound is to open your mouth and pretend you are using your breath to fog your glasses to clean them. Then close your lips and continue into Ujjayi. Breathe in and out through your nose, making the soft ocean-like sound. Observe and feel the sound, and make it subtle, soft, continuous and smooth.

3. Kapalabhati = “shining the skull”, a cleansing technique for the central pranic channel, the Sushumna Nadi. The essence of this one is a series of quick, forceful exhalations through your nose, alternating with normal, automatic inhalations. It’s best done sitting, not lying down.

Preparation: Practice the abdominal action of quick contractions of your lower abdominal muscles, which will push the air out of your lungs and nose. Do not contract the upper abdominals or tighten the ribs, and avoid any tension or extraneous movements of your spine, shoulders or neck. Clear your nose. Sit tall with strength in your spine, shoulders and tongue relaxed. Now begin a series of 8-10 short, forceful exhalations and normal automatic inhalations. Keep the pace slow at first. Then take a few normal breaths. Repeat the process, increasing the speed and number of “puffs” as you are ready. If your face, neck, throat, shoulders, or ribs become tight or your rhythm becomes jagged, stop and rest. I recommend three rounds at first, then increase the number of puffs in each round or number of rounds as you are ready.
Note: it is common for people learning this for the first time to feel light-headed
afterward.

4. Nadi Shodhana = “cleansing of the nadis”, especially the ones that spiral around the Sushumna Nadi, the Ida and the Pingala. It’s also best done sitting. Alternating nostril breathing uses the fingers to regulate the nostrils, called “digital pranayama”.
Ida: the nadi on the left side, is associated with the parasympathetic nervous system and the
moon energy: cooling and calming.
Pingala: the nadi on the right side, is associated with the sympathetic nervous system, and
energizing and activating.

Preparation: Without coordinating the breath, practice the hand position and the action of gently closing one nostril at a time. The touch is soft and delicate, and does not compress the nose or turn it to the side.
Classic hand position: Right hand: index and second finger curl to touch the base of the thumb. Pinky and fourth finger touch the left nostril, thumb touches the right nostril.
Alternate hand position: Index and second finger touch the space between your eyebrows, otherwise the same as above.

Do one round of basic Ujjayi breath. Then close the right nostril gently and inhale through the left. At the top of the inhale, close the left nostril and exhale through the right. At the end of the exhalation, inhale through the right nostril. At the top of the inhalation, close the right and exhale through the left. This is one round. Each time, you change nostrils at the top of the inhalation.

Repeat as many rounds as you wish. Keep the flow of the breath slow, smooth and steady. If agitation occurs, take a few natural breaths. Keep your spine long and tall, your shoulders released down, and your head facing straight forward. If your right arm gets tired, you can support it with your other hand, or take some resting breaths with your hand resting on your thigh. Try for five minutes of Nadi Shodhana.

I invite you to spend some time each day focusing on your breath. Watch how it feels and enjoy its benefits. Visit my Youtube channel for more instructional videos and please leave a comment below.

Design Your Practice To Give You What You Need

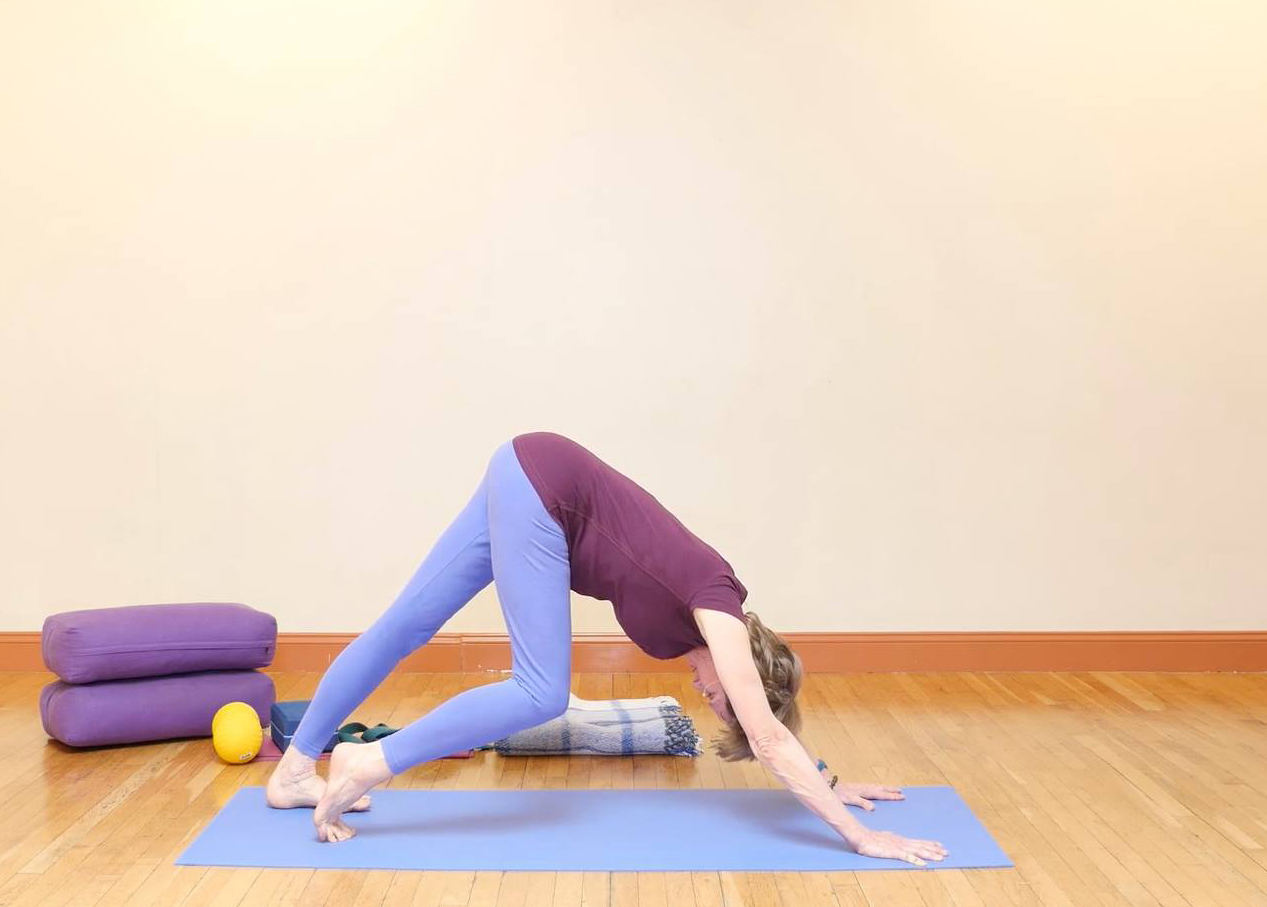
In a recent blog post I talked about interoception, the ability to keep track of inner sensations in an ongoing way. The next step is to use what you feel through interoception to help guide you in designing your own practice for your particular body and mind.

What is your body type? Are you more fluid, and attracted to a nice stretchy practice? Or do you have a more solid musculature, pulling you toward weight lifting or gym workouts emphasizing strength? It’s not about which is better, it’s more about observing the body type you were born with, and using your choice of exercise to fill in the gaps.

Recent research tells us that the best way to have a resilient, strong body is to do a variety of movements – not just the same yoga series every day, or the same game of tennis, or the same gym workout with machines. Give your body a variety of challenges – balance, coordination, strength, flexibility – and you will lessen your chances of injury from underdoing or overdoing.

True confessions: My preference for years has been the Iyengar/Anusara yoga menu of poses, figuring that there is enough variety inherent in the poses to adequately build my strength, flexibility, balance and coordination. But aging shows us the weak points! With recent hip and knee issues, I’m appreciating the benefits of physical therapy to target the weaker areas, and then I integrate those skills into my yoga practice with more fine-tuned awareness of the parts within the whole.


I invite you to read my blog “The ABC’s of Yoga” in which I discuss the foundations of any good yoga practice: Awareness, Balance of opposites, and Creativity.

The take-aways:
Know and honor your own body type, its strengths and weaknesses.
Find ways to refine and vary your exercise routine to bring you into balance as much as possible.

Tiny Habits

Did you make any New Year’s resolution about your physical health? Many people resolve to exercise more, lose weight, get rid of an unwanted habit, or some combination of those goals. But the complexity of life can so easily take over and dislodge even the best intentions.

The other day, I heard an author speak on NPR about how to establish new good habits and get rid of “bad” ones. His name is BJ Fogg, and his book is Tiny Habits, The Small Changes that Change Everything. As you can guess from the title, the trick is to take small steps toward your goal. Instead of resolving to do an hour of yoga a day or taking class once a week, you can set the goal of doing one or two poses each day on your own. Make the “tiny” effort, and you’ll feel the results and probably want to do more.

Instead of approaching a complex chronic pain issue with the pressure of “solving it”, you can explore one small strategy on a regular basis, like doing ten minutes of ballwork, or one targeted stretch or strengthening exercise. Gradually you will gain momentum and your practice will mature.

For example, watch this short 4 minute video to experience Bodymind Ballwork and how it relieves tension in your hips, thighs, knees, lower legs and ankles.


The next part of the method is to schedule the activity to give you a daily prompt. Some examples: Right after you shower and get dressed in the morning, you can do some stretches to fully wake up your body and your breath. Or: Right before dinner, you can do a few strengthening exercises, or you can meditate for whatever period of time you have – from 5-20 minutes. As another teacher put it, think “Small, Scheduled, and Specific”. It’ll put you on the path, and once you’re on it, there will be enough to learn and enjoy that you’ll want to continue.

You can join me in NYC any time, every week (Wednesday 12-2) for a class with Bodymind Ballwork and yoga. See the schedule of that and other classes here. I also offer multiple workshops throughout the year in New York and beyond. To see where and when I’ll be teaching, check in often here.

Better Interoception Equals Better Health

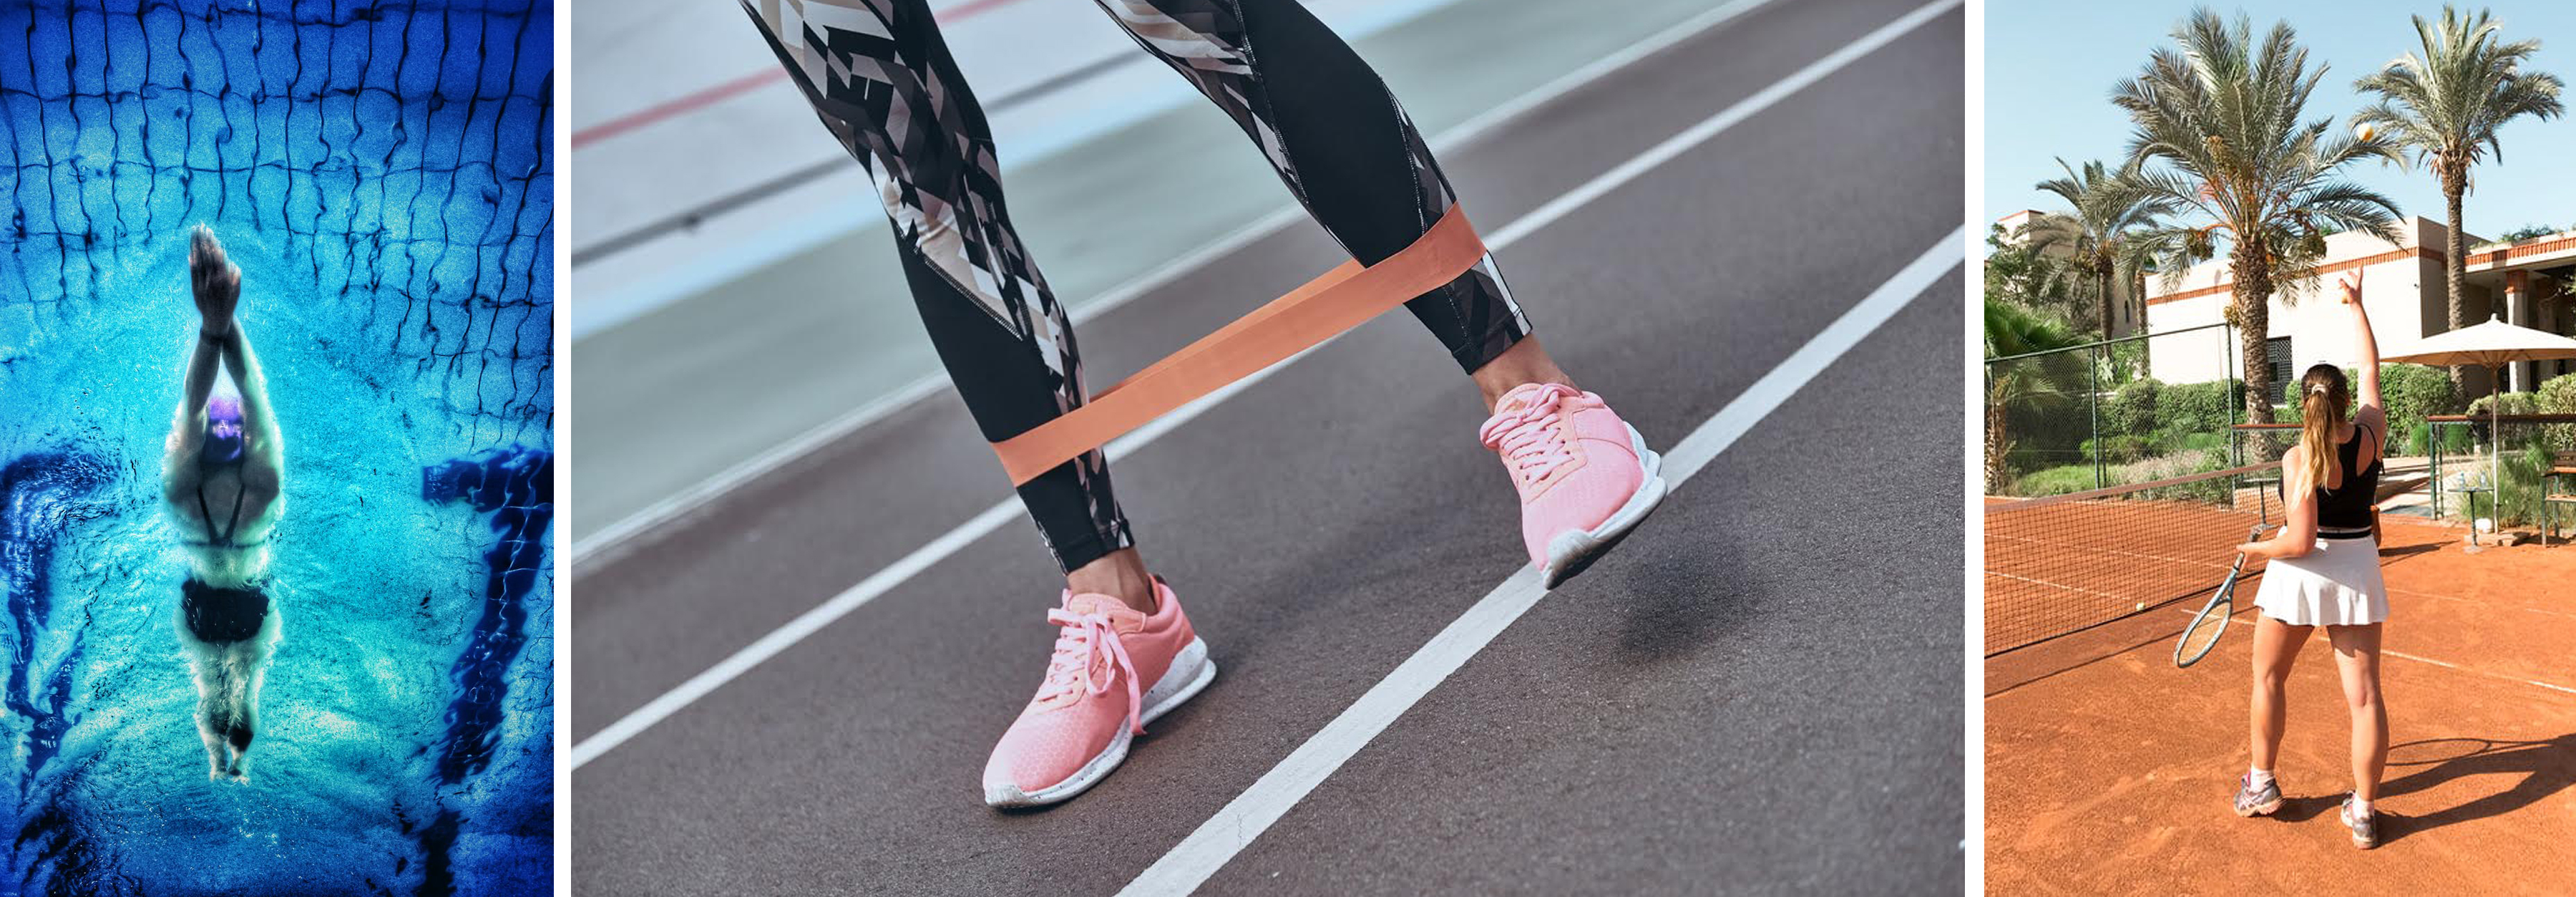
How’s your interoception? In case you’re not familiar with that word, it’s the inner felt sense of the body, including being warm or cold, hungry or full, tired or energized, stiff or flexible. Interoception is increasingly seen as a crucial component of health by twenty-first century researchers, especially in how it bridges the gap between physical and emotional experience.  Recent research shows that well-developed interoception can lessen our experience of pain, which might surprise you.  In other words, the more we are in touch with our inner world of sensation, the more we can adapt our behaviors to lessen the causes of pain.  When our interoception is faulty and we are disconnected from the body, we are more vulnerable to anxiety and depression.

One way to check in with our interoception – our inner sense of subjective presence in the body – is with an inner dialogue. Think for a moment about whether you have an inner dialogue, a way of checking in with yourself throughout your day. If you do, what are its contours and themes? Do you talk to yourself with judgment, criticism, or disapproval? Or are you an encouraging coach for yourself? Does your body have a voice in the conversation? If your neck hurts and you are short-tempered, can you see the connection between those two states? Do you see your body as an ally, or as an adversary? A burden that you carry around, or your very own self?

I believe that we develop our inner dialogue over our lifetime. It is influenced by our family and by the culture we live in, the education we receive, the work that we do, and our goals for ourselves. I often ask students what they were taught about self-care while growing up. For many of us, it’s the usual short list: eat healthy food, get exercise, get enough sleep. Rarely is anything taught about the value of interoception or embodied self-awareness – the ongoing process of dialogue between your mental and physical selves. Being embodied with awareness requires practice and continuous renewal.

Bodymind Ballwork is a great way to develop your interoception and gradually build a more authentic and self-supporting inner dialogue.  If you haven’t tried it, now is a good time. I am offering several workshops this summer and fall to teach the full spectrum of this empowering and healing work. Check out the Bodymind Ballwork page and the workshop page of my website for more information. If you are already a practitioner, tell your friends about it!

Adapted and excerpted from The Bodymind Ballwork Method, pp 35-36.


Bodymind Ballwork for The Outer Side of The Legs

Right now, it’s the beginning of winter in the Northeast USA. We are wearing heavier clothing and shoes, the ground might be slippery, and the cold temperatures can sometimes cause muscles to tighten as we rush through our day. Tension in the outer legs that can cause hip, knee or ankle pain and fatigue.

Last year I wrote a blog about strengtheners for this part of the body, and today’s blog is about how to release tension there with the balls. While I acknowledge that many people use rollers for this, and get a lot of benefit, I prefer the balls, because I feel that the balls can get in between the layers and neighboring muscles really well, and they facilitate inner “glide” and healthy circulation.

Two of the techniques are done sitting on the floor, and the other two lying down. The balls can be purchased from www.lifesaball.org – look for the 4” spikey ball, and the 2.5” rainbow sponge ball, both of which I also sell at my studio. (Watch for the balls for sale from my website soon!)

1. Sitting with two 3-4” hollow balls: Begin by sitting with your legs spread to the side, and a ball under each buttock. Explore small movements with your pelvis to work on the muscles of the pelvic floor and lower buttocks.
Then stretch one leg to the side, bend the other one, and turn your upper body toward the bent leg. The ball will begin to move down your outer leg. You can lean over to that side to get more pressure if you wish. Make small slow movements to work on the outer thigh and the iliotibial band. Work for 5-10 minutes on one leg, moving the ball gradually down toward your knee, then repeat the same process on the other leg.


2. Sitting with one ball under the outer shin: For this you can use the hollow ball (for less pressure) or the solid ball (for more pressure). Sit with one leg bent and one leg straight out to the side. Place one ball under your outer shin. Lean over the bent leg and stabilize it with one hand on your knee and one on the ankle. Then slowly move your leg, moving the ball along the length of your outer shin muscles and fascia. Repeat on the other leg.


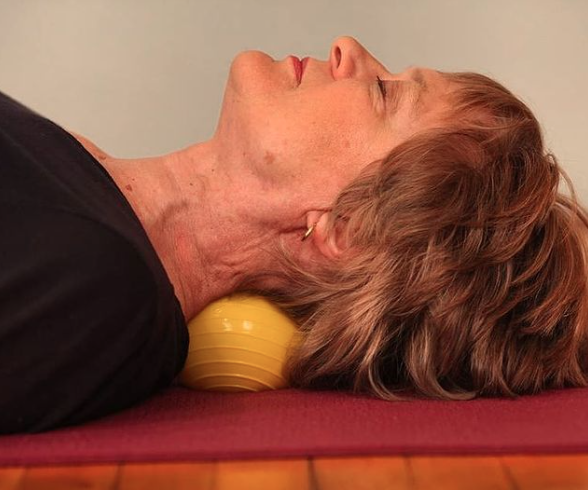
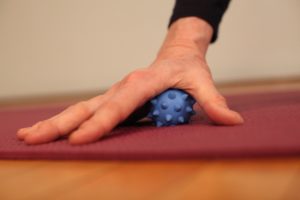
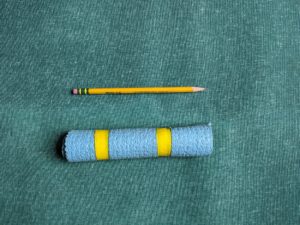
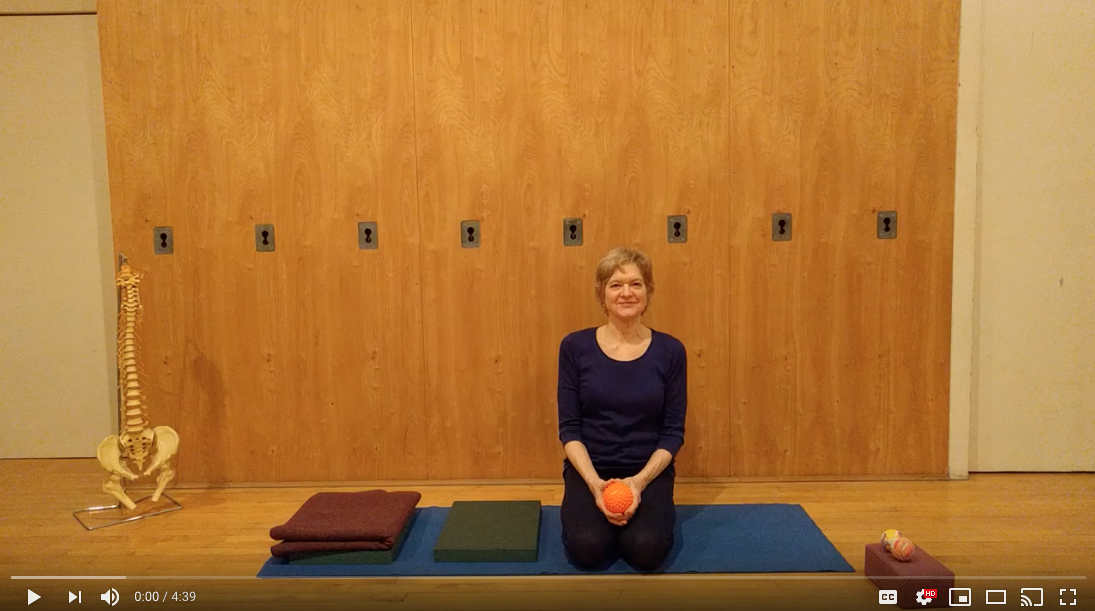
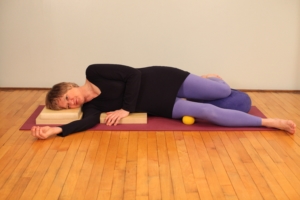
3. Lying on your side with one 3-4” hollow ball: Start by arranging props to support your upper body well while lying on your side. In this photo I have one pad under my ribs, two under my head, and a space between them for my shoulder.
Then place the ball under the side of the pelvis, where the iliotibial band begins. Your other leg can be behind, possibly on a bolster as shown here. Move your pelvis slowly forward and back to massage the muscles and fascia. Take your time, and stop in places that feel particularly tight.
Then move the ball a few inches down on the side of your thigh, skipping the bony prominence which is the greater trochanter of your femur. Work down the side of the thigh slowly, working on one spot at a time, moving the ball down with your hand when you’re finished with each spot. You can progress down to the side of the knee. Repeat on your other leg.


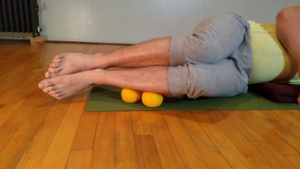
4. Lying on your side with two small solid balls under the side of your lower leg: Support your upper body in the same way as in #3 above.
Place the two balls under the outer shin of your bottom leg, and stack the other leg on top. You can start at the top and progress down toward your ankle. Move your legs slowly so that the ball works into the tibialis anterior and the peroneal muscles, and their associated fascia. You can roll the balls up and down, or across the outer shin. Improvise your movements to reach the places where you want the pressure.


For more fabulous ball techniques, check out my book The Bodymind Ballwork Method, published in October by North Atlantic Books.


Yoga On-the-Go: 7 Yoga Poses You Can Do Anywhere

Summer has finally arrived on the East Coast, and these seasonal transitions are a good time to review and refresh our commitment to self-care. If you’ve been browsing my website, you know that I practice yoga asana, pranayama, meditation and Bodymind Ballwork, a myofascial release technique. And in summer I look forward to adding in hiking, swimming, gardening, and playing outdoors with grandchildren. Plus one of my favorites – just lying in the grass and watching the sky. So the idea of what is “exercise” can expand beyond the normal routine.

What does your self-care look like? Perhaps you attend a yoga class or a meditation group, or go to the gym, or do some exercise at home. Does it change with the seasons? Can you throw in something new from time to time to keep it playful and fresh? Whether you’re in your twenties, your eighties, or somewhere in between, you may find that there is an ebb and flow to what your body likes to do. Aging is a reality for all of us, the body changes gradually but inevitably, and it’s important to adapt our practice to the fluctuations that are built into being human.

I encourage my students to try variations of yoga poses that they can do at in-between moments in the day – at the office, at home, or while travelling – to remind the body and mind to stay connected and to be fully present in the body for whatever you do. Here are some that I do at my kitchen table, while waiting at an airport, or on a break during a long drive. No need to change clothes, have a yoga mat, or even take off your shoes. Stretch in each direction: forward, backward, sideward and twisting. Be creative with your use of props (a park bench, the side of your car, etc) and also with the sequence – do what feels good to you.

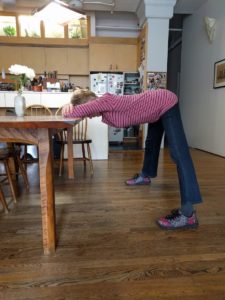
Prasarita Padottanasana: With feet spread wide apart, stretch your legs and reach your hips back as you stretch your torso forward. Rest your head on the table with your arms folded. Breathe and quiet your mind as you connect with sensations inside.


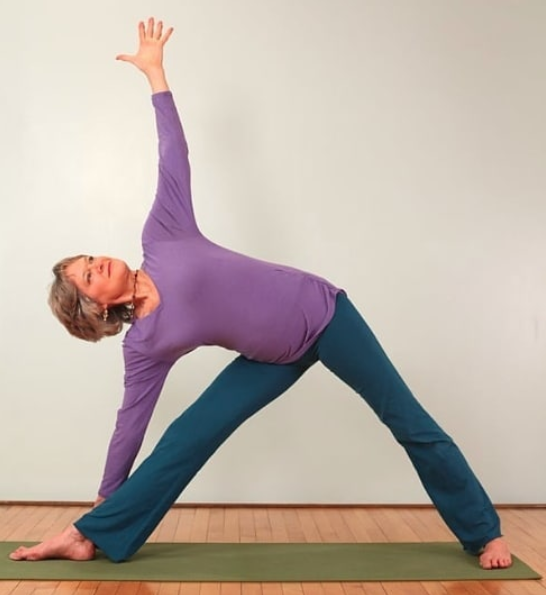
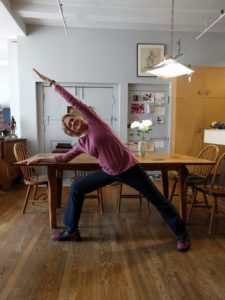
Parsvakonasana with your back to the table: With your right leg turned out parallel to the table, bend the right knee, pointing it toward the middle toes. The other hips shifts forward slightly, away from the table. Lean to the right with the right arm on the table. Keeping your legs and abdomen strongly active, bring your torso to the side as far as you wish. Stretch your left arm alongside your head, reaching vigorously from hand to foot. Repeat on the other side.


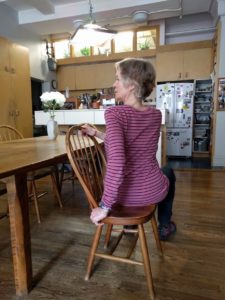
Seated twist with chair: Sit sideways in the chair, with your spine erect and legs steady. Inhale, lift your spine, and exhale, twist toward the back of the chair. Place your hands wherever it helps you to twist more. Hold for a few breaths, and repeat on the other side.


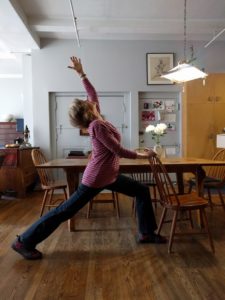
High lunge with the chair: Face the back of the chair and step your right foot forward, your left foot back. Both legs are parallel and the back heel will be off the floor. Face your pelvis squarely toward the chair, and hold the back of the chair with your hands. Lean forward a bit and push into the back leg, widening inside your pelvis and hips. Then pull down through the back of the pelvis as you lift up in the front torso. Raise your chest, look up, and expand from the top of your head all the way to the back foot. Raise your left arm up, and possibly also your right arm. Enjoy your strong and expanded self, then release and repeat on the other side.


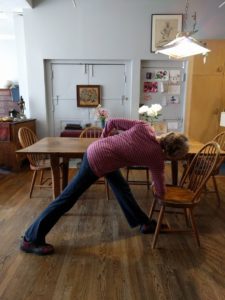
Parivrrta Trikonasana with the chair and tabletop: Place the chair sideways next to the table, the seat facing you, as shown. Step your left leg forward and keep both legs straight. Reach your hips back and your chest forward as you place your right hand on the chair seat. Twist toward the table, with your left hand pressing down into the tabletop to help empower your twist. Breathe several times, then come out of the twist and repeat on the other side.


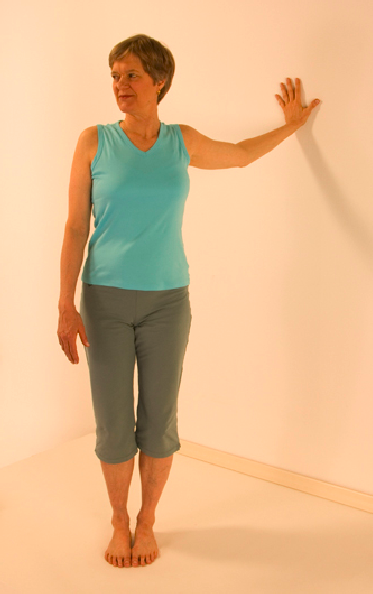
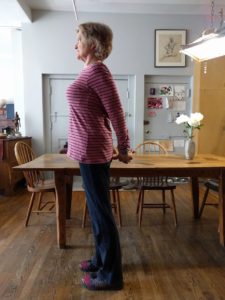
Shoulders and arms pulling back: Stand tall, roll your shoulders back and clasp your hands behind you. Pull your arms back to find a stretch in the front of your shoulders, and a supportive strength in the upper back. Take several deep breaths, feeling all inner sensations as you hold the pose.


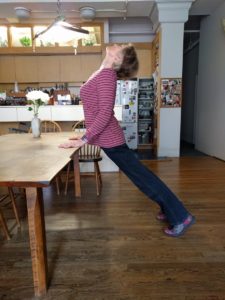
Upward facing dog with hands on the table: Place your hands on the edge of the table and walk your feet back. As you bring more weight onto your arms, be sure to keep your shoulders back and your chest lifted. Bend your elbows a bit, bring your pelvis toward the table with your tailbone lengthening, and move your chest forward between your arms, as if going through a doorway. Look up if you can, and enjoy a full stretch from your chin to your toes.
Then repeat the first pose, Prasarita Padottanasana, one more time to finish.

I invite you to leave a comment below…. and enjoy the summer.


I am excited to announce my new book, “The Bodymind Ballwork Method: A Self-Directed Practice to Help You Move with Ease, Release Tension, and Relieve Chronic Pain” to be released in October 2018 by North Atlantic Books. You can pre-order your copy now. Click here.

The Unexpected Silver Linings of Major Hip Surgery

At almost four months after hip replacement surgery, I wanted to collect my thoughts about the whole process, in hopes that hearing about my experience might help others who are considering or definitely heading toward a similar experience.

The lead-up:

I notice that my pain is more frequent and more disruptive of daily activities about two years before surgery.

I go to physical therapy, hoping that will be enough. It is very helpful, but not enough.

I take time to make a list of possible doctors to see.

I see four hip surgeons over the course of a few months. They all tell me I need hip replacement because of advanced arthritic changes in one hip, and they think I’ll need it in the other one too (but I don’t think so).

I choose one of the doctors based on two friends who had surgery with him, plus I liked him and his staff at the initial visit. He’s Patrick Meere at NYU Langone, Hospital for Joint Diseases.

I delay choosing a date, putting off the decision for a few months. Just can’t do it.

My physical therapist encourages me to get the surgery while I’m in relatively good shape, and save the remaining insurance therapy allotment for afterwards.

I schedule a date in late September, giving myself 2 months of time off from teaching afterward, plus another month with no travel. (Actually, I began teaching private sessions after two weeks and classes after three weeks, all at my home studio.)

I am grateful that I have both a solid background in complementary healing methods such as acupuncture, massage, chiropractic and homeopathy, plus a basic faith in mainstream medicine from my father who was a general surgeon. This way I go into the process with confidence on both sides of that spectrum.

The surgery day and first two weeks:

I am nervous, but the morning of surgery I feel ready and grateful for family support. My son is a medical student and I’m comforted as he chats with the anesthesiologist about drugs with impossibly long names (he’s studying pharmacology at the time).

After about 3 hours of pre-op procedures, I say goodbye to family, walk into the OR and sit on the table, greeted by the anesthesiologist and a very nice nurse. They chat as they prepare to give me the drugs, and I marvel at the high-tech feeling of the room. Everyone is wearing suits and helmets as if it’s a space flight about to launch. Thankfully a nurse without a helmet is right by my side, and probably holding me up. The last thing I remember is putting my head into a face cradle while still sitting up. I have heard that people talk at this early stage of anesthesia but don’t remember any of it, so that probably happened to me. I probably lay down on the table still chatting with the nurse.

The next thing I know, it’s 3 hours later and I’m in the recovery room with a very friendly young male nurse by my side asking how I’m feeling. He brings me juice and I am filled with gratitude that it’s over and I’m awake and feeling mentally normal. I have no pain, and in fact, I feel euphoric, thanks to those drugs flooding my system. The euphoria lasts all day while I transition to a room upstairs (with a great view) and get settled, greeting visiting family members. The hospital staff gets me up and walking that afternoon. As I traverse the hallway near my room, there is a framed print by my husband artist Robert Kushner on the wall – a welcome sight.

The next day I have more pain, but I can still get up and walk. That night I have my first melt-down of frustration, and a very kind nurse offers me a hug and a shoulder to cry on. That means a lot to me.

The third day I am scheduled to go home, and there’s a flurry of people in and out to arrange all the discharge procedures. Finally at noon, I walk out on crutches and take the short 4-block trip home via Uber. Too far to walk at this point. But only 2.5 days in the hospital, not much.

At home, I have two places where I spend time – my bed and a couch in the living room. Pretty soon I have a routine and everything I need within reach – phone, laptop, water, reading, medications, snacks. This is when the new normal emerges – resting, walking, taking care of only basic daily needs. This is radical for me, being a person who’s always keeping busy and going from one thing to another all day. Here I am, just on the couch. It’s kind of fun learning how to put on socks and pants with a long-handled grabber.

I’m tremendously grateful for family members and friends who care for me, make my meals, rub my feet, help me navigate daily needs. For these first two weeks, an occupational therapist, a physical therapist, and a visiting nurse come to see me. The PT gets me up and walking outside the very first day. We walk to the corner and back, and that is plenty. When his time is up, I’m sad to say goodbye because we have become friends. He says he wants to come study yoga with me. He buys a rubber ball to help with his plantar fasciitis.

The long-term recovery

As an anatomy geek, I’m fascinated to watch the changes day by day. The incision goes from being quite gory looking with lots of bruises, to a thin red line. My walking becomes smoother, and I transition from walker to cane to nothing. Each week I keep track of my successes, and I laugh at how small but how significant they are. The first time I can wash my feet and put lotion on them. The first time I can put on lace-up shoes. The first time I can go to the grocery store, carry things home, and cook a meal. The first time I can sleep on my left side. The first time I do downward facing dog, sit cross-legged for meditation, do pigeon pose, sun salutation, kick-up handstand.

My muscles are sore and weak in unusual places, but physical therapy always makes me feel more fluid in my walking and confident in my strength. I gradually return to almost all of my favorite yoga poses, and although that process is slower than I anticipated, it feels right. My body clearly tells me yes and no. I get very creative with props.


The silver linings:

Ingenuity in figuring out how to do things in a new way.

Patience with myself and my “to-do” list which is ever present.

Gratitude for small and large kindnesses from family, friends and strangers.

Gratitude for yoga and physical therapy, both of which sped me along toward recovery faster than otherwise would have happened.

Awe at the body’s capacity to heal.

Awe for the medical profession to have figured out how to safely replace a hip joint.

And excitement to be in a new phase of wellness and enthusiasm for life!


Feel free to write me if you want to dialogue about any of this, or if I can support you in your journey.