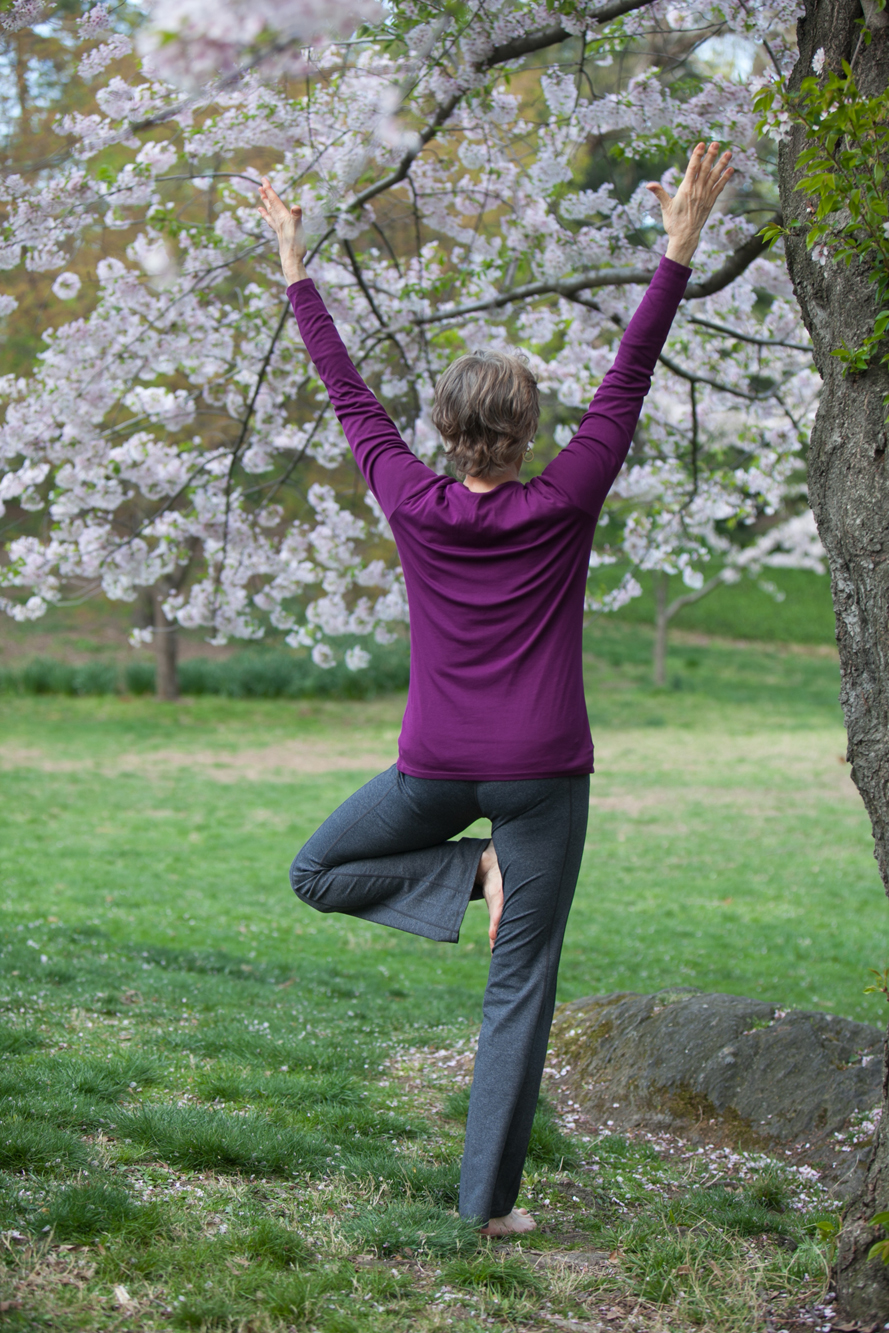
B is for Balance of Opposites: Tree Pose, Vrksasana.
B.K.S Iyengar said, “The study of asana is not about mastering posture. It’s about using posture to understand and transform yourself.” My teacher, Mary Dunn, taught her own version of this: “First you learn about the asanas, and then you learn about yourself in the asanas.”
I have pondered this a lot over my 34 years of practice. What are we really practicing? We are not just making shapes, stretching, getting a workout – there’s so much more to it. My thoughts have been greatly influenced by my teachers, but at a certain point I felt the need to distill my personal approach into a paradigm. It can be summarized as ABC: Awareness, the Balance of opposites, and Creative expression.
We focus on the ABCs in my upcoming workshop, Yoga Anatomy and Therapy.
A for Awareness
In asana, the practice of awareness can take many forms. The first and most important step is to become aware of yourself in the present moment. When practicing asana, we move our awareness into our bodies. We exercise our “muscles of awareness” in relation to sensations, thereby increasing our ability to be aware in all other areas of our lives.
As you practice asana, here are some questions that might trigger your awareness.
Important note: Awareness is separate from analysis and judgment! Try to let all sensations and thoughts register without categorizing them or giving yourself a scorecard.
What is your state of being, your energetic presence right now? Do you feel focused or distracted? Tired or energized?
What body sensations are you aware of? Listen to find out if parts of your body talking to you, either to relay that they are feeling good, or that there is some pain or compression or strain. Is there any area of the body that might need extra care today in your practice?
Feel the pull of gravity on your body, and notice if it feels like a burden, or more like a comforting sense of grounding.
Become aware of your breath – its texture, rhythm, and degree of comfort or discomfort. Observe it without judgment.
Observe the activity of your mind. Perhaps there are worries, plans, or other distractions, or perhaps your mind is calm and focused. It’s natural for the mind to generate thoughts, but we can take a step back and observe it.
What do you want to offer today with your practice, and what do you want to receive? Acknowledge your goals for your practice – for both your body and your mind.
Can you catch a glimpse of your own consciousness as part of something much bigger – the community of humanity and the cosmos?
With this breadth of awareness, notice how your practice becomes fuller and richer than simply “exercise”. Be open to expanding your awareness and learning about yourself while you practice, rather than just performing a task.
B for the Balance of Opposites
After the first step of becoming aware, there are guidelines help us do the physical work of the asanas without letting the process become simply making shapes. Without intention and attention, mind tends to wander to what’s on your agenda for later in the day, or a dozen other topics. I’ve found that balancing pairs of opposite actions in the body and attitudes in the mind can be very engaging, keeping me in the present moment for my practice. Here are some examples of pairs of opposites to consider.
1. Rooting and Rising
Every pose has a base, whether it is in the feet, the hands, the pelvis, the shoulders, or some other part of the body. In every asana we can simultaneously reach down into that base (“root”), and lift up away from it (“rise”). The more we connect downward to the base, the more we can lift up. For instance, in a standing pose, the pelvis and legs root down into the earth, while the torso and spine rise up. We feel simultaneously both solidly grounded and yet expanded and light.
2. Integrating and Expanding
The body needs both integration for stability and expansion for freedom. Each of us has characteristic types of connective tissue and patterns of muscular use that will determine whether our body is more loose and flexible, or more tight and compact. During asana practice we work to bring balance to the tissues of the body and to the pose itself. We explore each posture by becoming aware of the axial lines of energy that both integrate and expand simultaneously in opposite directions.
Try this with your arms extending to the sides. With your muscles firm, draw your arms into the shoulder sockets and magnetize into your spine. Feel the stability that gives to your joints. Then add another current of equal energy that extends from your spine all the way out to your fingertips, expanding your reach. With those two opposite directions balanced, you’ll have tremendous strength.
3. Wrapping Inward and Outward
In the pelvis and legs, inner rotation of the hip and thigh widens the pelvis, including the sacro-iliac joint, and it tips the top of the sacrum forward which maintains a good lumbar arch. We balance that rotation with outer rotation to bring stability and length to the sacrum, hips and lower back.
In the arms, especially in weight-bearing poses like Downward Dog, we balance inward and outward rotation as well. Placing our hands palms down onto the floor requires inner rotation, to which we add an outer rotation in the upper arms to support the shoulders well (see another blog post coming soon with more detail about safety for the arms and hands in weight-bearing poses).
4. Front and Back
Often in a pose, our attention is drawn to the front of the body. It’s what we can see in the mirror, and what others can see. Or, perhaps in other poses, our attention goes to the back because that’s where the most muscular work is happening. For example, in Bhujangasana (Cobra Pose) we might focus on the contracting sensation in the back body in order to create the backbend shape. Bringing attention to elongation in the front body can make space for a deeper and more comfortable backbend.
5. Core and Periphery
I define “core” as the part of the body closest to the center. In daily life, we often move from the periphery, such as picking up a cup of coffee, or reaching a foot forward to take a step. When we’re not aware of it, our core is supporting us in whatever movement we do. To refine and strengthen our movements, we need to attend to what the core is doing.
When performing yoga poses, moving from the core is more efficient, more stabilizing and much safer for the body than moving from the periphery. For instance, when doing a twisting pose, the effects are deeper when we move from the torso and spine rather than pulling ourselves into the twist with our arms or legs.
6. Effort and Surrender
Any pose can be an exploration of a balance between holding firm and yielding. For instance, in a balancing pose, we create stability in the core of the body and the key joints that are holding us up, and yet we also leave room for yielding to the slight sway that will happen as we readjust our balance. You can observe this in Tree Pose, Vrksasana.
In your practice as a whole, can you find the right degree of effort without working too hard or not working hard enough? Notice where you need to hold firm and where you can soften, in the body and in the mind. Which parts of a pose will be more successful with more effort, and which parts with more surrender? Notice where you fit on the spectrum of making effort or surrendering. Are you a person who pushes very hard, or prefers to take it easy? Find the right balance through the practice.
7. Aspiration and Acceptance
It’s good to have a goal: I want to relax, I want to become more flexible, I want to be able to fully stretch my legs and arms in Downward Dog, or to balance in headstand, or to straighten my arms in a full backbend (Urdhva Dhanurasana). These are healthy aspirations that keep us growing, reaching for our full potential, while having fun with the challenges that yoga offers. In yoga practice the aim is to balance these aspirations with an acceptance of who we are, what body we live in, our age, and what is realistic to expect. My practice in my sixties is different from what I did in my twenties. Finding this balance involves knowing ourselves and making realistic intentions while fully accepting who we are.
8. Discipline and Playfulness
Anything worth learning requires and deserves some discipline. With yoga, that discipline can take the form of doing the practices regularly, practicing some poses and techniques that are not easy for you, or holding poses for a longer time. Discipline could also mean being particularly precise with your alignment and actions as you perform the poses.
But lest you get too serious, temper that discipline with playfulness. Play with your sequencing, the speed of the practice, and even the form of the poses. Practice outdoors, in the water, or some other unusual location. Mix up the discipline with something fun.
C for Creative Expression
Each of us has a unique practice, even though the vocabulary of asana might be relatively consistent around the world. We can express our individuality and our best qualities in how we perform the asanas.
How is your yoga practice expressing something about you as an individual? Even though some aspects of yoga are centuries old, we create the practice each time we go onto the mat. Even the act of applying these principles can be creative, not rote.
It’s good to modify poses to adapt to your needs and desires, while remaining safe. Make a standing pose into more of a backbend, a twist, or a forward bend. Find variations that stretch you in a new way. Use props to experiment with challenging arm balances. Connect poses in creative ways. Use music to find a refreshing rhythm in your body. Practice inversions and backbends on a hillside.
Shaking things up and trying things “out of the box” is a good way to keep the practice fresh and alive. It’s not just flexibility of the body that yoga can offer. Tap into your creative self to keep the practice true and alive for you.
Look for Anatomy for Yoga Students and Teachers and Bodymind Ballwork, 2 new titles by Ellen Saltonstall to be published in 2016.
Share the post "The ABCs of Yoga: Awareness, the Balance of opposites, and Creative expression"
 This time of year gets busy, whatever holidays you do or do not celebrate. Year-end tasks, family visits, shopping, changing seasons, school events – it can be overwhelming. We all need some self-care, but we think we don’t have time. My message to you is: YOU DO HAVE TIME – perhaps just 10-15 minutes a day – and it will pay off with more centeredness to go about your day and your week.