Bodymind Ballwork for The Outer Side of The Legs
Right now, it’s the beginning of winter in the Northeast USA. We are wearing heavier clothing and shoes, the ground might be slippery, and the cold temperatures can sometimes cause muscles to tighten as we rush through our day. Tension in the outer legs that can cause hip, knee or ankle pain and fatigue.
Last year I wrote a blog about strengtheners for this part of the body, and today’s blog is about how to release tension there with the balls. While I acknowledge that many people use rollers for this, and get a lot of benefit, I prefer the balls, because I feel that the balls can get in between the layers and neighboring muscles really well, and they facilitate inner “glide” and healthy circulation.
Two of the techniques are done sitting on the floor, and the other two lying down. The balls can be purchased from www.lifesaball.org – look for the 4” spikey ball, and the 2.5” rainbow sponge ball, both of which I also sell at my studio. (Watch for the balls for sale from my website soon!)
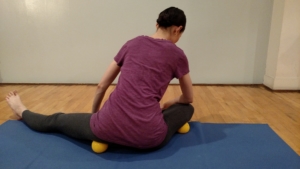
1. Sitting with two 3-4” hollow balls: Begin by sitting with your legs spread to the side, and a ball under each buttock. Explore small movements with your pelvis to work on the muscles of the pelvic floor and lower buttocks.
Then stretch one leg to the side, bend the other one, and turn your upper body toward the bent leg. The ball will begin to move down your outer leg. You can lean over to that side to get more pressure if you wish. Make small slow movements to work on the outer thigh and the iliotibial band. Work for 5-10 minutes on one leg, moving the ball gradually down toward your knee, then repeat the same process on the other leg.
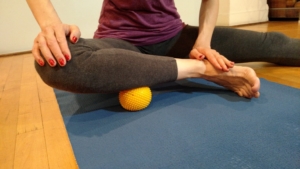
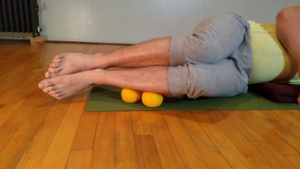
2. Sitting with one ball under the outer shin: For this you can use the hollow ball (for less pressure) or the solid ball (for more pressure). Sit with one leg bent and one leg straight out to the side. Place one ball under your outer shin. Lean over the bent leg and stabilize it with one hand on your knee and one on the ankle. Then slowly move your leg, moving the ball along the length of your outer shin muscles and fascia. Repeat on the other leg.
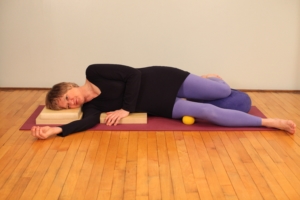 3. Lying on your side with one 3-4” hollow ball: Start by arranging props to support your upper body well while lying on your side. In this photo I have one pad under my ribs, two under my head, and a space between them for my shoulder.
Then place the ball under the side of the pelvis, where the iliotibial band begins. Your other leg can be behind, possibly on a bolster as shown here. Move your pelvis slowly forward and back to massage the muscles and fascia. Take your time, and stop in places that feel particularly tight.
Then move the ball a few inches down on the side of your thigh, skipping the bony prominence which is the greater trochanter of your femur. Work down the side of the thigh slowly, working on one spot at a time, moving the ball down with your hand when you’re finished with each spot. You can progress down to the side of the knee. Repeat on your other leg.
 4. Lying on your side with two small solid balls under the side of your lower leg: Support your upper body in the same way as in #3 above.
Place the two balls under the outer shin of your bottom leg, and stack the other leg on top. You can start at the top and progress down toward your ankle. Move your legs slowly so that the ball works into the tibialis anterior and the peroneal muscles, and their associated fascia. You can roll the balls up and down, or across the outer shin. Improvise your movements to reach the places where you want the pressure.
For more fabulous ball techniques, check out my book The Bodymind Ballwork Method, published in October by North Atlantic Books.
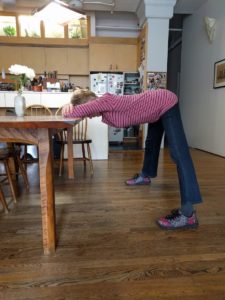 Prasarita Padottanasana: With feet spread wide apart, stretch your legs and reach your hips back as you stretch your torso forward. Rest your head on the table with your arms folded. Breathe and quiet your mind as you connect with sensations inside.
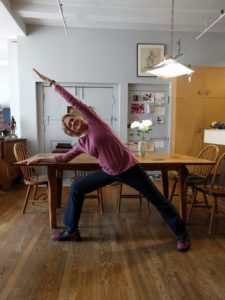 Parsvakonasana with your back to the table: With your right leg turned out parallel to the table, bend the right knee, pointing it toward the middle toes. The other hips shifts forward slightly, away from the table. Lean to the right with the right arm on the table. Keeping your legs and abdomen strongly active, bring your torso to the side as far as you wish. Stretch your left arm alongside your head, reaching vigorously from hand to foot. Repeat on the other side.
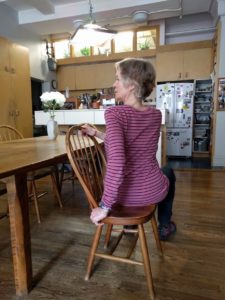 Seated twist with chair: Sit sideways in the chair, with your spine erect and legs steady. Inhale, lift your spine, and exhale, twist toward the back of the chair. Place your hands wherever it helps you to twist more. Hold for a few breaths, and repeat on the other side.
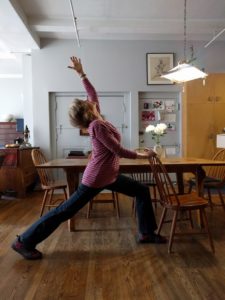 High lunge with the chair: Face the back of the chair and step your right foot forward, your left foot back. Both legs are parallel and the back heel will be off the floor. Face your pelvis squarely toward the chair, and hold the back of the chair with your hands. Lean forward a bit and push into the back leg, widening inside your pelvis and hips. Then pull down through the back of the pelvis as you lift up in the front torso. Raise your chest, look up, and expand from the top of your head all the way to the back foot. Raise your left arm up, and possibly also your right arm. Enjoy your strong and expanded self, then release and repeat on the other side.
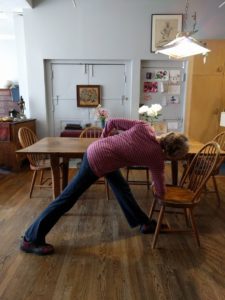 Parivrrta Trikonasana with the chair and tabletop: Place the chair sideways next to the table, the seat facing you, as shown. Step your left leg forward and keep both legs straight. Reach your hips back and your chest forward as you place your right hand on the chair seat. Twist toward the table, with your left hand pressing down into the tabletop to help empower your twist. Breathe several times, then come out of the twist and repeat on the other side.
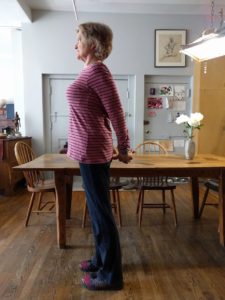 Shoulders and arms pulling back: Stand tall, roll your shoulders back and clasp your hands behind you. Pull your arms back to find a stretch in the front of your shoulders, and a supportive strength in the upper back. Take several deep breaths, feeling all inner sensations as you hold the pose.
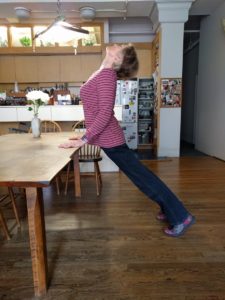 Upward facing dog with hands on the table: Place your hands on the edge of the table and walk your feet back. As you bring more weight onto your arms, be sure to keep your shoulders back and your chest lifted. Bend your elbows a bit, bring your pelvis toward the table with your tailbone lengthening, and move your chest forward between your arms, as if going through a doorway. Look up if you can, and enjoy a full stretch from your chin to your toes.