The 15 minute stay-cation with Bodymind Ballwork

elongating the spine with Ellen Saltonstall's Bodymind Ballwork TechniqueWhat do you do to take a break from daily stress, body aches, worry and fatigue? Maybe it’s a cup of tea, a phone call with a friend, or a few minutes of yoga. I recommend that you add this to your choices: a Bodymind Ballwork technique for the spine which will de-stress you, lengthen your back, and refresh your breath and your mind. I do it every day, as do many of my students.
All you need is 15 minutes, a clear space of floor and a yoga mat, and two balls. You can use tennis balls, or find various types of massage balls online. The ones I use are 3” solid rubber, but you can use larger ones as well. A smaller firmer ball will give you a deeper massage, and a larger hollow ball will give you a less specific pressure and an overall feeling of stretch. Both are good.

Lie on your back with your knees bent or straight, whichever is more comfortable to you. Spend a few minutes connecting with your breath, and feeling your body and mind – how are you right now? Are there some sore spots, achy muscles, worries, or emotions that are predominant in your experience right now? No judgment or analysis, just observation.

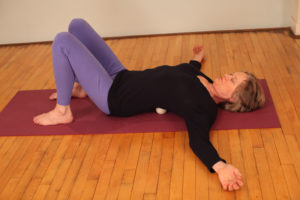
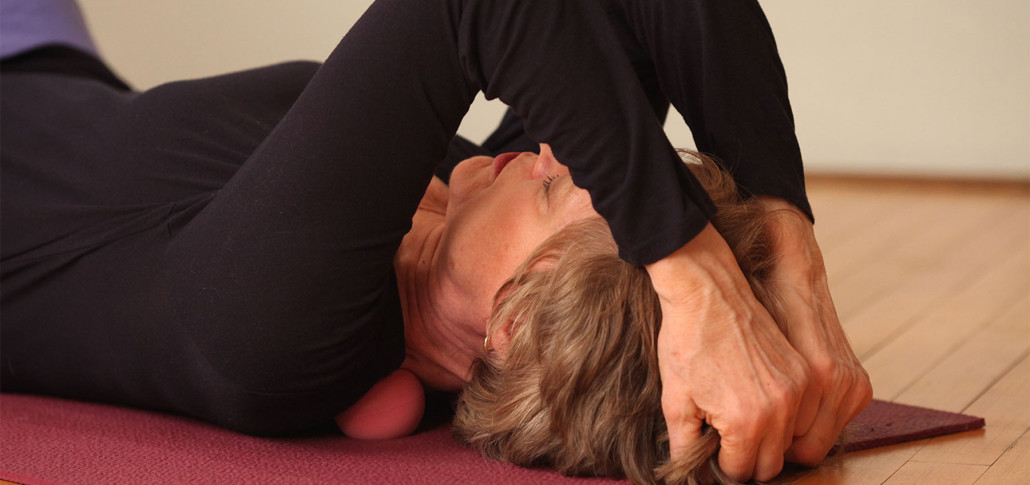
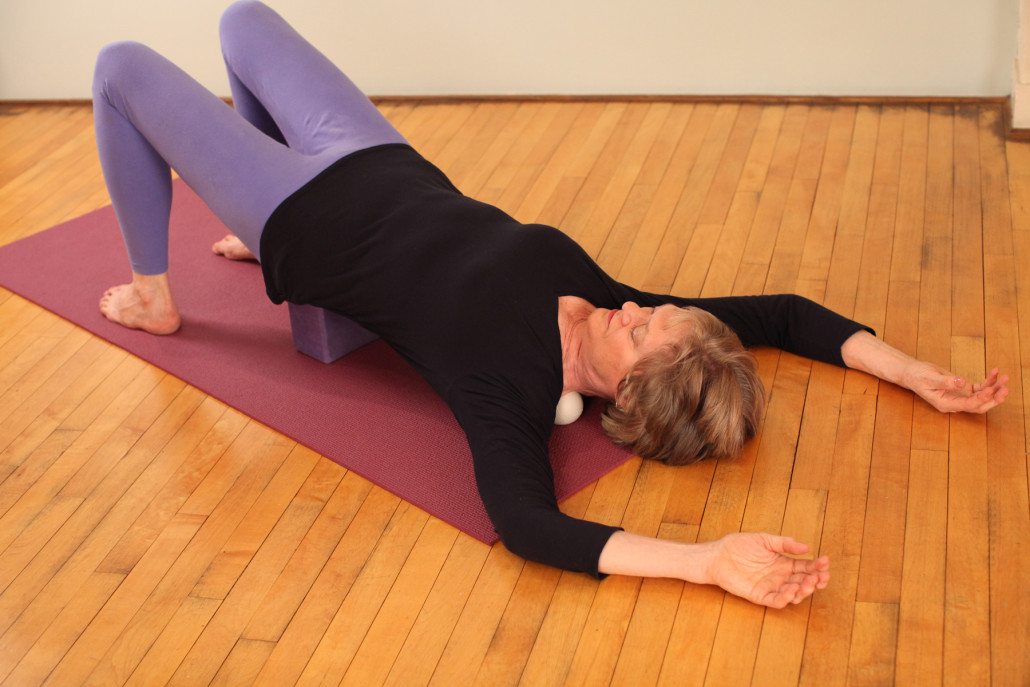
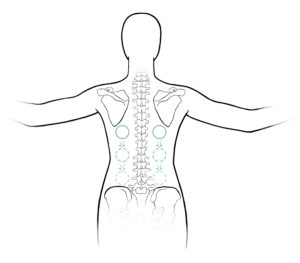
Now place the balls on your mat so that you can lie down with one ball on each side of the spine, near the bottom of your shoulder blades. They can be quite close to the spine, or a few inches away from it. As you first feel the pressure from the balls, you might be surprised at how strong the sensation is, but just give it some time. Let yourself settle, breathing slowly. Your arms can rest to your side on the floor, or you can stretch them overhead and on the floor.

Placement of balls in Ellen Saltonstall's Bodymind Ballwork to massage the spineNow move your back very slowly to one side, just an inch or two. Try to move only that segment of your back where you feel the balls. Breathe as you go, and notice any sensations, strong or subtle. The balls are massaging your spinal muscles, of which there are many, and all the surrounding fascia which is richly innervated. Some areas will probably be sore, others not. Think of it as an exploration of your own self, your back body which you can never actually see, but you can deeply feel.
After moving slowly to one side, and lingering there for a few breaths to give the balls time to do their work, glide back to center again. Then do the same to the other side. After one pass to each side, you can decide to repeat, or move the balls down. I usually go from side to side at least three times at each level of the spine, and more if I have sore spots.

When you are ready, roll yourself to another spot by pushing with your feet, and the balls move down your back an inch or two. Then work this new spot in the same way, slowly moving to one side, back to center, and to the other side. The combination of your body weight and your movement is dissolving tension, encouraging better circulation, and bringing more sensory vitality to all the soft tissue of your back.

Continue to progress down your back one spot at a time, noting the differences in sensation in each spot as you go. Also notice any changes in your breathing, especially when the balls are near your lower ribs. If you’ve had chronic back pain, your breath has surely been affected since the fascia of the diaphragm and back muscles are connected, and the stress of chronic pain can also disturb your breath.

Once you reach the pelvic bones, you can move the balls onto the buttocks and choose any spot to work on. This might lead to another 15 minutes, since most of us carry tension in the buttocks! You can choose to work more thoroughly here, finding several spots to place the balls, or just do one spot to finish your journey down your spine.

When you’re ready to stop, remove the balls from under you, and lie flat. Notice what you feel: what changes have occurred? Is there more ease, a softer and fuller breath, more contact with the floor?

Bodymind Ballwork offers more than 30 techniques, with something for each part of the body.

This technique for the middle and lower back is good to combine with the technique for the shoulders, described in my blog “Release Shoulder Tension with Bodymind Ballwork”, from January 2016.

I have a book in progress that will provide all the instructions, but in the meantime, you can come to class if you’re in New York, or attend a workshop – the next one is at Tasha Yoga in Williamstown, MA, August 11-13, 2017.

Want to learn more? In November 2017 I’m offering a three day intensive where I teach ALL the Bodymind Ballwork techniques in three days (open to anyone, come for a half day, full day or several), and there’s an added 2-day teacher training portion (by application).

Enjoy the summer and take time to renew yourself with Bodymind Ballwork!


Meet your hard-working (and possibly under-appreciated) outer hip muscles

The teams of muscles that support and move your hips are awesome.   Even if you’re not an anatomy geek, they are worth getting to know. You have the flexors in the front (with the iliopsoas as the team leader) which bring your leg forward to take a step. Their counterpart is the extensors in the back – gluteus maximus and hamstrings – the push-off muscles for running. We also have teams that rotate the hip joint – external rotators (piriformis being the midget but strong team leader here) and the internal rotators, which I’ll talk about below. Another team is the adductors on the inner thighs, a group of five that stabilize the inner thighs, pulling toward the midline.
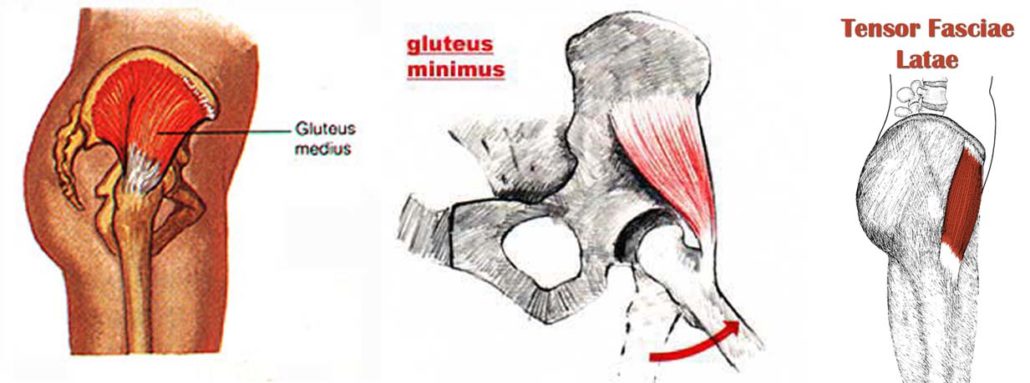
My favorite group is the abductor-medial rotators, a team of three multi-taskers on the outer hips. This group does both abduction (pulling the leg to the side) and medial rotation (turning the leg in toward the midline). Its role for stability is often ignored. Yoga students usually want to “open the hips” and I can understand that, but it’s easy to get fixated on flexibility and ignore our need for strength and stability. In that sense, we can do well to consider practicing some techniques from fitness trainers and physical therapists.

Here are the three muscles: gluteus medius, gluteus minimus, and tensor fascia lata.


Because of their attachment on the bones above and below, these muscles have a variety of actions, depending on what part of the body is stable. If you put all your weight on one leg, the abductors will move the other leg to the side, and potentially also rotate it a bit. They’ll also be stabilizing your standing leg! Because the gluteus medius has such a wide attachment on the pelvic crest, it can either rotate the thigh externally or internally, as well as abduct it…the multi-tasker.

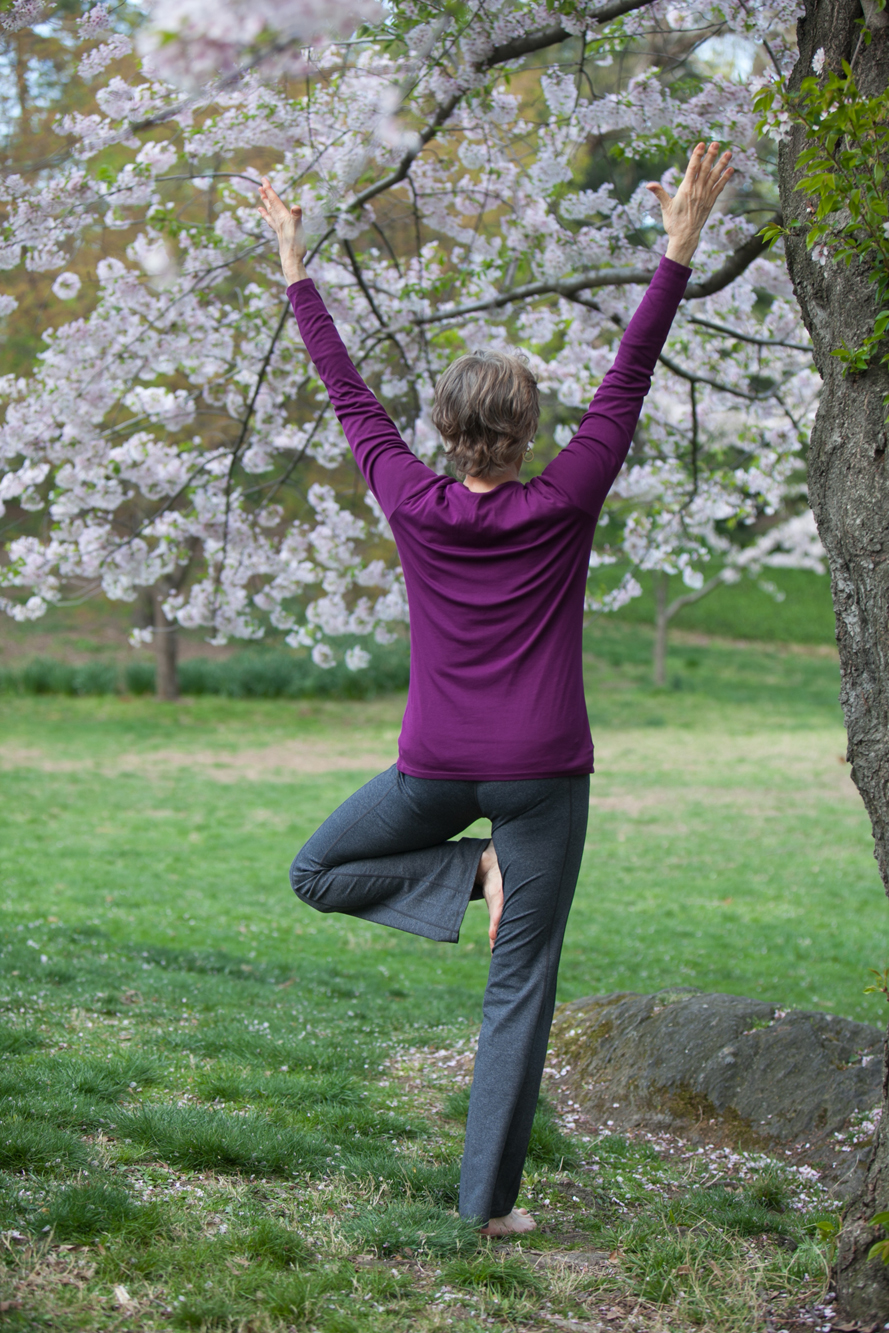
But if you have your weight on both feet, as in Tadasana or Uttanasana or Utkatasana, the abductors isometrically pull the upper thighs apart without affecting the lower legs, which adds to your stability and prevents compression in the hip joints and the sacro-iliac joint. I think it’s particularly good action in Utkatasana, the pose shown above.

You might say: I don’t want to strengthen my outer hips because they’re often achy and tired! Often when the outer hips are achy, it’s because the muscles are reacting to something we’re doing or not doing on a daily basis that causes all the teams to operate in a disorganized way. Perhaps we stand on one leg without realizing it, or we have some other slight imbalance or asymmetry that’s under the radar of ordinary awareness. Gradually over time, some muscles get a lot of stimulus and others not so much. This can be reinforced in our yoga practice or athletic activity like running, once the habits are established.

Here are some examples of good additions to your daily practice that highlight these abductor-rotator muscles, both for strength and stretch. First you can isolate them, and then focus on how they play a part in your favorite asanas. Practice these on both sides, of course.

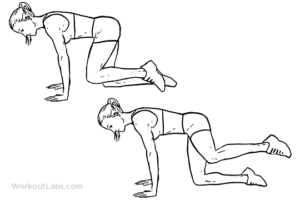
1. Side leg lift from all fours: From hands and knees position, lift one leg to the side, at first with the knee bent, and then straighten the leg to the side, as in a slow karate kick with the heel raised slightly. This works the abductor-medial rotator team. Do 10 slow kicks on each side, and increase the number as you get stronger.


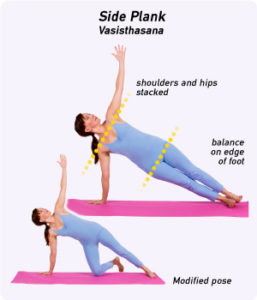
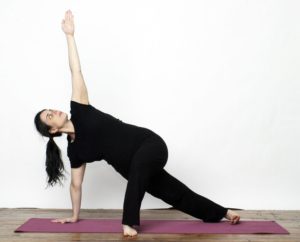
2. Side plank pose (Vasishtasana): In this pose, side body strength is emphasized, and the abductor team lifts up the hips. It’s a really good core strengthener.   There are many good variations of this pose, and here are a few.  Hold them for as long as you can, with your supporting shoulder pulled firmly back.


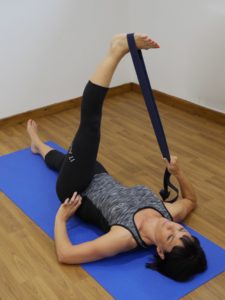
3. Outer hip and thigh stretch: A variation of Supta Padangusthasana, this crosses one leg over the midline, highlighting the outer hip and thigh. Keep your leg muscles strongly contracting as you hold the pose.


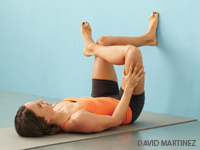
4. Another outer hip stretch, this time with bent knees. Be sure to keep the shoulders and pelvis flat on the floor, and adjust your distance from the wall as needed.


I hope this has peaked your interest in your hip muscles! You can appreciate the contribution of these multi-taskers in all standing poses, but especially in any balance pose, such as Vrksasana (Tree Pose), Trikonasana (Triangle Pose) and Ardha Chandrasana (Half-Moon Pose).

For more on the hip muscles, see my new book Anatomy and Yoga: A Guide for Teachers and Students, available online and in bookstores.

Cycles of Time, Cycles of Breath

interlocking-circlesAt the end of a year, we can reflect on the passage of time, reviewing the events and growth of the past year and setting intentions for the next year. It’s a valuable time to renew values and goals, and to savor meaningful experiences. What did I enjoy this year? What do I want to do more or less of next year?   What mistakes did I learn from? What obstacles did I overcome, and which ones are still ahead?

For me the highlights of 2016 included a trip to south India visiting ancient temples, and publishing my book, Anatomy and Yoga, a labor spanning many years. I also proudly saw my youngest son begin medical school, and I reconnected with friends from 40 years ago. Profound sadness came from losing two loved ones, both too young. Somehow each of these experiences related to the passage of time.

The year – and a life span – are long cycles, made up of billions of short ones. Each breath we take is a cycle, taking less than a minute of time. We have an infinite number of chances in any day to connect with our breathing cycle. Though our breath continues on its own, it welcomes our awareness and playful participation.

Right now as you’re reading this, take a big deep breath, filling yourself with Prana, the life force in the air. Then exhale until you’ve let out all the air, letting it subside naturally like a wave in the ocean. Reflect on the passage of that moment in time, the rhythm of it. The inhale is a new beginning, offering fresh energy, then the natural pause at the top is a time for assimilation, and the exhale is a release, a settling. So many cycles of time have these elements – creation, sustenance, dissolution – three of the “cosmic acts”, according to Hinduism. (There are more, but that’s for another blog). We know that conscious deep breathing is physically healing – it lowers blood pressure, boosts the immune system, and reduces emotional stress by shifting the nervous system to a calmer state. And it’s so easy to do!

This year, I recommend that you practice conscious breathing a little bit each day.   It could be when you first wake up, or before you eat, or whenever there is a transition in your day.   Here are a few ideas.

1) Watch the breath play inside your body. Where do you feel it? What movement does it create? What changes does it bring about in your inner feeling? How is the breath being affected by what you are doing?

2) Practice slowing it down. This is a great one to do just before meditation. You can count the duration of your inhalation – perhaps 4-6 counts – and then see how long the exhalation is naturally, without doing anything about it. Then gently elongate the exhalation, so that it’s about half again as long as the inhalation. Then add a pause at the top of the breath, between the inhalation and the exhalation. The pause is a magical moment of entry into a deeper awareness – called the Madhya, the middle place where a more subtle state of consciousness is available.

3) Repeat a natural mantra along with your breath. This is a classical meditation technique that you can practice for a short few minutes to center yourself, or for a longer seated meditation. As you inhale, inwardly hear the internal sound “Ham”, and as you exhale, hear the internal sound “Sah”. This is said to be the natural sound of the breath, its meaning is “I am that”: the essence of each of us expands into the world, and the world also exists inside us.

Enjoy your breath, and please leave me a comment about your favorite kind of conscious breathing!

Make New Friends, But Keep the Old

Milton 1966“Make new friends, but keep the old. One is silver and the other gold.”
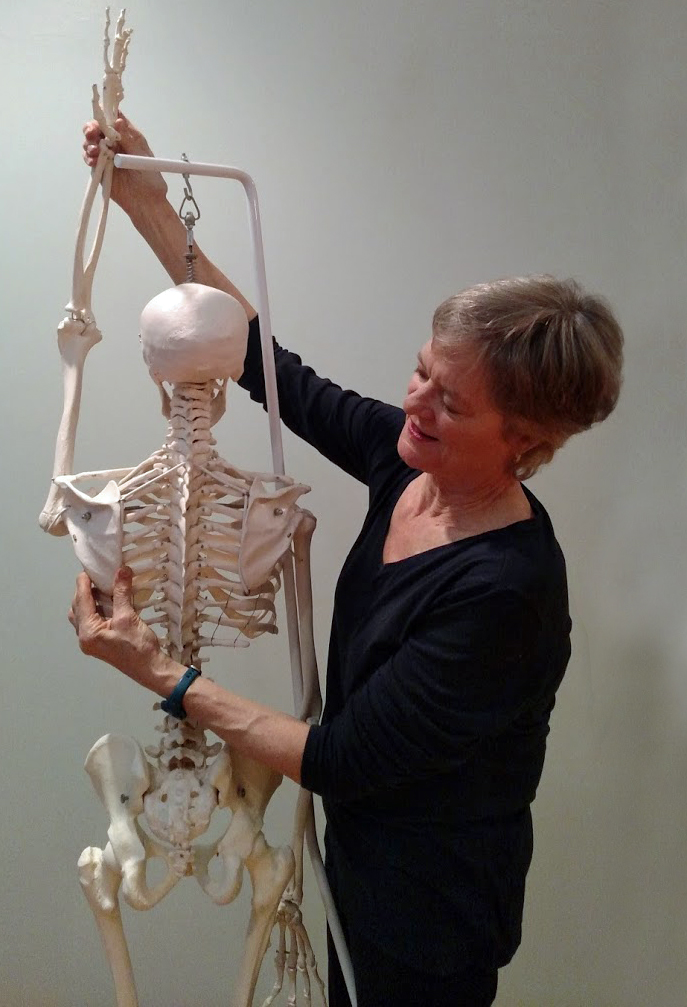
These are the words of a song I sang with my mother as a child and as a Girl Scout – does anyone else remember them?

Friendships show us the love and humanity inside us that is our essence. We discover ourselves through doing things together, talking over current life issues and future goals. New friends give us a fresh chance for discovery and playfulness as we look for their unique qualities and bounce those qualities against our own. Old friends are actually part of us already and, in some ways, they might know us better than we know ourselves. As friends, we underscore and amplify each other’s values and uniqueness; we stand in each other’s truth. We are there for each other in celebrations and in rough times, giving moral support and delighting in each others’ company.

I recently attended my 50th high school reunion for the women of my graduating class, and was moved to see these women again after so long. Out of 42 women, 23 of us attended – a pretty good percentage I’d say. I had not really kept in touch with any of them except one who is my first cousin. One came from Panama, one from Italy, one from Australia, and the rest from around the USA.   Even though so many years had passed, there was a strong and positive link between us, probably because of the formative experiences of those teenage years. Many professions are represented: doctors, lawyers, actors and acting teachers, psychotherapists, schoolteachers for all ages, musicians, visual artists. But I think I’m the only yoga teacher in the bunch. As I talked with many of them, I saw through their eyes and careers how the past 50 years have shaped us from our schoolgirl selves. It was impressive.

Walking around the school and remembering stories, I felt like I was almost able to see myself again at that age. Those experiences are still inside me, having partly shaped who I am today, for better and for worse. And these women were part of it.

Then I think of new friends I’ve made – through family connections, yoga connections and just living in a crowded city. They are neighbors, students, in-laws and colleagues. One of them said to me recently: “We’ve worked together but I don’t really know much about you – let’s have lunch and talk.” Connections grow from curiosity – what is common between us? What is different and how might I grow from that? Friendship grows from spending time together, listening, and opening the inner door to new understandings of the marvelous diversity and complexity of human nature. It’s a risk sometimes, but a risk worth taking. And then silver can turn to gold.

Photo:  My High School Reunion, Class of ‘66

What is Yoga Therapy and Who’s Qualified to Offer It?

Ellen Saltonstall, AnatomyAll yoga is inherently therapeutic, so what exactly is yoga therapy as distinct from yoga in general? I’ve heard many great teachers define it in different ways. To me, what makes the distinction is in the goal and the education/experience of the teacher.
A yoga teacher guides students in the practices of asana, pranayama, meditation, study of the philosophical teachings, chanting, and community service, in order to uplift their lives. Therapy will be part of it, because yoga improves our health.

A yoga therapist uses the tools of yoga to help people relieve pain and suffering in the body-mind-spirit. We use yoga techniques toward a particular goal. We do not diagnose. We work with the person, not the disease. We educate with the intention of relieving suffering.

Yoga opens the pathway for people to understand themselves more deeply, and to experience the flow of prana (life force) in the body-mind-spirit more clearly and powerfully. It is the prana that heals, not the therapist. Any good yoga teacher helps students to enhance the flow of prana. We teach people how to move intelligently, how to align the body well so that the natural healing power of the body-mind-spirit can do its work. A person’s own vitality will do the healing. We provide the support, the environment and the techniques, and that’s where the training comes in. We need to know about the underlying conditions to teach effectively. The teacher-student relationship is part of the therapy, but that’s also true in medicine and psychology, so we can’t claim to utilize more than other modalities.

So truly, every yoga teacher uses yoga as a therapeutic tool, and many students will expect their teacher to do just that. It’s inevitable, because that’s the way yoga works. Before every class, a student tells me about their latest ache or pain and wants my advice. Students put us into the role of healer, whether we want that or not. But we must practice ahimsa (non-harming), and avoid pretending that we know more than we do.

It matters how we present ourselves and how we pursue ongoing education. For myself, I continue to do research and learn from good teachers in related fields. Basic training to lead a yoga class is one thing. Training to be able to help people with medical ailments requires much more training in topics such as anatomy, physiology, psychology, and the characteristics of common medical conditions. We also need to have at least some knowledge of the current medical treatments for a range of common conditions. It’s a larger skill set, a larger toolbox, and one we must use with discretion.

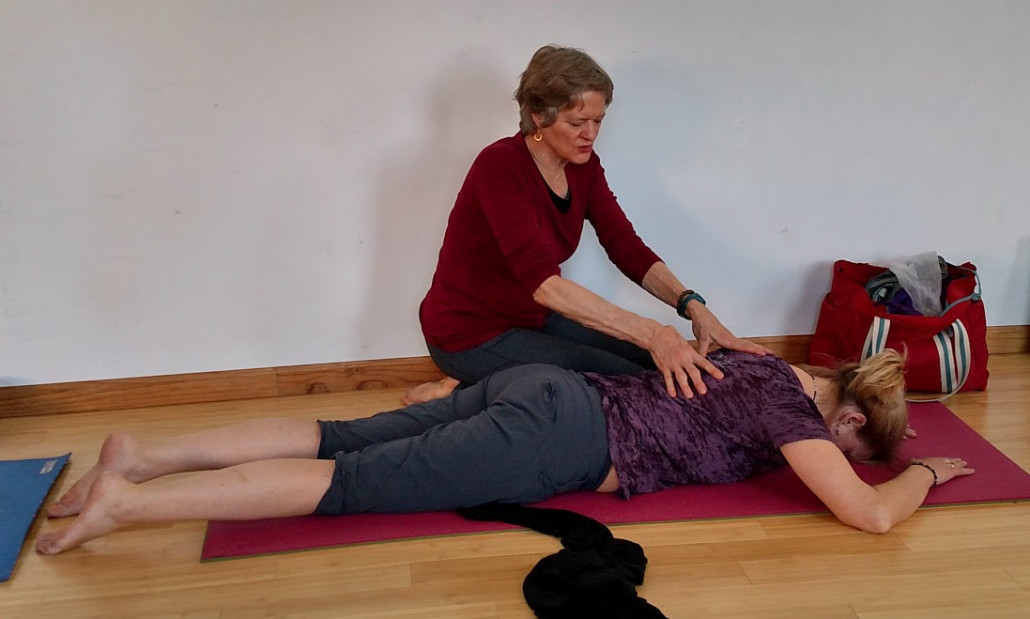
Ellen Saltonstall Massage DemoWhere can one get this training? Yoga therapy training programs exist around the world, and more will come every year. IAYT has set preliminary standards for training, and this is a good start. We can use the training of psychotherapists, physical therapists and physicians as a model for what’s needed. I advocate a period of formal training (at least two years after completing 500 hours of basic yoga teacher training), followed by a period of supervision/internship, similar to the training of social workers and medical doctors (at least two years). The formal training could be a combination of online and in-person courses, with competency tests. Perhaps those yoga teachers who are also accredited physicians or psychologists could help to design the curriculums and tests based on what has worked in their fields. And these programs should be administered by people who know about yoga. I’d hate to see the training of yoga therapists being legislated by people who know little or nothing about yoga (like university administrators, for instance).
What about licensing? Even though the issue of licensing has many dangers, I think it’s the only way for yoga to be fully recognized as an effective health care modality. I would like to see different sub-specialties, like yoga for structural/orthopedic issues, for mental health issues, for disease management (cancer, diabetes, osteoporosis etc), for elder care, for children, and for military personnel and veterans. We don’t all need to be expert at everything.

Right now this kind of training is self-directed, relying on the motivation, persistence, curiosity and integrity of each teacher to seek the training they need for what they want to offer. But potential students have no reliable way to evaluate a yoga therapist.

We’re in an important transition now as a professional field. Yoga has proven its worth in helping to heal or manage dozens of medical conditions, and more evidence will come to light every year(1). We need to be ready to competently serve the multitudes of people seeking the benefits that yoga has to offer.

Footnote:
1. Dr.Timothy McCall’s website has an ongoing list of studies showing the healing benefits of yoga.

Visiting the Hindu Temples of South India: The Source of Yoga

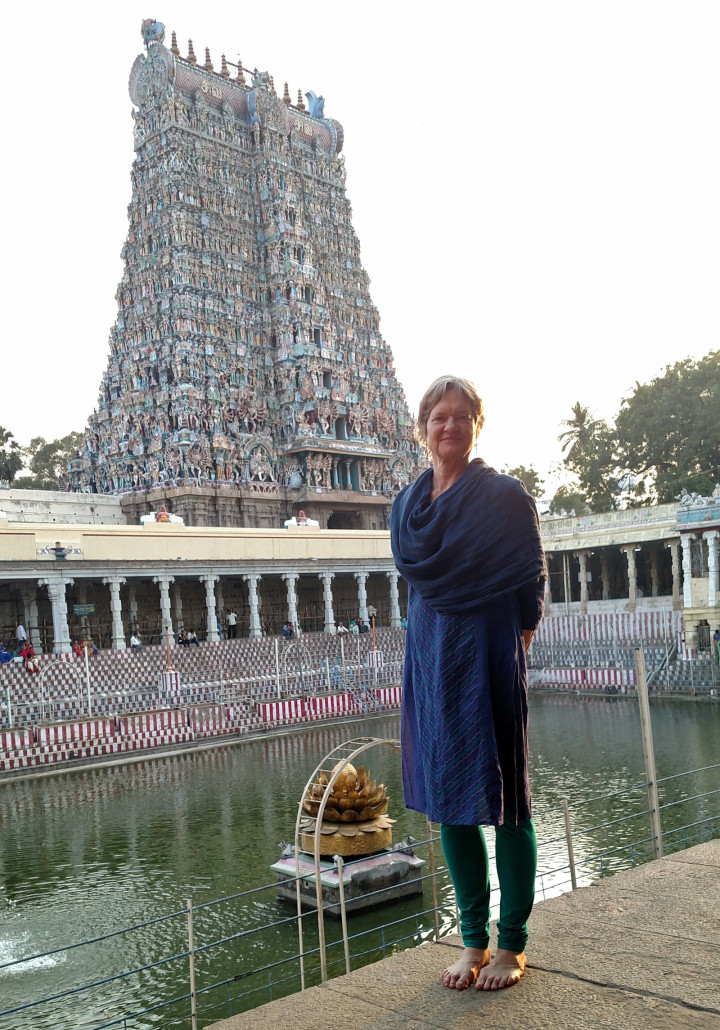
Ellen Saltonstal, Meenakshi Amman Temple

Ellen Saltonstall, Meenakshi Amman Temple, Madurai, India

When I returned from a recent trip to South India, my students asked,  “What was the spiritual significance of your trip?”  It’s a good question, worthy of ongoing contemplation. We visited 18 temples, ranging from a small outdoor one (just a platform under a tree), to the enormous Meenakshi Amman Temple in Madurai, which covers 45 acres.  It was definitely a pilgrimage for me to visit the birthplace of yoga and to feel its strong presence in 21st century life.  In particular, we spent a fabulous day at the Nataraj Temple in Chidambaram, which I’ll describe later.

I’ve been a meditator and student of yoga for over 40 years. If you think yoga is just an exercise class, you’re missing out on a huge range of practices and traditions. I began meditating in 1974 within the non-dual Shaivite branch of Hindu yoga, that is, centering on Shiva, one of the Hindu deities. Shiva, Vishnu, Lakshmi, Minakshi, Ganesh – these deities and others are all representatives of cosmic functions and human qualities.  Hinduism is generous in saying that you can align with any of the deities that appeals to you, since they all represent aspects of the highest truth. Each temple we visited had dozens of depictions of these deities in sandstone, granite, wood, and paintings.  They become like familiar friends after a very short time.

The underlying teaching of Hindu non-dual philosophy: Everything is comprised of the same consciousness in different forms. The highest reality, the Absolute, is not separate from the concrete reality that we experience in daily life – it is interwoven through it. In other words, all life is sacred, and we can connect with that sacredness in our everyday world.

My experiences in the temples we visited made that very clear. In the active temples, devotees were streaming in and out, participating fully in whatever was going on. Rituals that have been performed for centuries are maintained and offered for anyone to witness and participate in.  Far from being just about the performance of a task, the authenticity of these rituals is palpable.

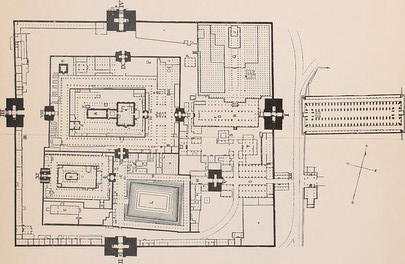
Plan_of_Meenakshi_Amman_Temple_Madurai_India Ellen Saltonstall Yoga

Plan of Meenakshi Amman Temple Madurai, India.

I love that Hindu temples are designed to mirror the layers of the human body. Put your western anatomical thinking aside for the moment, and consider this: We each are made of five concentric sheaths, or layers of being, called koshas. The outermost layer is the sheath of food, the physical body. Next is the more subtle sheath of breath, followed by the still more subtle sheath of thinking, followed by the sheath of understanding. The most subtle and central core sheath is of bliss, in which we revel in our own being in the most profound way.  We practice yoga to traverse gradually and systematically through these koshas.

The temples are constructed in concentric courtyards to represent these sheaths. The first entrance and courtyard have the bustle of regular life, but as you get closer to the central area, there’s a strong feeling of vibrating stillness, like what we can experience in meditation.   The inner sanctum is often dark and partially hidden, pulling us in like a magnet.

The Nataraj Temple in Chidambaram was the main focus of my pilgrimage; I had heard about it for years, and it was thrilling to be there. Its history goes back to the second century BCE and, among Shiva devotees, it is the pinnacle of sacred places.

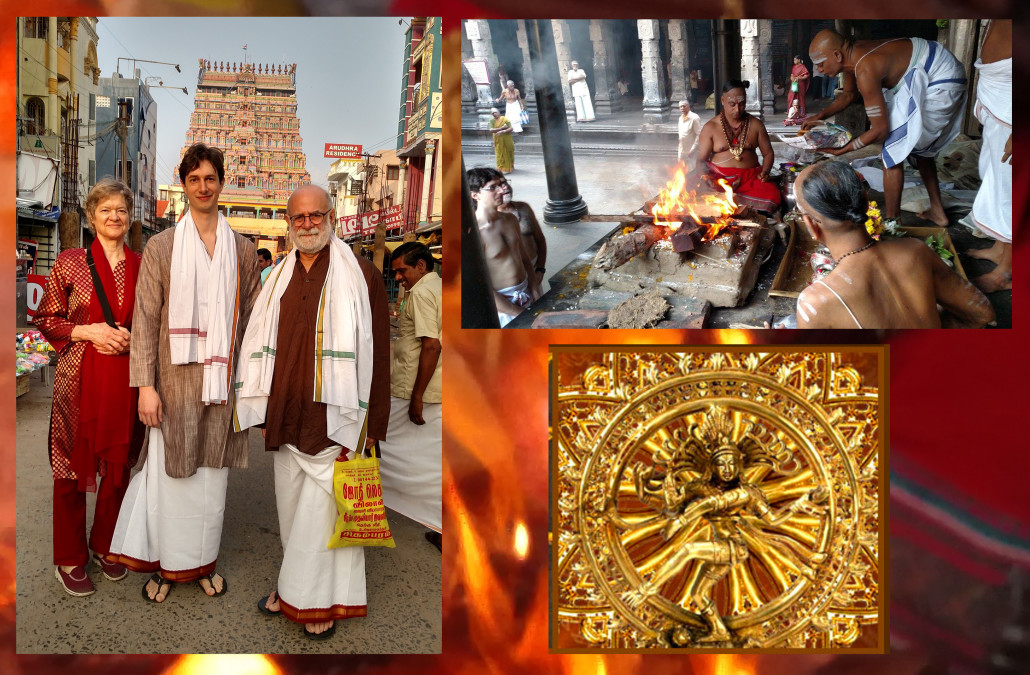
Chidambaram Ellen Saltonstall Yoga

At Chidambaram Temple. (clockwise, left to right): Ellen and family; Fire ceremony; Nataraj.

Nataraj is the name given to the form of Shiva dancing the cosmos into creation. He has four arms and two legs, and each limb is performing a cosmic function: creation, sustenance, destruction, concealment, and revelation.  The temple’s architecture has correspondences to the human body: the golden roof over the inner sanctum is made of the same number of tiles as the number of breaths we take every day. The central shrine can be entered from two sides, symbolizing the flow of blood in and out of the heart. The outer walls of the temple have nine entrances, corresponding to the orifices of the human body.  The iconography on the major towers (gopurams) depicts the 108 dance forms of Bharanatyam.  Honoring the sanctity of the human body is built right into the temple.

This temple, covering 35 acres of land, is cared for by a democratic and hereditary group of 300-400 priests who perform all the rituals and attend to visitors to the temple. We had one priest as our host, a charismatic man with a dynamic energy and huge heart. He guided us through our day there with great generosity and compassion. We watched many ceremonies, and I was particularly mesmerized by the chanting of mantras and sacred texts. Sometimes I could recognize words and could chant along, and other times I just bathed in the sound.  It felt both very exotic and also very familiar, as if I had been here before.  It also felt nourishing at a very deep level. After each ritual, the priest would say: “Happy?” And I was. The chanting had a purifying effect, burning away the dross of mundane distractions and worries to reveal a wellspring of underlying joy.  What a gift!  Seeing the practices of yoga in their historical context of these south Indian temples gave me a potent reminder of the power and diversity of this path, for which I’m profoundly grateful.

Join me on March 5 & 6 for the Bodymind Ballwork Workshop where we use we use rubber balls of varying sizes and textures (as small as a walnut and as big as a melon) to support, massage and stretch localized areas of the body. Experience a positive mental and physical shift!

Look for Anatomy for Yoga Teachers and Students and Bodymind Ballwork, two new titles by Ellen Saltonstall to be published in 2016.

_______

Photo credits:
Plan of Meenakshi Amman Temple, Madurai, India : https://en.wiki2.org/wiki/Meenakshi_Amman_Temple
Image of Naturaj figurine: http://www.chidambaramnataraja.org
All other photos by Ellen Saltonstall

Release Shoulder Tension with Bodymind Ballwork

This is one of the best stress-busters I know of.  Who doesn’t have tightness in the upper shoulders?   Working on a computer, carrying things or children, worrying, getting inadequate sleep, and having less-than-ideal posture—these all contribute to chronic contraction in the trapezius, a superficial muscle spanning your entire upper back and neck.  When you let go of tension here, with the help of balls, it does a huge service to your state of mind—not to mention helping to dissolve headaches and neck tension.

You’ll need two balls about the size of tennis balls (2-3” diameter), a place to lie on the floor, and a yoga block, if you have one. You might also want a bolster to rest your hands on, if your shoulders are tight, and a yoga mat for padding.

Lie on your back with the bolster above your head on the floor and the block near you. Take a moment to settle yourself, releasing unnecessary tension as much as possible while breathing fully. Notice how your shoulders feel.

Then place the balls under your upper shoulders, one on each side, in the area between the base of your neck and your shoulder blade. This is the upper trapezius, as well as some other deeper muscles. Bring your arms up in front of you and bend your elbows, pointing them toward the ceiling. This position brings more weight onto the balls and keeps them in place. You can rest your hands on your forehead or the floor behind your head.

There are two movements, each done very slowly and with awareness and care.  Notice as many details of sensation as you can. Don’t rush.  The benefit comes from the balls’ pressure on your tissues, the slow movement, and your attention.

Ballwork-shoulders_1500
1) Move your arms slowly up and down toward the ceiling, in a movement called protraction of the shoulder blades, which move away from the spine. Take special care to release your arms back to your rest position, feeling them settle onto the balls.  Do this for several minutes.


IMG_02592) Extend your arms overhead, resting your hands on the bolster or on the floor. Settle in this new position, and feel the difference in sensation where the balls are. If they have slipped out of place, just reach back with one hand to reposition them.
Now move your shoulders and upper back slowly and carefully off to one side, shifting sideward rather than turning. Keep your weight on both balls if you can. It’s a small movement, just enough to work into the muscles laterally.  Return to center and repeat to the other side, and continue like this as long as you like.

Try this variation: place the block under your pelvis and feel how this changes the balls’ contact with your trapezius muscle. Then repeat #2, slowly moving from side to side to massage the muscle. If you find a trigger point, you can stay on that spot for a longer time, or go back and forth over it.  Be careful to keep your movements slow and steady.

After 5-10 minutes, remove the balls and feel your shoulders as you lie flat on the floor. Is there a change? What do you feel?  This is the beginning of the trapezius technique, which you can read more about in my upcoming book, Bodymind Ballwork.

If you have questions or want to tell me how it feels, please write me via the contact page. Look for another blog coming soon with essentials for shoulder alignment and strengthening.

Self Care for the Holidays, Inside and Out

OMThis time of year gets busy, whatever holidays you do or do not celebrate. Year-end tasks, family visits, shopping, changing seasons, school events – it can be overwhelming. We all need some self-care, but we think we don’t have time. My message to you is: YOU DO HAVE TIME – perhaps just 10-15 minutes a day – and it will pay off with more centeredness to go about your day and your week.
Why do we procrastinate and delay the very things we know are good for us? Maybe it’s because we doubt that we’ll enjoy doing them, or that we’ll be successful at them. Or something else is “more important”. We all do this. Procrastination and avoidance can apply to self-care like meditation or exercise, chores around the house, professional tasks, or even big life changes like changing where you live, whom you live with, and what you do with your time.

When we are nagged internally by those things that we want-but-don’t-want to do, one approach is to examine the task or project or situation, and find a small – and specific – step in the right direction. A little bit goes a long way.

Let’s say you want to meditate, but you never seem to get around to it. The first step is to pick a time and place – both need to be quiet (although once you are a practiced meditator, you can do it anywhere). The next step is to choose a method – will you use awareness of breath, or a mantra, or some other method?   Sally Kempton’s book, Meditation for the Love of Itis a great source of ideas. Also, set a realistic time frame – I recommend at least 15 minutes to start with.

Then you need to drop your expectations of having some huge breakthrough right away. Meditation is a slow process of reconnecting to more subtle layers of awareness. In normal Western culture, we are not trained to turn inside and see what’s behind the thinking mind. There’s a one-liner about meditation: “It’s not what you think….” Give yourself a chance to find out, to let something emerge. Do a little bit at a time. Even if your mind races at first, watch it lovingly and breathe. Your mind will calm down and there is a deeper part of your awareness – the witness – that can watch the process.

To help the mind and breath to slow down, try chanting the syllable ‘OM’ for a few minutes. Pick a comfortable pitch, feel the vibrations inside of you, and allow your mind to become absorbed in those vibrations. Picture them healing and cleansing you inside. See how you feel afterward. It may be much easier to drift into meditation.

How about practicing yoga asana? Many of my students love coming to class but don’t manage to practice regularly at home. My advice: choose three things you’ve learned in class that feel good, and follow the same steps – find a time and place, and drop your expectations, and just DO IT. Your body will thank you and remind you to do it again.

My ballwork students tell me how much they gain from doing the ballwork in class, yet they don’t do it at home. Again, just 10 or 15 minutes can make such a big difference in your state of mind and your connection to your body. Releasing tension, opening up the breath, and simply tuning into yourself is immensely powerful as a re-set to your day, and money in the bank of sanity. You can do it anytime in the day – beginning, middle or end.

One more little thing that can make a difference in your state of mind – your physical environment, your home or office. Maybe you can reorganize a shelf or tabletop that’s covered with clutter, or get a bunch of flowers to brighten up the room. These little touches of beauty and order can be an undercurrent of coherence in a complex life.

Remember:

1) Pick a time and place
2) Choose a method of meditation or other practice
3) Set a realistic time frame
4) Drop your expectations and be present

Will power is a muscle – it gets stronger with use.

Look for Anatomy for Yoga Teachers and Students and Bodymind Ballwork, 2 new titles by Ellen Saltonstall to be published in 2016.

Three Steps to Wrist Safety in Yoga

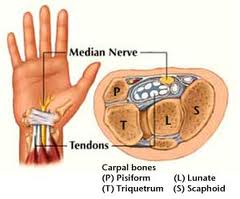
carpl tun3*

The human wrist is not designed for weight-bearing.  Even though our hands have evolved with many skills, bearing the full weight of body is not one of them. The bones are small and there are structural weak points, notably the carpal tunnel. The carpal tunnel is formed by the combined curvature of the group of eight small carpal bones, forming the “roof” of the tunnel, plus a ligament across the palm side, forming the “floor” of the tunnel.  (In this image the wrist is turned upward, so the roof is below, the floor is above). Through that tunnel pass nerves and tendons going to our fingers.  Problems come when the tunnel gets too much pressure and swelling forms inside the tunnel. Symptoms can be pain, numbness, and loss of strength in the hand.

The good news is that we can protect the carpal tunnel in our practice. The 3 protective steps are: 1) understanding the natural movements of the wrist and nearby bones and joints, 2) building strength and mobility, and 3) being very careful with your technique.

Proper shoulder alignment is crucial to protect the wrists, but I’ll address that in another blog. For now, here are some things that help prevent wrist problems.  Directional terms assume that you begin in the anatomical position, with your arms by your sides, palms forward.

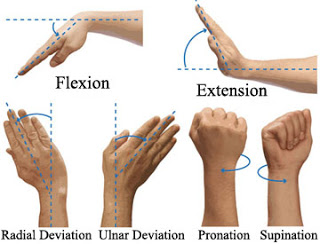
1. Awareness of your range of motion: Move your wrists in all directions, including the ones shown here.  Then find a “neutral wrist” position, with your middle finger extending directly out from your forearm bones. Return to this home base as much as possible.

wrist movements defined


2. Stretches and strengtheners (balancing opposites):
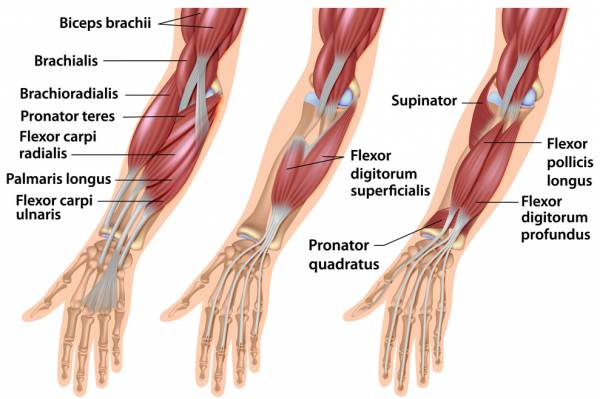
  See the short films on this website for 12 wrist exercises.  These exercises include flexion, extension, twisting, and some combinations of the above. You’ll notice the sensations in your forearms (which consist of two bones, the ulna and radius), and you’ll be stretching the tissue between those two bones (the interosseous membrane), as well as muscles on all sides of the bones.  

forearm flexors-2


3. Technique: 
Experiment with the exact placement of weight on your hands in Cat-Cow as a preparation for weight-bearing. Notice what it feels like to bear more weight on the inner edge, the outer edge, the wrist, or the fingers.  Can you have “neutral wrists” with the fingers (especially the middle one) extending straight forward, or do you tend toward ulnar deviation or radial deviation?  If you have stiff shoulders, you may benefit from turning your hands out (slight ulnar deviation) to point your index finger forward rather than your middle finger.

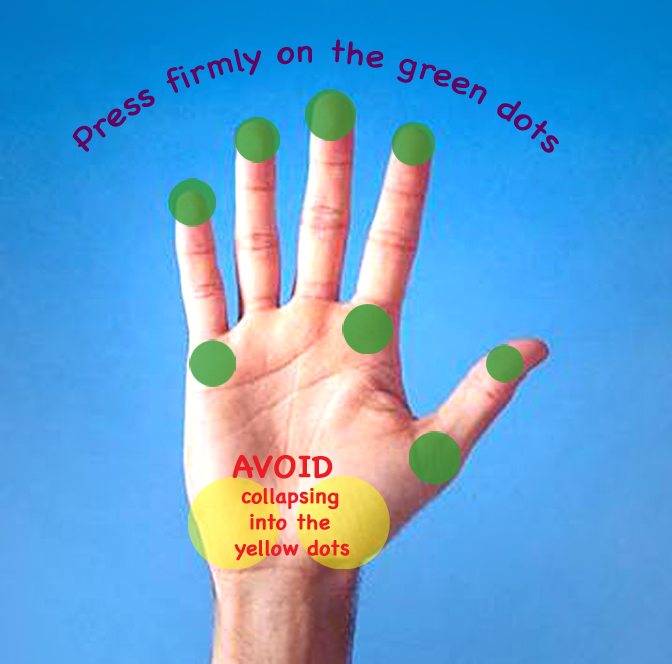
Ideally you have the four corners of the hands pressing down equally, and an upward lift in the center of the palm. Pressing the fingertips down engages muscles that prevent collapse into the carpal tunnel, so this is very important. In general, bear your weight more forward toward the fingers, and less back toward the wrists.

polkadotwristblog3


Review this balance when entering poses such as handstand, Downward Dog, and all arm balances. The extra minute it takes to remind yourself will pay off!  And study up on your anatomy – it’s worth it to protect your body and your yoga practice!

Consider attending my Yoga Anatomy and Therapy Workshop Nov 7, 8 & 14 where we study the joints, muscles and fascia and learn how to practice safely and effectively for a lifetime. Register here.

The ABCs of Yoga: Awareness, the Balance of opposites, and Creative expression

vrksas back

B is for Balance of Opposites: Tree Pose, Vrksasana.

B.K.S Iyengar said, “The study of asana is not about mastering posture. It’s about using posture to understand and transform yourself.” My teacher, Mary Dunn, taught her own version of this:  “First you learn about the asanas, and then you learn about yourself in the asanas.”

I have pondered this a lot over my 34 years of practice. What are we really practicing? We are not just making shapes, stretching, getting a workout – there’s so much more to it.  My thoughts have been greatly influenced by my teachers, but at a certain point I felt the need to distill my personal approach into a paradigm. It can be summarized as ABC:  Awareness, the Balance of opposites, and Creative expression.

We focus on the ABCs in my upcoming workshop, Yoga Anatomy and Therapy.

A for Awareness

In asana, the practice of awareness can take many forms. The first and most important step is to become aware of yourself in the present moment. When practicing asana, we move our awareness into our bodies. We exercise our “muscles of awareness” in relation to sensations, thereby increasing our ability to be aware in all other areas of our lives.

As you practice asana, here are some questions that might trigger your awareness.

Important note: Awareness is separate from analysis and judgment!  Try to let all sensations and thoughts register without categorizing them or giving yourself a scorecard. 

What is your state of being, your energetic presence right now? Do you feel focused or distracted?  Tired or energized?

What body sensations are you aware of?  Listen to find out if parts of your body talking to you, either to relay that they are feeling good, or that there is some pain or compression or strain.  Is there any area of the body that might need extra care today in your practice?

Feel the pull of gravity on your body, and notice if it feels like a burden, or more like a comforting sense of grounding.

Become aware of your breath – its texture, rhythm, and degree of comfort or discomfort.  Observe it without judgment.

Observe the activity of your mind.  Perhaps there are worries, plans, or other distractions, or perhaps your mind is calm and focused.  It’s natural for the mind to generate thoughts, but we can take a step back and observe it.

What do you want to offer today with your practice, and what do you want to receive?  Acknowledge your goals for your practice – for both your body and your mind.

Can you catch a glimpse of your own consciousness as part of something much bigger – the community of humanity and the cosmos?

With this breadth of awareness, notice how your practice becomes fuller and richer than simply “exercise”. Be open to expanding your awareness and learning about yourself while you practice, rather than just performing a task.

B for the Balance of Opposites

After the first step of becoming aware, there are guidelines help us do the physical work of the asanas without letting the process become simply making shapes. Without intention and attention, mind tends to wander to what’s on your agenda for later in the day, or a dozen other topics. I’ve found that balancing pairs of opposite actions in the body and attitudes in the mind can be very engaging, keeping me in the present moment for my practice. Here are some examples of pairs of opposites to consider.

1. Rooting and Rising

Every pose has a base, whether it is in the feet, the hands, the pelvis, the shoulders, or some other part of the body. In every asana we can simultaneously reach down into that base (“root”), and lift up away from it (“rise”).  The more we connect downward to the base, the more we can lift up. For instance, in a standing pose, the pelvis and legs root down into the earth, while the torso and spine rise up. We feel simultaneously both solidly grounded and yet expanded and light.

2. Integrating and Expanding

The body needs both integration for stability and expansion for freedom. Each of us has characteristic types of connective tissue and patterns of muscular use that will determine whether our body is more loose and flexible, or more tight and compact. During asana practice we work to bring balance to the tissues of the body and to the pose itself. We explore each posture by becoming aware of the axial lines of energy that both integrate and expand simultaneously in opposite directions.

Try this with your arms extending to the sides. With your muscles firm, draw your arms into the shoulder sockets and magnetize into your spine. Feel the stability that gives to your joints.  Then add another current of equal energy that extends from your spine all the way out to your fingertips, expanding your reach.  With those two opposite directions balanced, you’ll have tremendous strength.

3. Wrapping Inward and Outward

In the pelvis and legs, inner rotation of the hip and thigh widens the pelvis, including the sacro-iliac joint, and it tips the top of the sacrum forward which maintains a good lumbar arch.  We balance that rotation with outer rotation to bring stability and length to the sacrum, hips and lower back.

In the arms, especially in weight-bearing poses like Downward Dog, we balance inward and outward rotation as well. Placing our hands palms down onto the floor requires inner rotation, to which we add an outer rotation in the upper arms to support the shoulders well (see another blog post coming soon with more detail about safety for the arms and hands in weight-bearing poses).

4. Front and Back

Often in a pose, our attention is drawn to the front of the body. It’s what we can see in the mirror, and what others can see.  Or, perhaps in other poses, our attention goes to the back because that’s where the most muscular work is happening.  For example, in Bhujangasana (Cobra Pose) we might focus on the contracting sensation in the back body in order to create the backbend shape.  Bringing attention to elongation in the front body can make space for a deeper and more comfortable backbend.

5. Core and Periphery 

I define “core” as the part of the body closest to the center. In daily life, we often move from the periphery, such as picking up a cup of coffee, or reaching a foot forward to take a step. When we’re not aware of it, our core is supporting us in whatever movement we do. To refine and strengthen our movements, we need to attend to what the core is doing.

When performing yoga poses, moving from the core is more efficient, more stabilizing and much safer for the body than moving from the periphery. For instance, when doing a twisting pose, the effects are deeper when we move from the torso and spine rather than pulling ourselves into the twist with our arms or legs.

6. Effort and Surrender

Any pose can be an exploration of a balance between holding firm and yielding. For instance, in a balancing pose, we create stability in the core of the body and the key joints that are holding us up, and yet we also leave room for yielding to the slight sway that will happen as we readjust our balance.  You can observe this in Tree Pose, Vrksasana.

In your practice as a whole, can you find the right degree of effort without working too hard or not working hard enough? Notice where you need to hold firm and where you can soften, in the body and in the mind.  Which parts of a pose will be more successful with more effort, and which parts with more surrender? Notice where you fit on the spectrum of making effort or surrendering. Are you a person who pushes very hard, or prefers to take it easy?  Find the right balance through the practice.

7. Aspiration and Acceptance

It’s good to have a goal: I want to relax, I want to become more flexible, I want to be able to fully stretch my legs and arms in Downward Dog, or to balance in headstand, or to straighten my arms in a full backbend (Urdhva Dhanurasana). These are healthy aspirations that keep us growing, reaching for our full potential, while having fun with the challenges that yoga offers. In yoga practice the aim is to balance these aspirations with an acceptance of who we are, what body we live in, our age, and what is realistic to expect. My practice in my sixties is different from what I did in my twenties. Finding this balance involves knowing ourselves and making realistic intentions while fully accepting who we are.

8. Discipline and Playfulness

Anything worth learning requires and deserves some discipline. With yoga, that discipline can take the form of doing the practices regularly, practicing some poses and techniques that are not easy for you, or holding poses for a longer time. Discipline could also mean being particularly precise with your alignment and actions as you perform the poses.

But lest you get too serious, temper that discipline with playfulness. Play with your sequencing, the speed of the practice, and even the form of the poses. Practice outdoors, in the water, or some other unusual location. Mix up the discipline with something fun.

C for Creative Expression

Each of us has a unique practice, even though the vocabulary of asana might be relatively consistent around the world. We can express our individuality and our best qualities in how we perform the asanas.

How is your yoga practice expressing something about you as an individual? Even though some aspects of yoga are centuries old, we create the practice each time we go onto the mat.  Even the act of applying these principles can be creative, not rote.

It’s good to modify poses to adapt to your needs and desires, while remaining safe.  Make a standing pose into more of a backbend, a twist, or a forward bend. Find variations that stretch you in a new way. Use props to experiment with challenging arm balances. Connect poses in creative ways. Use music to find a refreshing rhythm in your body. Practice inversions and backbends on a hillside.

Shaking things up and trying things “out of the box” is a good way to keep the practice fresh and alive.  It’s not just flexibility of the body that yoga can offer.  Tap into your creative self to keep the practice true and alive for you.

Look for Anatomy for Yoga Students and Teachers and Bodymind Ballwork, 2 new titles by Ellen Saltonstall to be published in 2016.