Three Steps to Wrist Safety in Yoga
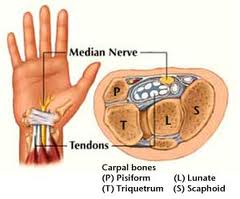
The human wrist is not designed for weight-bearing. Even though our hands have evolved with many skills, bearing the full weight of body is not one of them. The bones are small and there are structural weak points, notably the carpal tunnel. The carpal tunnel is formed by the combined curvature of the group of eight small carpal bones, forming the “roof” of the tunnel, plus a ligament across the palm side, forming the “floor” of the tunnel. (In this image the wrist is turned upward, so the roof is below, the floor is above). Through that tunnel pass nerves and tendons going to our fingers. Problems come when the tunnel gets too much pressure and swelling forms inside the tunnel. Symptoms can be pain, numbness, and loss of strength in the hand.
The good news is that we can protect the carpal tunnel in our practice. The 3 protective steps are: 1) understanding the natural movements of the wrist and nearby bones and joints, 2) building strength and mobility, and 3) being very careful with your technique.
Proper shoulder alignment is crucial to protect the wrists, but I’ll address that in another blog. For now, here are some things that help prevent wrist problems. Directional terms assume that you begin in the anatomical position, with your arms by your sides, palms forward.
1. Awareness of your range of motion: Move your wrists in all directions, including the ones shown here. Then find a “neutral wrist” position, with your middle finger extending directly out from your forearm bones. Return to this home base as much as possible.
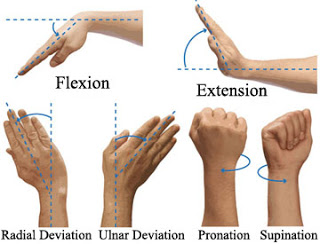
2. Stretches and strengtheners (balancing opposites): See the short films on this website for 12 wrist exercises. These exercises include flexion, extension, twisting, and some combinations of the above. You’ll notice the sensations in your forearms (which consist of two bones, the ulna and radius), and you’ll be stretching the tissue between those two bones (the interosseous membrane), as well as muscles on all sides of the bones.
3. Technique: Experiment with the exact placement of weight on your hands in Cat-Cow as a preparation for weight-bearing. Notice what it feels like to bear more weight on the inner edge, the outer edge, the wrist, or the fingers. Can you have “neutral wrists” with the fingers (especially the middle one) extending straight forward, or do you tend toward ulnar deviation or radial deviation? If you have stiff shoulders, you may benefit from turning your hands out (slight ulnar deviation) to point your index finger forward rather than your middle finger.
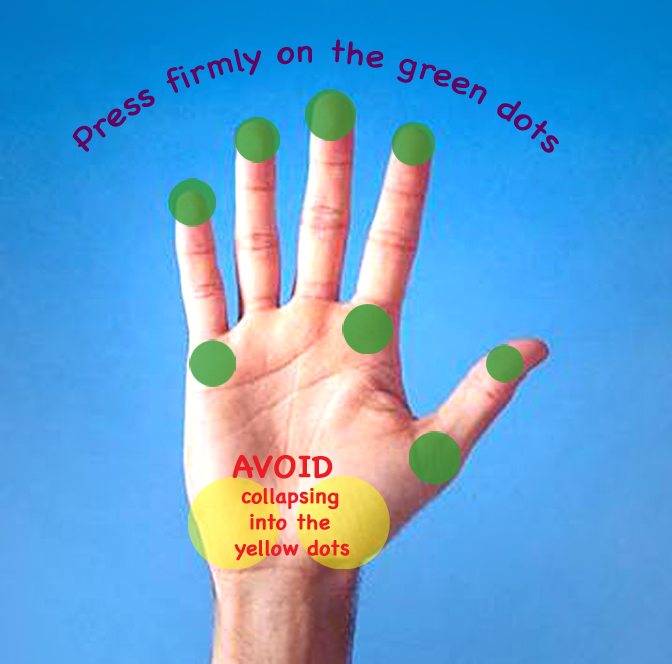
Ideally you have the four corners of the hands pressing down equally, and an upward lift in the center of the palm. Pressing the fingertips down engages muscles that prevent collapse into the carpal tunnel, so this is very important. In general, bear your weight more forward toward the fingers, and less back toward the wrists.
Review this balance when entering poses such as handstand, Downward Dog, and all arm balances. The extra minute it takes to remind yourself will pay off! And study up on your anatomy – it’s worth it to protect your body and your yoga practice!
Consider attending my Yoga Anatomy and Therapy Workshop Nov 7, 8 & 14 where we study the joints, muscles and fascia and learn how to practice safely and effectively for a lifetime. Register here.
The ABCs of Yoga: Awareness, the Balance of opposites, and Creative expression
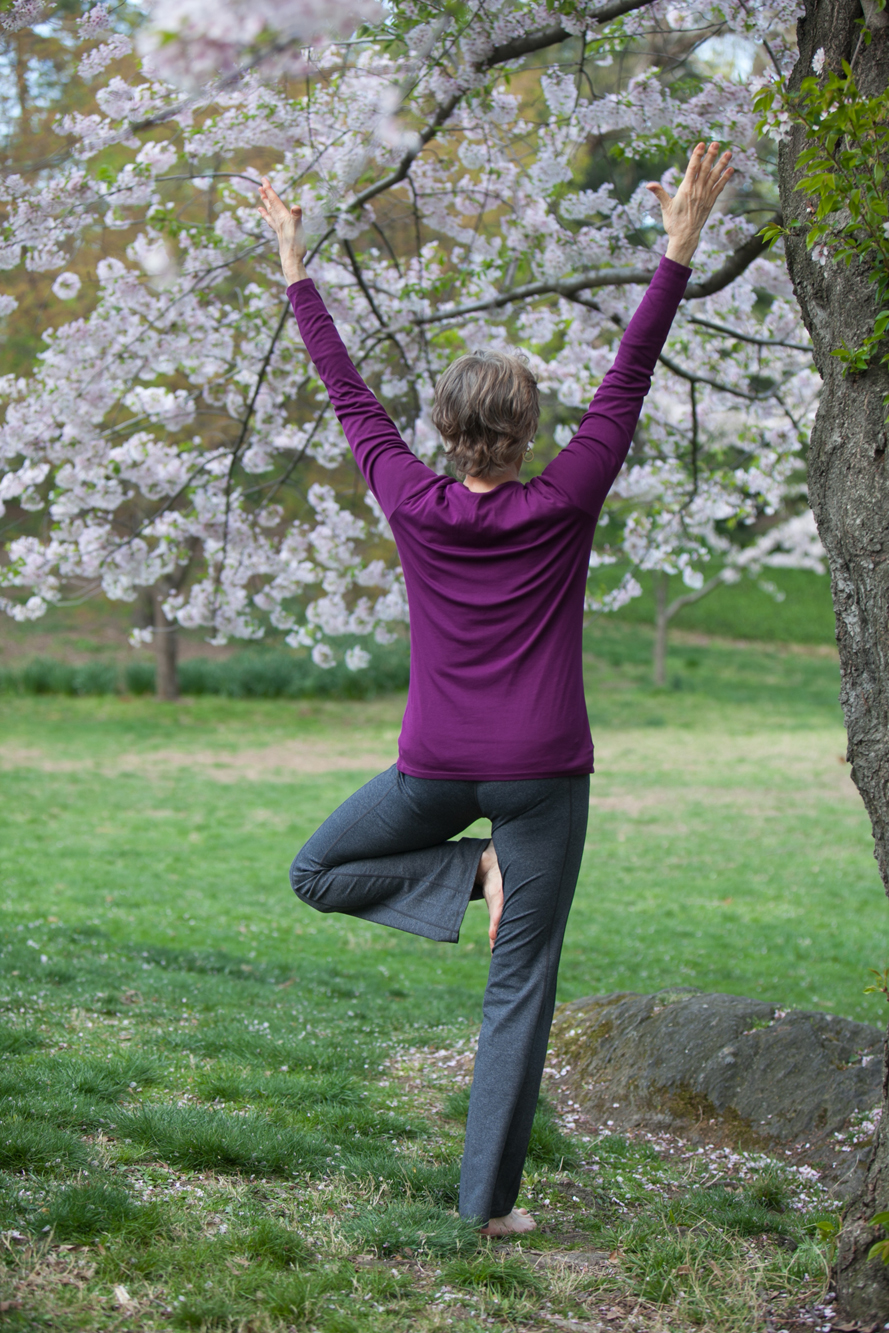
B is for Balance of Opposites: Tree Pose, Vrksasana.
B.K.S Iyengar said, “The study of asana is not about mastering posture. It’s about using posture to understand and transform yourself.” My teacher, Mary Dunn, taught her own version of this: “First you learn about the asanas, and then you learn about yourself in the asanas.”
I have pondered this a lot over my 34 years of practice. What are we really practicing? We are not just making shapes, stretching, getting a workout – there’s so much more to it. My thoughts have been greatly influenced by my teachers, but at a certain point I felt the need to distill my personal approach into a paradigm. It can be summarized as ABC: Awareness, the Balance of opposites, and Creative expression.
We focus on the ABCs in my upcoming workshop, Yoga Anatomy and Therapy.
A for Awareness
In asana, the practice of awareness can take many forms. The first and most important step is to become aware of yourself in the present moment. When practicing asana, we move our awareness into our bodies. We exercise our “muscles of awareness” in relation to sensations, thereby increasing our ability to be aware in all other areas of our lives.
As you practice asana, here are some questions that might trigger your awareness.
Important note: Awareness is separate from analysis and judgment! Try to let all sensations and thoughts register without categorizing them or giving yourself a scorecard.
What is your state of being, your energetic presence right now? Do you feel focused or distracted? Tired or energized?
What body sensations are you aware of? Listen to find out if parts of your body talking to you, either to relay that they are feeling good, or that there is some pain or compression or strain. Is there any area of the body that might need extra care today in your practice?
Feel the pull of gravity on your body, and notice if it feels like a burden, or more like a comforting sense of grounding.
Become aware of your breath – its texture, rhythm, and degree of comfort or discomfort. Observe it without judgment.
Observe the activity of your mind. Perhaps there are worries, plans, or other distractions, or perhaps your mind is calm and focused. It’s natural for the mind to generate thoughts, but we can take a step back and observe it.
What do you want to offer today with your practice, and what do you want to receive? Acknowledge your goals for your practice – for both your body and your mind.
Can you catch a glimpse of your own consciousness as part of something much bigger – the community of humanity and the cosmos?
With this breadth of awareness, notice how your practice becomes fuller and richer than simply “exercise”. Be open to expanding your awareness and learning about yourself while you practice, rather than just performing a task.
B for the Balance of Opposites
After the first step of becoming aware, there are guidelines help us do the physical work of the asanas without letting the process become simply making shapes. Without intention and attention, mind tends to wander to what’s on your agenda for later in the day, or a dozen other topics. I’ve found that balancing pairs of opposite actions in the body and attitudes in the mind can be very engaging, keeping me in the present moment for my practice. Here are some examples of pairs of opposites to consider.
1. Rooting and Rising
Every pose has a base, whether it is in the feet, the hands, the pelvis, the shoulders, or some other part of the body. In every asana we can simultaneously reach down into that base (“root”), and lift up away from it (“rise”). The more we connect downward to the base, the more we can lift up. For instance, in a standing pose, the pelvis and legs root down into the earth, while the torso and spine rise up. We feel simultaneously both solidly grounded and yet expanded and light.
2. Integrating and Expanding
The body needs both integration for stability and expansion for freedom. Each of us has characteristic types of connective tissue and patterns of muscular use that will determine whether our body is more loose and flexible, or more tight and compact. During asana practice we work to bring balance to the tissues of the body and to the pose itself. We explore each posture by becoming aware of the axial lines of energy that both integrate and expand simultaneously in opposite directions.
Try this with your arms extending to the sides. With your muscles firm, draw your arms into the shoulder sockets and magnetize into your spine. Feel the stability that gives to your joints. Then add another current of equal energy that extends from your spine all the way out to your fingertips, expanding your reach. With those two opposite directions balanced, you’ll have tremendous strength.
3. Wrapping Inward and Outward
In the pelvis and legs, inner rotation of the hip and thigh widens the pelvis, including the sacro-iliac joint, and it tips the top of the sacrum forward which maintains a good lumbar arch. We balance that rotation with outer rotation to bring stability and length to the sacrum, hips and lower back.
In the arms, especially in weight-bearing poses like Downward Dog, we balance inward and outward rotation as well. Placing our hands palms down onto the floor requires inner rotation, to which we add an outer rotation in the upper arms to support the shoulders well (see another blog post coming soon with more detail about safety for the arms and hands in weight-bearing poses).
4. Front and Back
Often in a pose, our attention is drawn to the front of the body. It’s what we can see in the mirror, and what others can see. Or, perhaps in other poses, our attention goes to the back because that’s where the most muscular work is happening. For example, in Bhujangasana (Cobra Pose) we might focus on the contracting sensation in the back body in order to create the backbend shape. Bringing attention to elongation in the front body can make space for a deeper and more comfortable backbend.
5. Core and Periphery
I define “core” as the part of the body closest to the center. In daily life, we often move from the periphery, such as picking up a cup of coffee, or reaching a foot forward to take a step. When we’re not aware of it, our core is supporting us in whatever movement we do. To refine and strengthen our movements, we need to attend to what the core is doing.
When performing yoga poses, moving from the core is more efficient, more stabilizing and much safer for the body than moving from the periphery. For instance, when doing a twisting pose, the effects are deeper when we move from the torso and spine rather than pulling ourselves into the twist with our arms or legs.
6. Effort and Surrender
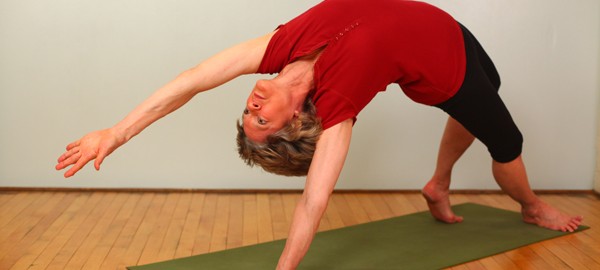
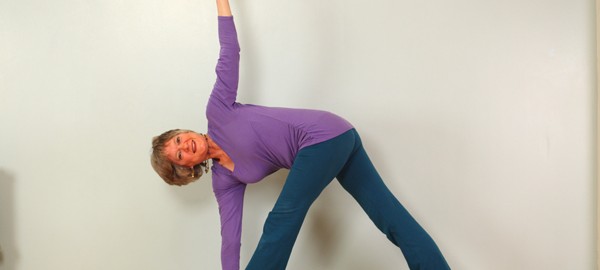
Any pose can be an exploration of a balance between holding firm and yielding. For instance, in a balancing pose, we create stability in the core of the body and the key joints that are holding us up, and yet we also leave room for yielding to the slight sway that will happen as we readjust our balance. You can observe this in Tree Pose, Vrksasana.
In your practice as a whole, can you find the right degree of effort without working too hard or not working hard enough? Notice where you need to hold firm and where you can soften, in the body and in the mind. Which parts of a pose will be more successful with more effort, and which parts with more surrender? Notice where you fit on the spectrum of making effort or surrendering. Are you a person who pushes very hard, or prefers to take it easy? Find the right balance through the practice.
7. Aspiration and Acceptance
It’s good to have a goal: I want to relax, I want to become more flexible, I want to be able to fully stretch my legs and arms in Downward Dog, or to balance in headstand, or to straighten my arms in a full backbend (Urdhva Dhanurasana). These are healthy aspirations that keep us growing, reaching for our full potential, while having fun with the challenges that yoga offers. In yoga practice the aim is to balance these aspirations with an acceptance of who we are, what body we live in, our age, and what is realistic to expect. My practice in my sixties is different from what I did in my twenties. Finding this balance involves knowing ourselves and making realistic intentions while fully accepting who we are.
8. Discipline and Playfulness
Anything worth learning requires and deserves some discipline. With yoga, that discipline can take the form of doing the practices regularly, practicing some poses and techniques that are not easy for you, or holding poses for a longer time. Discipline could also mean being particularly precise with your alignment and actions as you perform the poses.
But lest you get too serious, temper that discipline with playfulness. Play with your sequencing, the speed of the practice, and even the form of the poses. Practice outdoors, in the water, or some other unusual location. Mix up the discipline with something fun.
C for Creative Expression
Each of us has a unique practice, even though the vocabulary of asana might be relatively consistent around the world. We can express our individuality and our best qualities in how we perform the asanas.
How is your yoga practice expressing something about you as an individual? Even though some aspects of yoga are centuries old, we create the practice each time we go onto the mat. Even the act of applying these principles can be creative, not rote.
It’s good to modify poses to adapt to your needs and desires, while remaining safe. Make a standing pose into more of a backbend, a twist, or a forward bend. Find variations that stretch you in a new way. Use props to experiment with challenging arm balances. Connect poses in creative ways. Use music to find a refreshing rhythm in your body. Practice inversions and backbends on a hillside.
Shaking things up and trying things “out of the box” is a good way to keep the practice fresh and alive. It’s not just flexibility of the body that yoga can offer. Tap into your creative self to keep the practice true and alive for you.
Look for Anatomy for Yoga Students and Teachers and Bodymind Ballwork, 2 new titles by Ellen Saltonstall to be published in 2016.
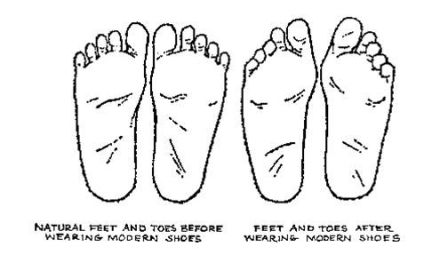
Wear shoes that fit
“The human foot is a masterpiece of engineering and a work of art.” (Leonardo da Vinci)
Are you a fashion victim? Do you wear shoes that are too tight, too floppy, too stiff, or too heavy ?
I recently found the best pair of boots I’ve ever had. They are light, flexible, waterproof, and they fit my foot shape, which has a narrow heel and a wide toe box. It’s amazing what a difference it can make in daily life to have shoes that really fit well.
Our feet need to move and stretch throughout the day to remain healthy. Often our shoes restrict us, while providing “support” and protection. I see many clients whose feet are weak, and sadly collapsing under the weight of the rest of the body. This collapse affects everything else in their posture. They may say “I’ve always had flat feet” but actually in most cases, the arch is normal but it is totally unused. Heavy or stiff shoes – even with arch support – merely reinforce that weakness. Orthotics, although they may help relieve pain in the short term, usually don’t let the feet move enough. They are usually rigid, reducing the chance that the foot will regain normal movement and strength.
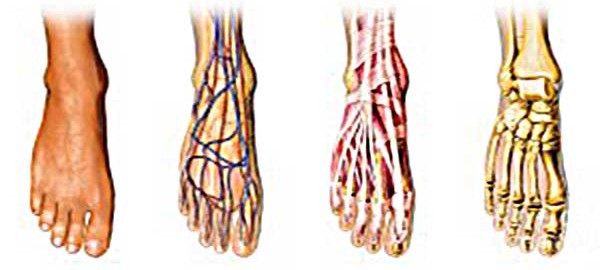
The foot is designed with various internal spring-like structures, the main one being the medial longitudinal arch. The way the bones are shaped and fit together makes these arches possible.
Of course there is structural variation from one person to the next, with some feet having a higher arch, some a “normal” arch, and some a lower arch. One way to observe this in your own feet is to lift your toes, leaving the rest of your foot on the floor. This pulls on the plantar fascia, shortening it and lifting the arch like a bow and a bowstring. This picture shows quite a high arch, so don’t expect that much, but for someone whose arches have been collapsed, some lift will occur.
We have a marvelous web of muscles and fascia on the undersurface of the feet, but in many people it is underused. In the course of normal gait, we strike the ground with the heel, then ideally we roll through each part of the foot (including the toes) before stepping onto the other foot. The foot changes shape as we roll through the arch and push off with the toes to complete each step. That shape change stimulates the muscles and fascia to stay healthy. Those with weak and collapsed feet tend to plunk the whole foot down at once, without using the spring that is inherent in the structure of the foot, or any of the muscles. It’s like falling from one foot the other, all day long. The plantar fascia degrades without the muscular teamwork, resulting in tears and inflammation. The hips, knees and lower back also suffer.
Educating collapsed feet is possible and even entertaining! Here are a few things to try:
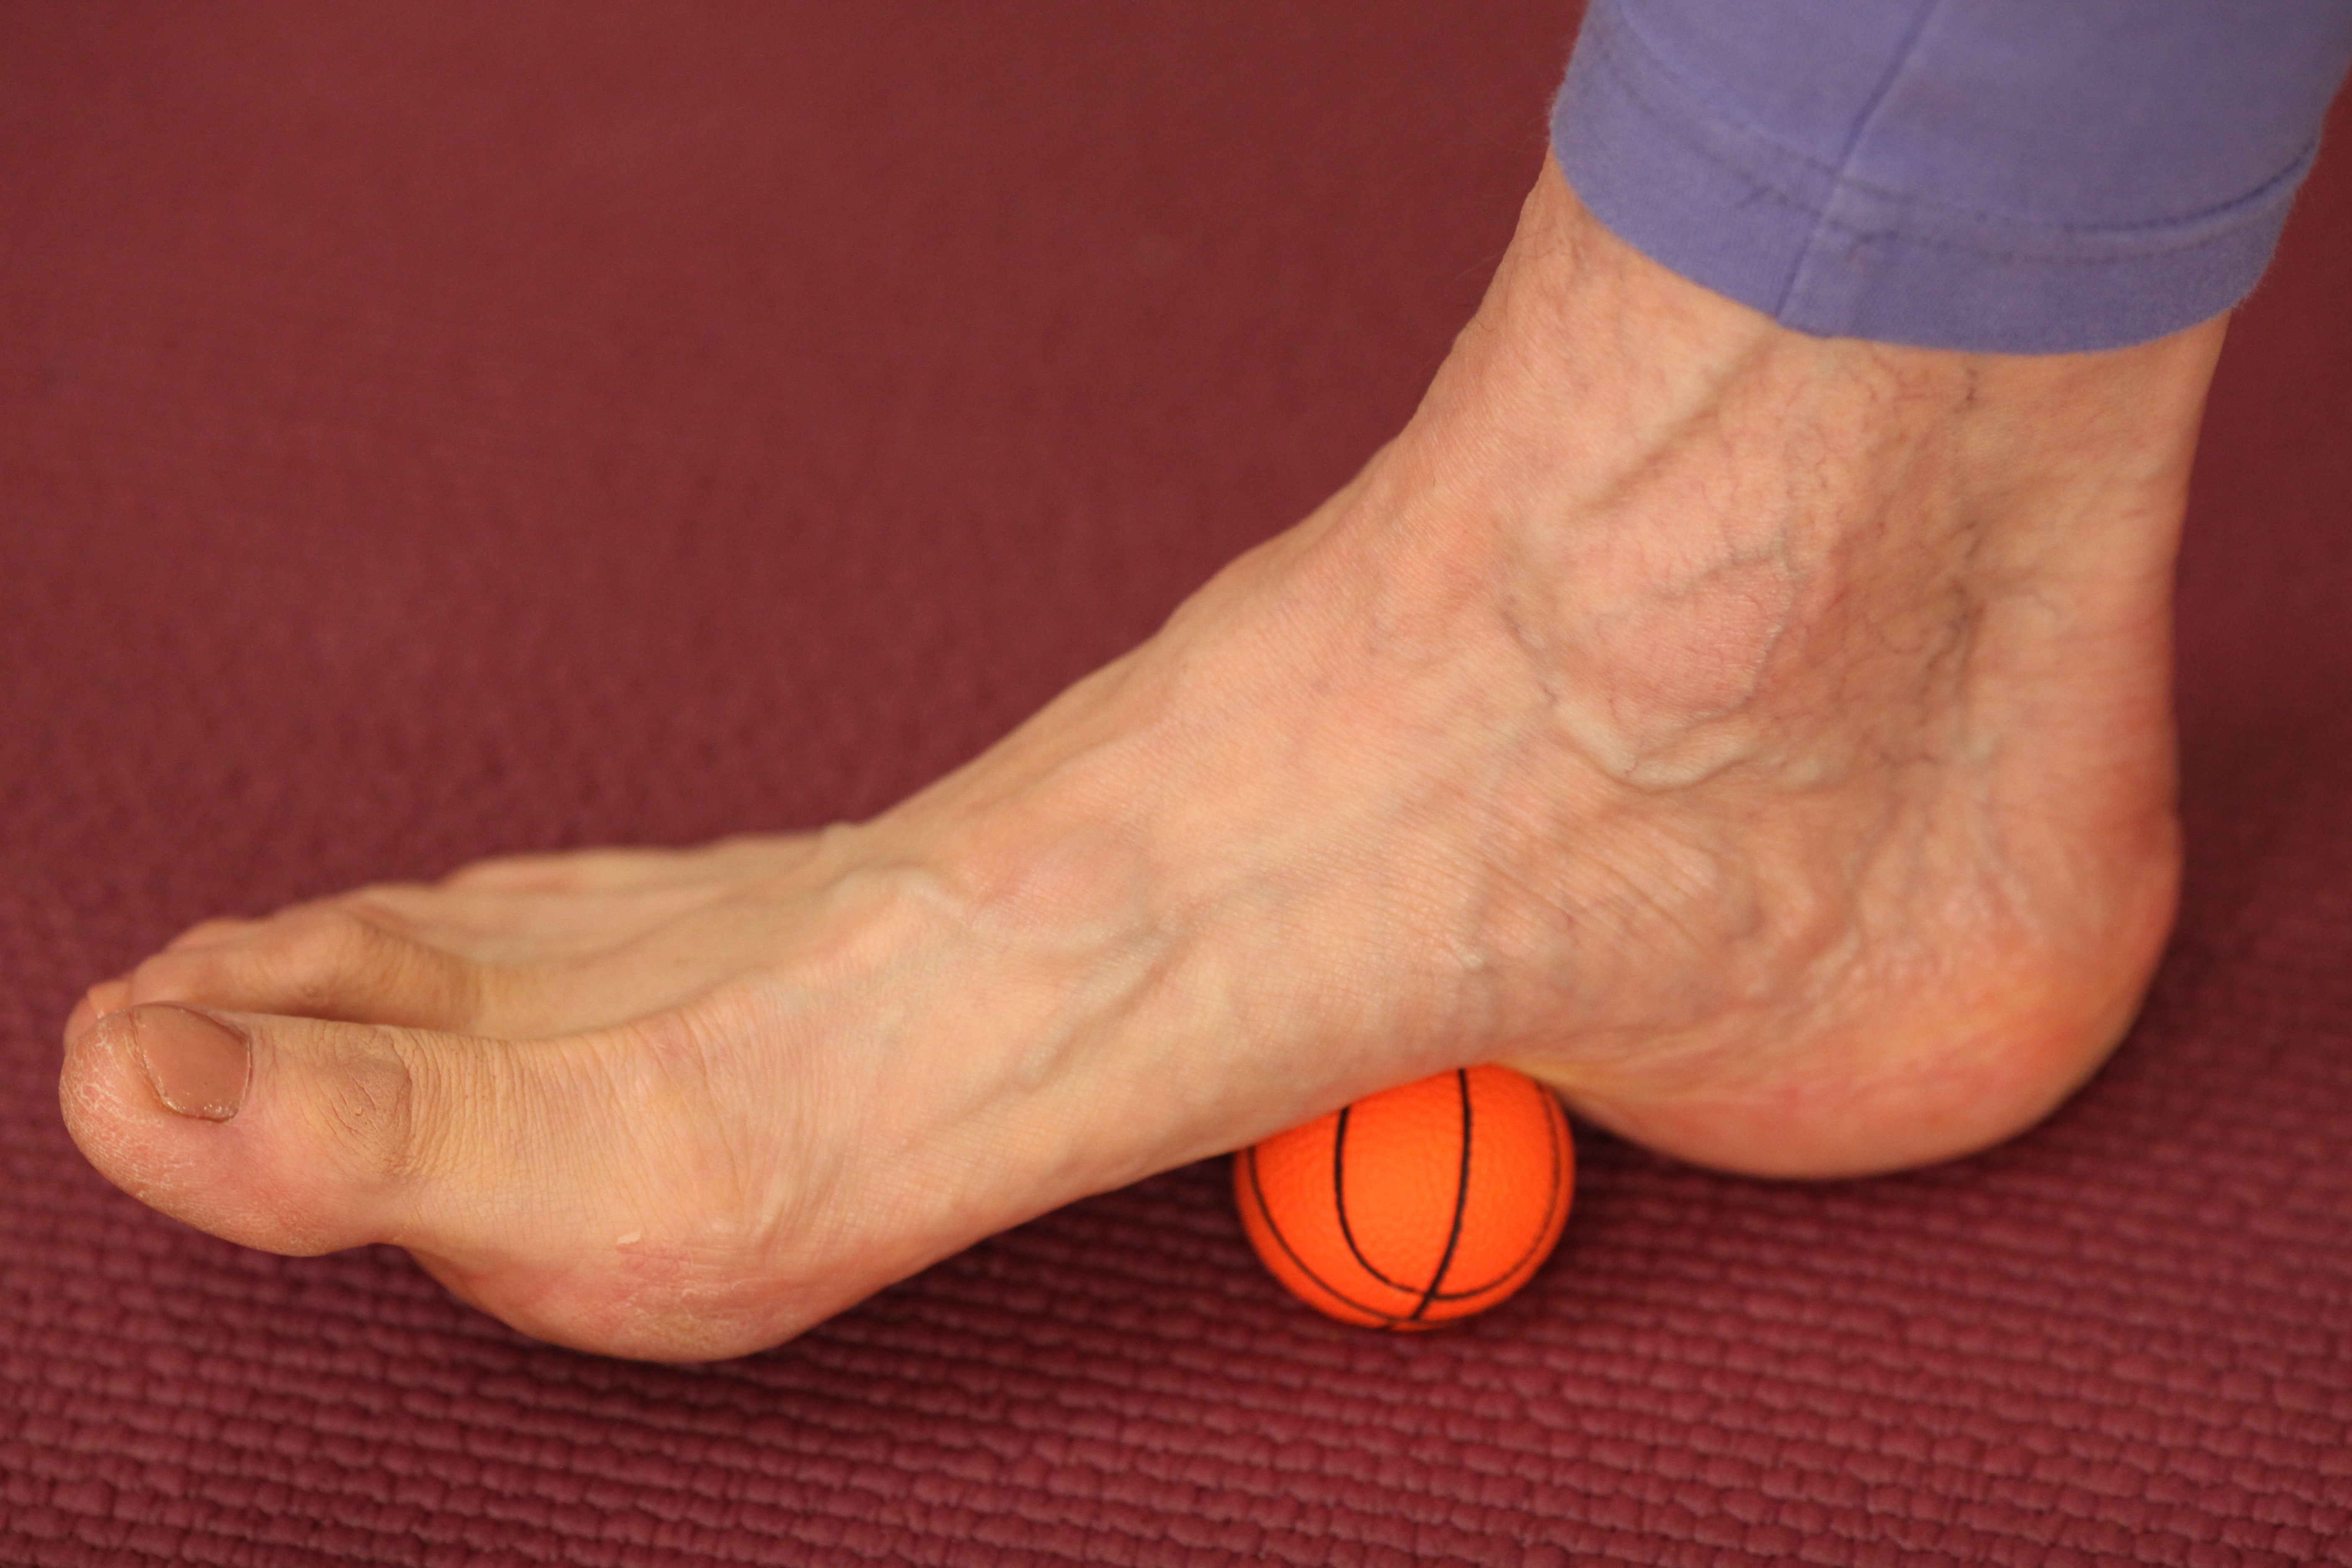
1. Foot Ball: First, roll the foot on a ball to wake up the kinesthesia of the foot and help to move the bones. In Kinetic Awareness, the foot ball technique is very specific and focused. We don’t roll the ball under the foot randomly. We work through the sole of the foot systematically, one spot at a time. With some part of your foot remaining on the floor, allow the ball to press in to the bones and soft tissue, mobilizing and bringing more circulation and sensation. The ball can encourage more movement because it opens up the fascia. Progress through the entire sole of the foot, taking time with the areas that are most in need. You can use a tennis ball, but ideally find one that is smaller, to reach more specific places in your foot. Choose a ball that is not too hard nor too soft: it should dig into the foot enough to provide stimulus. Spend at least 5 minutes on each foot, including the middle part, the edges, the toes, and the heel. Then walk around and feel how awake your feet are.
2. Toe curling: To strengthen the foot, sit in a chair and work one foot at a time. Curl your toes under and sweep them in toward the midline, in a gesture similar to gathering crumbs off the dinner table with your hand. This movement activates the muscles of your arch, particularly the toe flexors and the abductor of your big toe.
3. Foot Shrinking: Putting some weight on one foot, shrink the metatarsals and toes back toward the heel. Do this several times, and notice that the muscles you are using extend up into your lower leg. The arch will lift and your toes may also curl a bit.
For all you anatomy geeks, #2 and #3 strengthen the Tibialis Posterior, Abductor Hallucis Longus, Flexor Digitorum Longus and Brevis, Plantar and Dorsal Interossei.
4. Alphabet: Write the alphabet with your toes and feet, which works the foot and ankle muscles in multiple directions.
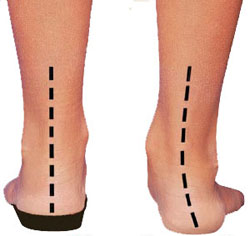
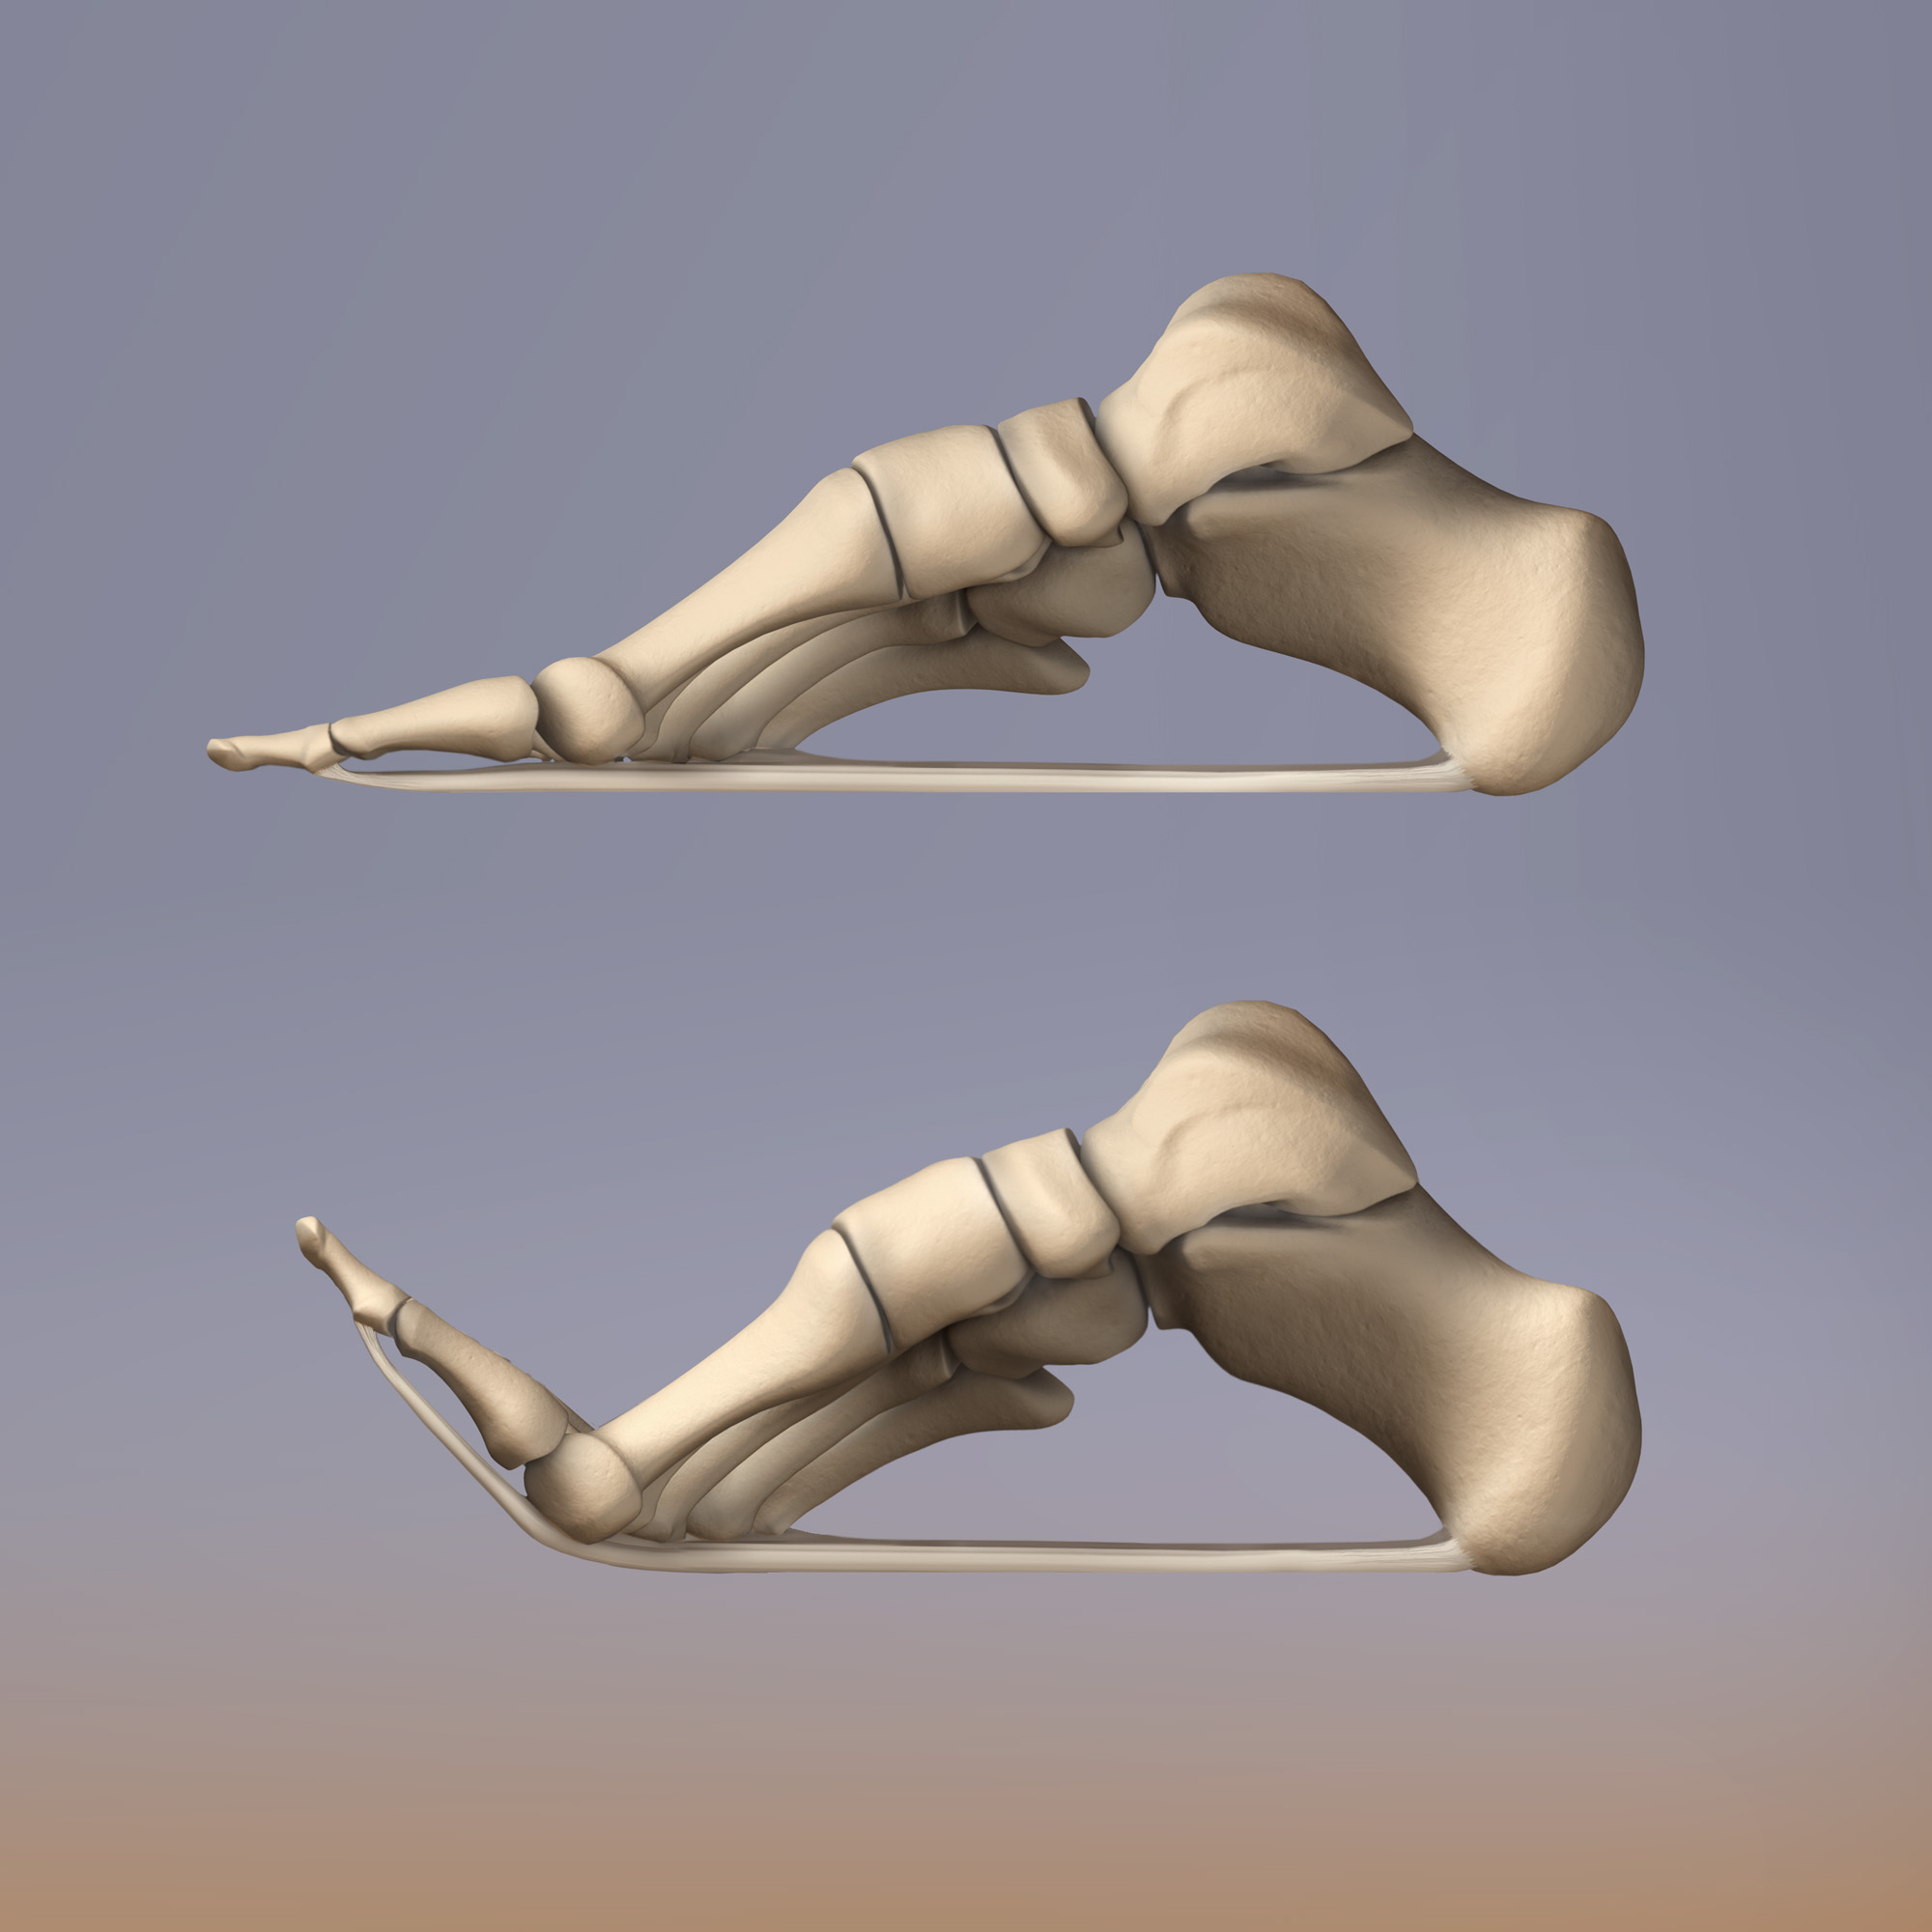
5. Heel raises: Stand near a wall or table for support. Lift your heels carefully, keeping your heels aligned by toning equally on the inner and outer edges. You are exercising the muscular sling around your arch, formed by the Tibialis Posterior and the Fibularis Longus. Most of the weight will be on your first three toes. Picture that your Achilles tendons are remaining absolutely vertical, and your ankles balanced directly over your heels. Get a friend to watch and see how you’re doing.
If the ankle and arch are collapsed, it will look like the foot on the right of this picture.
6. Four Corners: With one foot at a time, put weight into the four corners in the sequence described below, which accumulates by starting with one corner, then adding one more at a time until all four corners are down.
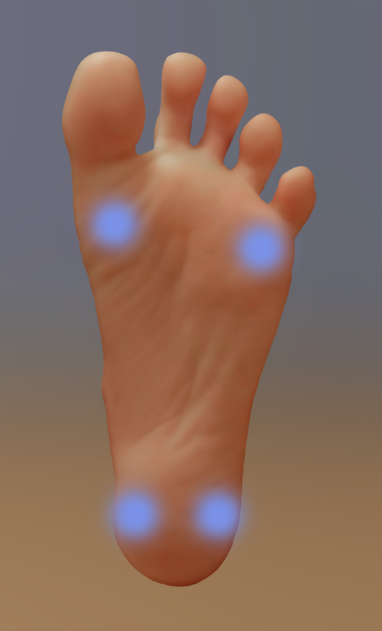 Start with only your inner heel on the floor, lifting the rest of the foot up. Then keep that inner heel down and put the base of your little toe down, making a diagonal connection across your foot. This activates the muscles in the mid-foot, your intrinsics. Then keeping those two down, widen across the toes to place the big toe mound down. Then keep those three down as you finish by crossing over to the outer heel. This last pass is the most important one for those with collapsed arches. It will bring more weight to the outer edge of the foot, allowing the arch to lift up. Notice the stability and strength when you have all four corners down and your arch lifted. Then repeat on the other foot.
Once your feet are alive and awake, you won’t want to stuff them into shoes that don’t fit. You’ll feel a new spring in your step, better balance, and greater stability in your yoga.
Be persistent; find the right shoes that allow your feet to have their full range of motion. Find the right combination of support, protection, and freedom of movement. Your feet deserve it!
This is a sample of some foot tricks, and there’s much more. Come to my therapeutics classes and workshops to learn more fun foot exercises. And watch for more blog posts about therapeutics.
Is Yoga Safe?
Attention: Media scare: Yoga is dangerous for stiff men and flexible women. Generalizations like this amaze and disturb me, because people read this and are scared to try yoga, or scared to continue if they already do it.
Big message here: Not all yoga is the same. People need to use discrimination in choosing an appropriate style of yoga and a good teacher. A well-educated, well-intentioned teacher can give instructions that will protect students from the errors that are easy for anyone to make: poor alignment, over-efforting or under-efforting. As one teacher taught me years ago, there are two mistakes in yoga: doing too much and doing too little. Beginners might tend to do too little, and experienced people might tend to do too much, although that’s another generalization, so feel free to disregard it.
Yoga is not about imitating a shape, it’s about inner transformation. It’s not meant to be competitive, but it is meant to challenge us. What makes this difference? Attitude and intention. The student who comes to yoga for the sake of achievement, competition, or self-promotion may leave their common sense behind, or maybe they never had it. The competition might be with the teacher, with other students, or with some mental image or internal standard that the student made consciously or unconsciously.
You can get injured doing anything – running, dancing, driving, crossing the street, cooking dinner, you name it. It’s our human responsibility to do anything with discrimination, with common sense. In yoga, common sense includes knowing your own body. Are you generally stiff, generally flexible, or a mixture of stiff in some areas of your body and looser in others? When you feel pain in a pose, is it the pain of unused muscles and joints starting to move, or is it strain? What kind of strain is it? Is something getting compressed, or is something stretching too much, or moving in ways that are not suitable to your particular physical structure? Have you prepared for the particular demands of the pose? These are all questions we can learn how to answer for ourselves.
Alignment and support also matter. How we arrange ourselves in a pose (every part counts) and the muscular supportive actions we do (while not appearing to move at all) are crucial to the safety (or lack of it) in the practice. I believe that we need enough time in each pose to feel, to activate the right support, and to prevent strain. A fast-moving practice doesn’t allow for that, and is particularly dangerous for beginners. And often the fast moving classes are large ones, in which the teacher can’t possibly monitor each student.
Most of us have the same set of bones and muscles, but within that, there’s a lot of individual variation. The shape of your joints and the qualities of your soft tissue are genetic traits. You may not know about a biomechanical variation you have until you start to feel pain during or after the practice. If you force yourself into a pose, you are asking for trouble, and the problem is not the yoga. We do get warning signs, and that’s the time to apply common sense: find out what’s going on and allow that information to inform the way you practice. Yoga asana practice includes a vast array of poses: if you can’t or shouldn’t do headstand or lotus, for example, there are many other wonderful poses you can do.
So: take a breath to refine your goals, find a good teacher, and use your common sense.
Ellen Saltonstall
Gratitude for the practices
Every time I practice, I feel better, more alive, more connected to myself and therefore more able to connect to others. The practice could be just ten minutes, or better yet 30 minutes, an hour or more. “Practice” for me means not just asana, but meditation, chanting, and Kinetic Awareness ballwork. I usually manage to do each of these every day.
Any one of these practices brings about a shift in energy, an inner resonance, a movement of prana that has a direct effect on how I feel physically and emotionally. Even when I’m dealing with a physical injury or a major life issue, something feels better. The inner subtle channels open, and whatever needs to happen at that time, can happen more clearly. The challenges are often still there – physical pain, strong emotions, decisions about work or relationships, the long to-do list – but I feel connection to the inner resources I need to meet the challenges.
Sometimes the practice is fueled by happiness or excitement, other times by frustration, anger, or even fatigue. Sometimes it’s pure discipline – doing it because of a commitment I’ve made to myself. These are all different forms of energy, always fluctuating, and often manifesting as reactions to situations. There are two yogic words for these fluctuations that I like to remember: “vrrtis”, meaning the quicker movements of the mind and emotions – and “vasanas”, the word for deeper tendencies in our character that recur over and over. Vrttis and vasanas can be positive, negative, or a combination of both. We all have them ! The question is, can we recognize them and ride the waves while remembering the stillness of our deepest self underneath them? That’s where practice is so useful and such a refuge.
As a gift for yourself in this season, I invite you to take time for whatever practice connects you to your deepest self. You won’t regret it, and it’s well worth the time.
Here’s what Judith Lasater says about practice in her book Living Your Yoga: “To practice is to pay attention to your whole life: Your thoughts, your bodily sensations, and your speech and other actions. As you do, you will discover that nothing is separate from anything else. Thoughts are the sensations of the mind, just as sensations are the thoughts of the body. Each moment of your life is a moment of potential practice.”
Ellen Saltonstall
Photo: Paula Court