Better Interoception Equals Better Health
 How’s your interoception? In case you’re not familiar with that word, it’s the inner felt sense of the body, including being warm or cold, hungry or full, tired or energized, stiff or flexible. Interoception is increasingly seen as a crucial component of health by twenty-first century researchers, especially in how it bridges the gap between physical and emotional experience. Recent research shows that well-developed interoception can lessen our experience of pain, which might surprise you. In other words, the more we are in touch with our inner world of sensation, the more we can adapt our behaviors to lessen the causes of pain. When our interoception is faulty and we are disconnected from the body, we are more vulnerable to anxiety and depression.
One way to check in with our interoception – our inner sense of subjective presence in the body – is with an inner dialogue. Think for a moment about whether you have an inner dialogue, a way of checking in with yourself throughout your day. If you do, what are its contours and themes? Do you talk to yourself with judgment, criticism, or disapproval? Or are you an encouraging coach for yourself? Does your body have a voice in the conversation? If your neck hurts and you are short-tempered, can you see the connection between those two states? Do you see your body as an ally, or as an adversary? A burden that you carry around, or your very own self?
I believe that we develop our inner dialogue over our lifetime. It is influenced by our family and by the culture we live in, the education we receive, the work that we do, and our goals for ourselves. I often ask students what they were taught about self-care while growing up. For many of us, it’s the usual short list: eat healthy food, get exercise, get enough sleep. Rarely is anything taught about the value of interoception or embodied self-awareness – the ongoing process of dialogue between your mental and physical selves. Being embodied with awareness requires practice and continuous renewal.
Bodymind Ballwork is a great way to develop your interoception and gradually build a more authentic and self-supporting inner dialogue. If you haven’t tried it, now is a good time. I am offering several workshops this summer and fall to teach the full spectrum of this empowering and healing work. Check out the Bodymind Ballwork page and the workshop page of my website for more information. If you are already a practitioner, tell your friends about it!
Adapted and excerpted from The Bodymind Ballwork Method, pp 35-36.
Bodymind Ballwork for The Outer Side of The Legs
Right now, it’s the beginning of winter in the Northeast USA. We are wearing heavier clothing and shoes, the ground might be slippery, and the cold temperatures can sometimes cause muscles to tighten as we rush through our day. Tension in the outer legs that can cause hip, knee or ankle pain and fatigue.
Last year I wrote a blog about strengtheners for this part of the body, and today’s blog is about how to release tension there with the balls. While I acknowledge that many people use rollers for this, and get a lot of benefit, I prefer the balls, because I feel that the balls can get in between the layers and neighboring muscles really well, and they facilitate inner “glide” and healthy circulation.
Two of the techniques are done sitting on the floor, and the other two lying down. The balls can be purchased from www.lifesaball.org – look for the 4” spikey ball, and the 2.5” rainbow sponge ball, both of which I also sell at my studio. (Watch for the balls for sale from my website soon!)
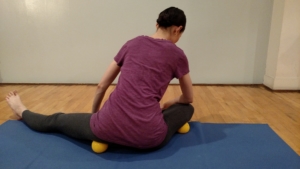
1. Sitting with two 3-4” hollow balls: Begin by sitting with your legs spread to the side, and a ball under each buttock. Explore small movements with your pelvis to work on the muscles of the pelvic floor and lower buttocks.
Then stretch one leg to the side, bend the other one, and turn your upper body toward the bent leg. The ball will begin to move down your outer leg. You can lean over to that side to get more pressure if you wish. Make small slow movements to work on the outer thigh and the iliotibial band. Work for 5-10 minutes on one leg, moving the ball gradually down toward your knee, then repeat the same process on the other leg.
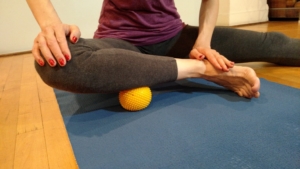
2. Sitting with one ball under the outer shin: For this you can use the hollow ball (for less pressure) or the solid ball (for more pressure). Sit with one leg bent and one leg straight out to the side. Place one ball under your outer shin. Lean over the bent leg and stabilize it with one hand on your knee and one on the ankle. Then slowly move your leg, moving the ball along the length of your outer shin muscles and fascia. Repeat on the other leg.
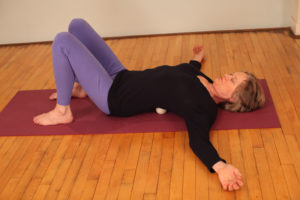
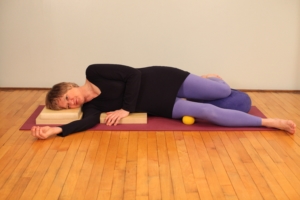 3. Lying on your side with one 3-4” hollow ball: Start by arranging props to support your upper body well while lying on your side. In this photo I have one pad under my ribs, two under my head, and a space between them for my shoulder.
Then place the ball under the side of the pelvis, where the iliotibial band begins. Your other leg can be behind, possibly on a bolster as shown here. Move your pelvis slowly forward and back to massage the muscles and fascia. Take your time, and stop in places that feel particularly tight.
Then move the ball a few inches down on the side of your thigh, skipping the bony prominence which is the greater trochanter of your femur. Work down the side of the thigh slowly, working on one spot at a time, moving the ball down with your hand when you’re finished with each spot. You can progress down to the side of the knee. Repeat on your other leg.
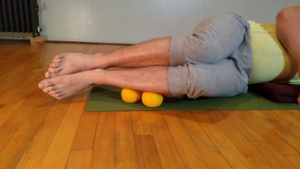 4. Lying on your side with two small solid balls under the side of your lower leg: Support your upper body in the same way as in #3 above.
Place the two balls under the outer shin of your bottom leg, and stack the other leg on top. You can start at the top and progress down toward your ankle. Move your legs slowly so that the ball works into the tibialis anterior and the peroneal muscles, and their associated fascia. You can roll the balls up and down, or across the outer shin. Improvise your movements to reach the places where you want the pressure.
For more fabulous ball techniques, check out my book The Bodymind Ballwork Method, published in October by North Atlantic Books.
Yoga On-the-Go: 7 Yoga Poses You Can Do Anywhere
Summer has finally arrived on the East Coast, and these seasonal transitions are a good time to review and refresh our commitment to self-care. If you’ve been browsing my website, you know that I practice yoga asana, pranayama, meditation and Bodymind Ballwork, a myofascial release technique. And in summer I look forward to adding in hiking, swimming, gardening, and playing outdoors with grandchildren. Plus one of my favorites – just lying in the grass and watching the sky. So the idea of what is “exercise” can expand beyond the normal routine.
What does your self-care look like? Perhaps you attend a yoga class or a meditation group, or go to the gym, or do some exercise at home. Does it change with the seasons? Can you throw in something new from time to time to keep it playful and fresh? Whether you’re in your twenties, your eighties, or somewhere in between, you may find that there is an ebb and flow to what your body likes to do. Aging is a reality for all of us, the body changes gradually but inevitably, and it’s important to adapt our practice to the fluctuations that are built into being human.
I encourage my students to try variations of yoga poses that they can do at in-between moments in the day – at the office, at home, or while travelling – to remind the body and mind to stay connected and to be fully present in the body for whatever you do. Here are some that I do at my kitchen table, while waiting at an airport, or on a break during a long drive. No need to change clothes, have a yoga mat, or even take off your shoes. Stretch in each direction: forward, backward, sideward and twisting. Be creative with your use of props (a park bench, the side of your car, etc) and also with the sequence – do what feels good to you.
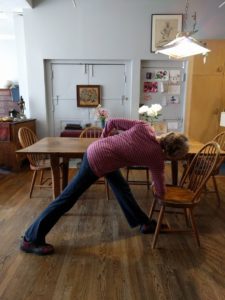
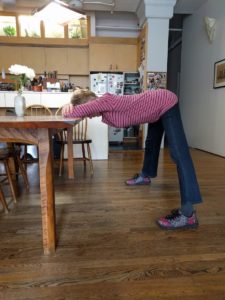 Prasarita Padottanasana: With feet spread wide apart, stretch your legs and reach your hips back as you stretch your torso forward. Rest your head on the table with your arms folded. Breathe and quiet your mind as you connect with sensations inside.
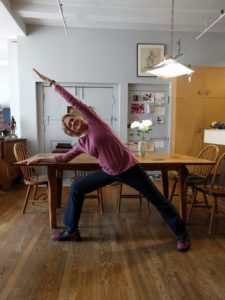 Parsvakonasana with your back to the table: With your right leg turned out parallel to the table, bend the right knee, pointing it toward the middle toes. The other hips shifts forward slightly, away from the table. Lean to the right with the right arm on the table. Keeping your legs and abdomen strongly active, bring your torso to the side as far as you wish. Stretch your left arm alongside your head, reaching vigorously from hand to foot. Repeat on the other side.
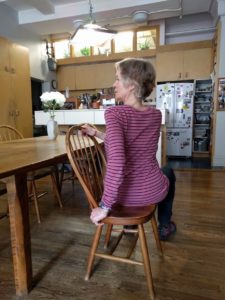 Seated twist with chair: Sit sideways in the chair, with your spine erect and legs steady. Inhale, lift your spine, and exhale, twist toward the back of the chair. Place your hands wherever it helps you to twist more. Hold for a few breaths, and repeat on the other side.
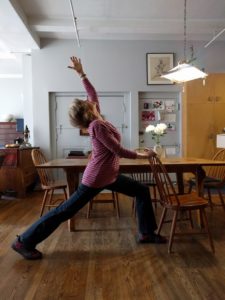 High lunge with the chair: Face the back of the chair and step your right foot forward, your left foot back. Both legs are parallel and the back heel will be off the floor. Face your pelvis squarely toward the chair, and hold the back of the chair with your hands. Lean forward a bit and push into the back leg, widening inside your pelvis and hips. Then pull down through the back of the pelvis as you lift up in the front torso. Raise your chest, look up, and expand from the top of your head all the way to the back foot. Raise your left arm up, and possibly also your right arm. Enjoy your strong and expanded self, then release and repeat on the other side.
 Parivrrta Trikonasana with the chair and tabletop: Place the chair sideways next to the table, the seat facing you, as shown. Step your left leg forward and keep both legs straight. Reach your hips back and your chest forward as you place your right hand on the chair seat. Twist toward the table, with your left hand pressing down into the tabletop to help empower your twist. Breathe several times, then come out of the twist and repeat on the other side.
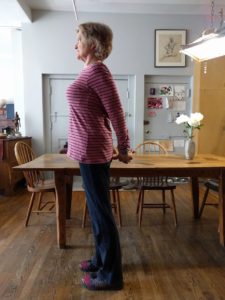 Shoulders and arms pulling back: Stand tall, roll your shoulders back and clasp your hands behind you. Pull your arms back to find a stretch in the front of your shoulders, and a supportive strength in the upper back. Take several deep breaths, feeling all inner sensations as you hold the pose.
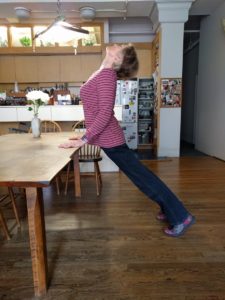 Upward facing dog with hands on the table: Place your hands on the edge of the table and walk your feet back. As you bring more weight onto your arms, be sure to keep your shoulders back and your chest lifted. Bend your elbows a bit, bring your pelvis toward the table with your tailbone lengthening, and move your chest forward between your arms, as if going through a doorway. Look up if you can, and enjoy a full stretch from your chin to your toes.
Then repeat the first pose, Prasarita Padottanasana, one more time to finish.
I invite you to leave a comment below…. and enjoy the summer.
I am excited to announce my new book, “The Bodymind Ballwork Method: A Self-Directed Practice to Help You Move with Ease, Release Tension, and Relieve Chronic Pain” to be released in October 2018 by North Atlantic Books. You can pre-order your copy now. Click here.
The Unexpected Silver Linings of Major Hip Surgery
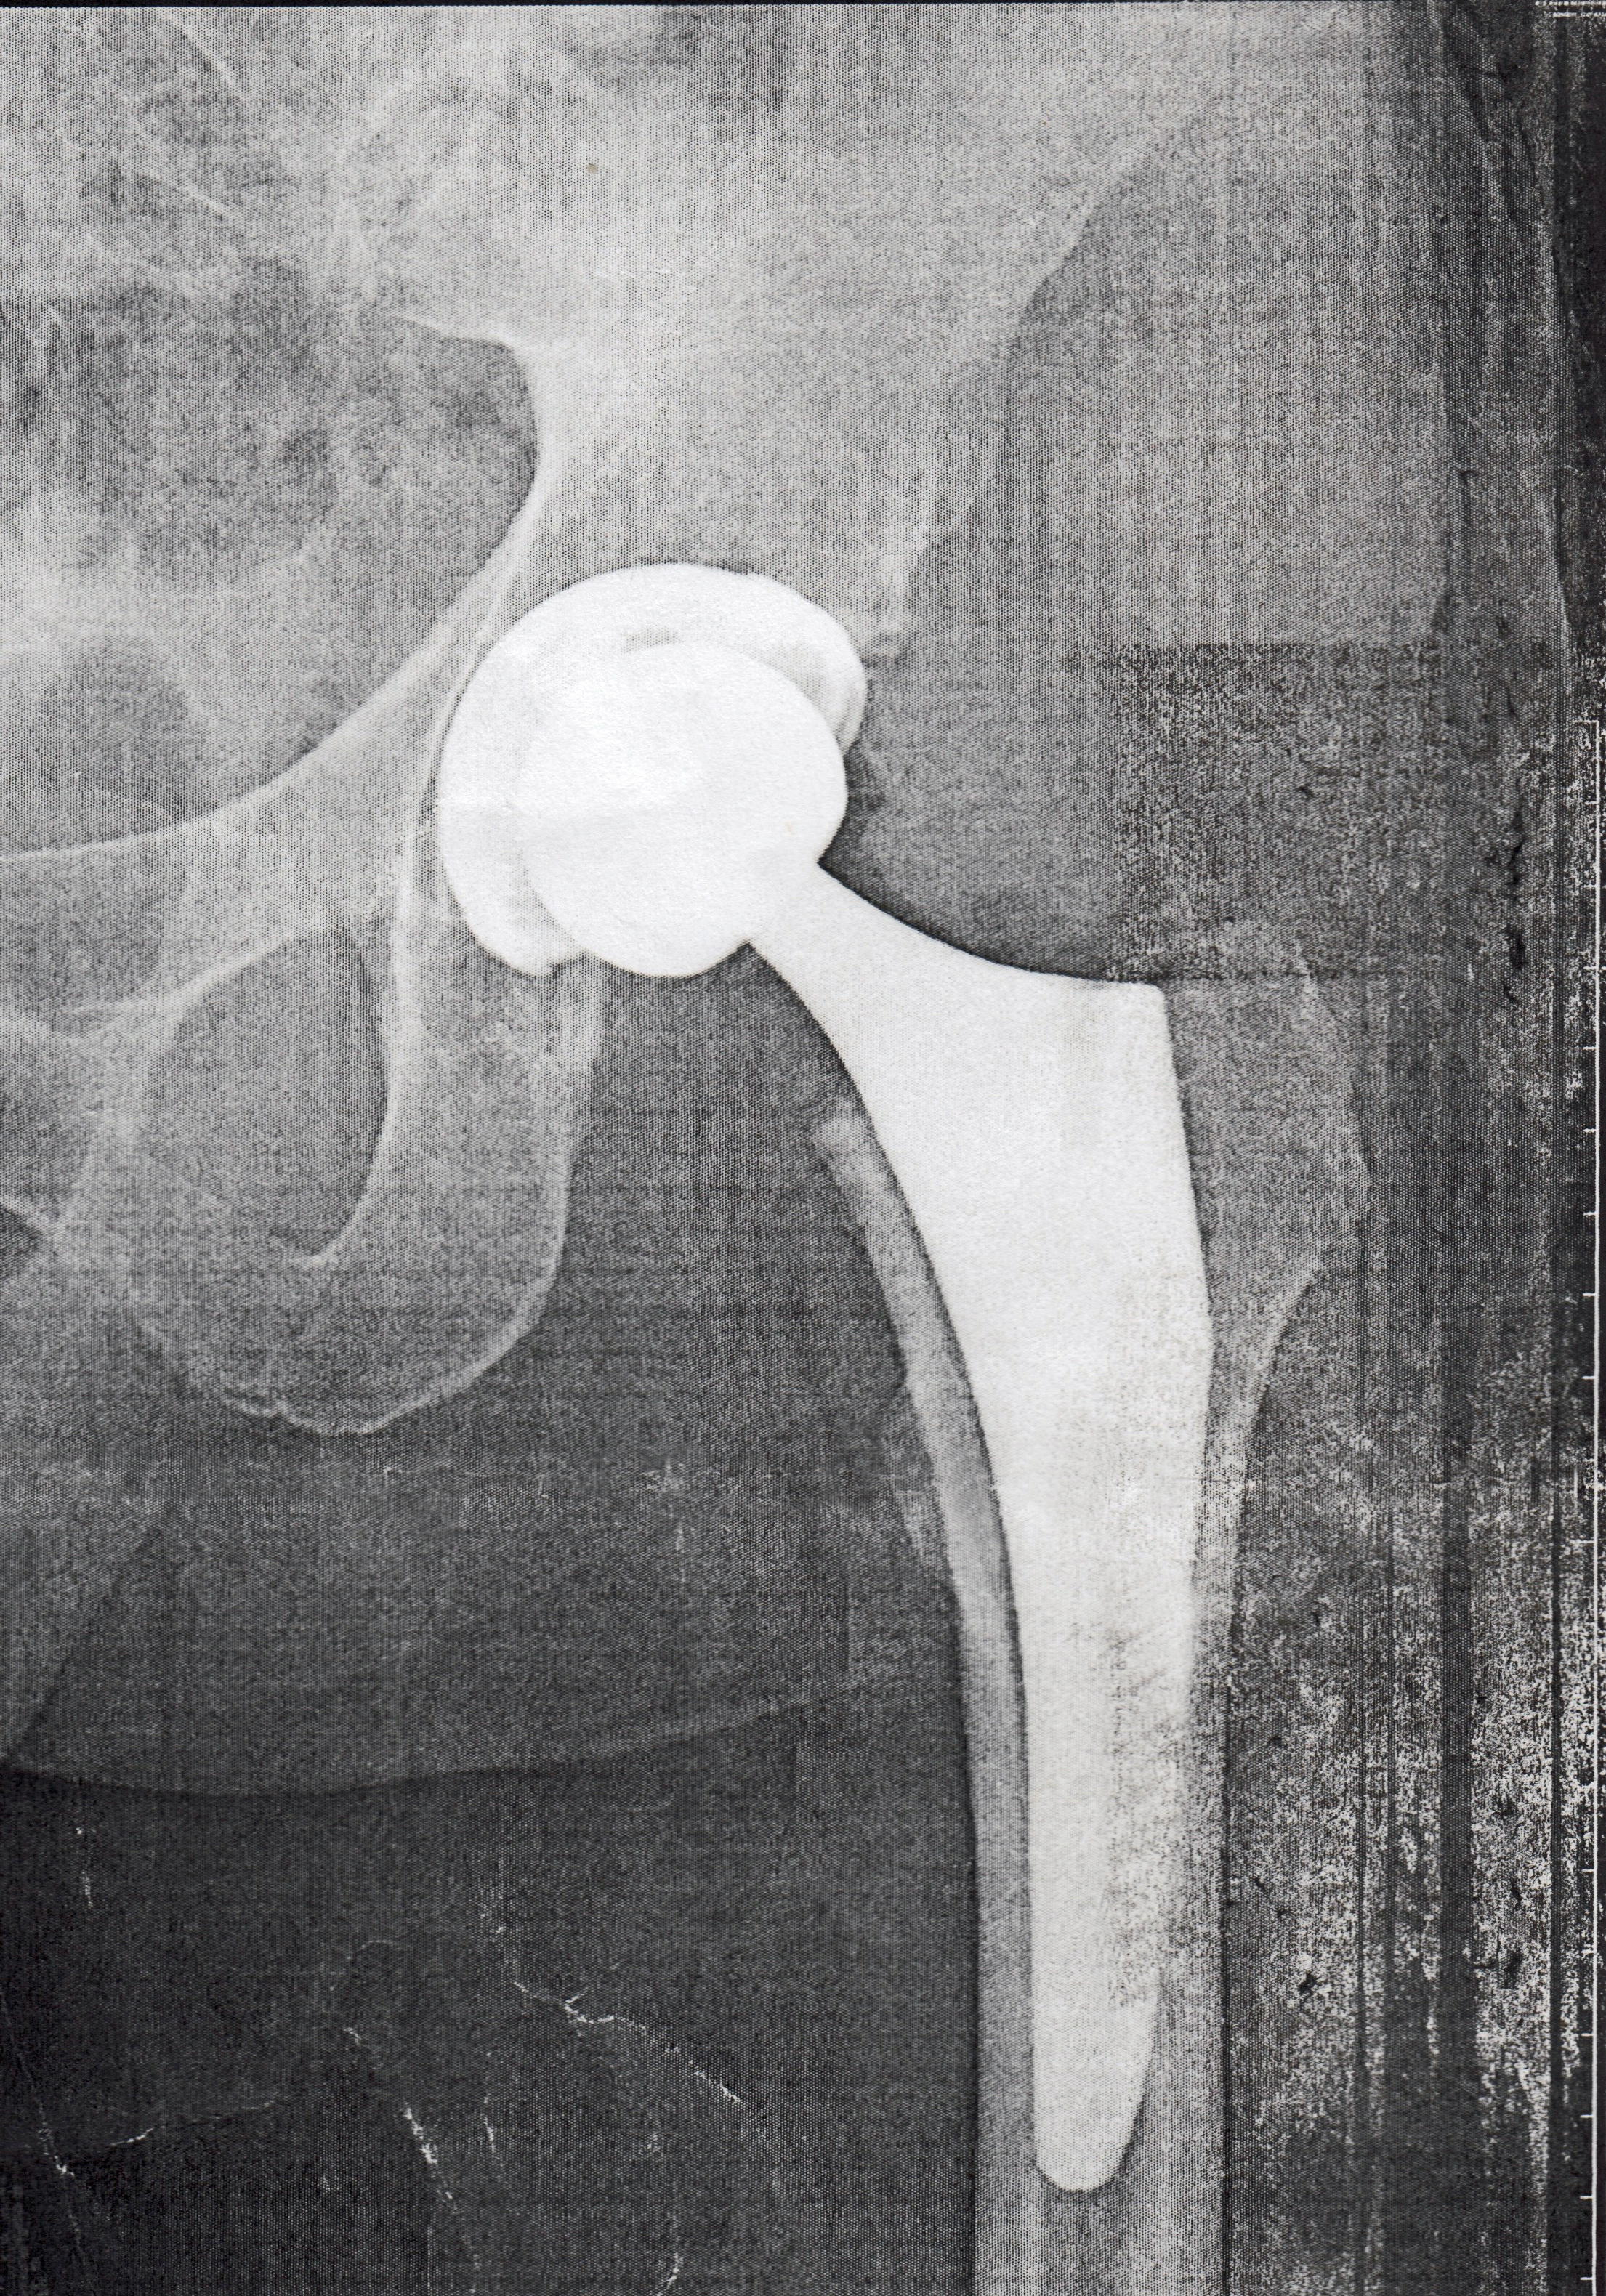
At almost four months after hip replacement surgery, I wanted to collect my thoughts about the whole process, in hopes that hearing about my experience might help others who are considering or definitely heading toward a similar experience.
The lead-up:
I notice that my pain is more frequent and more disruptive of daily activities about two years before surgery.
I go to physical therapy, hoping that will be enough. It is very helpful, but not enough.
I take time to make a list of possible doctors to see.
I see four hip surgeons over the course of a few months. They all tell me I need hip replacement because of advanced arthritic changes in one hip, and they think I’ll need it in the other one too (but I don’t think so).
I choose one of the doctors based on two friends who had surgery with him, plus I liked him and his staff at the initial visit. He’s Patrick Meere at NYU Langone, Hospital for Joint Diseases.
I delay choosing a date, putting off the decision for a few months. Just can’t do it.
My physical therapist encourages me to get the surgery while I’m in relatively good shape, and save the remaining insurance therapy allotment for afterwards.
I schedule a date in late September, giving myself 2 months of time off from teaching afterward, plus another month with no travel. (Actually, I began teaching private sessions after two weeks and classes after three weeks, all at my home studio.)
I am grateful that I have both a solid background in complementary healing methods such as acupuncture, massage, chiropractic and homeopathy, plus a basic faith in mainstream medicine from my father who was a general surgeon. This way I go into the process with confidence on both sides of that spectrum.
The surgery day and first two weeks:
I am nervous, but the morning of surgery I feel ready and grateful for family support. My son is a medical student and I’m comforted as he chats with the anesthesiologist about drugs with impossibly long names (he’s studying pharmacology at the time).
After about 3 hours of pre-op procedures, I say goodbye to family, walk into the OR and sit on the table, greeted by the anesthesiologist and a very nice nurse. They chat as they prepare to give me the drugs, and I marvel at the high-tech feeling of the room. Everyone is wearing suits and helmets as if it’s a space flight about to launch. Thankfully a nurse without a helmet is right by my side, and probably holding me up. The last thing I remember is putting my head into a face cradle while still sitting up. I have heard that people talk at this early stage of anesthesia but don’t remember any of it, so that probably happened to me. I probably lay down on the table still chatting with the nurse.
The next thing I know, it’s 3 hours later and I’m in the recovery room with a very friendly young male nurse by my side asking how I’m feeling. He brings me juice and I am filled with gratitude that it’s over and I’m awake and feeling mentally normal. I have no pain, and in fact, I feel euphoric, thanks to those drugs flooding my system. The euphoria lasts all day while I transition to a room upstairs (with a great view) and get settled, greeting visiting family members. The hospital staff gets me up and walking that afternoon. As I traverse the hallway near my room, there is a framed print by my husband artist Robert Kushner on the wall – a welcome sight.
The next day I have more pain, but I can still get up and walk. That night I have my first melt-down of frustration, and a very kind nurse offers me a hug and a shoulder to cry on. That means a lot to me.
The third day I am scheduled to go home, and there’s a flurry of people in and out to arrange all the discharge procedures. Finally at noon, I walk out on crutches and take the short 4-block trip home via Uber. Too far to walk at this point. But only 2.5 days in the hospital, not much.
At home, I have two places where I spend time – my bed and a couch in the living room. Pretty soon I have a routine and everything I need within reach – phone, laptop, water, reading, medications, snacks. This is when the new normal emerges – resting, walking, taking care of only basic daily needs. This is radical for me, being a person who’s always keeping busy and going from one thing to another all day. Here I am, just on the couch. It’s kind of fun learning how to put on socks and pants with a long-handled grabber.
I’m tremendously grateful for family members and friends who care for me, make my meals, rub my feet, help me navigate daily needs. For these first two weeks, an occupational therapist, a physical therapist, and a visiting nurse come to see me. The PT gets me up and walking outside the very first day. We walk to the corner and back, and that is plenty. When his time is up, I’m sad to say goodbye because we have become friends. He says he wants to come study yoga with me. He buys a rubber ball to help with his plantar fasciitis.
The long-term recovery
As an anatomy geek, I’m fascinated to watch the changes day by day. The incision goes from being quite gory looking with lots of bruises, to a thin red line. My walking becomes smoother, and I transition from walker to cane to nothing. Each week I keep track of my successes, and I laugh at how small but how significant they are. The first time I can wash my feet and put lotion on them. The first time I can put on lace-up shoes. The first time I can go to the grocery store, carry things home, and cook a meal. The first time I can sleep on my left side. The first time I do downward facing dog, sit cross-legged for meditation, do pigeon pose, sun salutation, kick-up handstand.
My muscles are sore and weak in unusual places, but physical therapy always makes me feel more fluid in my walking and confident in my strength. I gradually return to almost all of my favorite yoga poses, and although that process is slower than I anticipated, it feels right. My body clearly tells me yes and no. I get very creative with props.
The silver linings:
Ingenuity in figuring out how to do things in a new way.
Patience with myself and my “to-do” list which is ever present.
Gratitude for small and large kindnesses from family, friends and strangers.
Gratitude for yoga and physical therapy, both of which sped me along toward recovery faster than otherwise would have happened.
Awe at the body’s capacity to heal.
Awe for the medical profession to have figured out how to safely replace a hip joint.
And excitement to be in a new phase of wellness and enthusiasm for life!
Feel free to write me if you want to dialogue about any of this, or if I can support you in your journey.
The 15 minute stay-cation with Bodymind Ballwork
 What do you do to take a break from daily stress, body aches, worry and fatigue? Maybe it’s a cup of tea, a phone call with a friend, or a few minutes of yoga. I recommend that you add this to your choices: a Bodymind Ballwork technique for the spine which will de-stress you, lengthen your back, and refresh your breath and your mind. I do it every day, as do many of my students.
All you need is 15 minutes, a clear space of floor and a yoga mat, and two balls. You can use tennis balls, or find various types of massage balls online. The ones I use are 3” solid rubber, but you can use larger ones as well. A smaller firmer ball will give you a deeper massage, and a larger hollow ball will give you a less specific pressure and an overall feeling of stretch. Both are good.
Lie on your back with your knees bent or straight, whichever is more comfortable to you. Spend a few minutes connecting with your breath, and feeling your body and mind – how are you right now? Are there some sore spots, achy muscles, worries, or emotions that are predominant in your experience right now? No judgment or analysis, just observation.
Now place the balls on your mat so that you can lie down with one ball on each side of the spine, near the bottom of your shoulder blades. They can be quite close to the spine, or a few inches away from it. As you first feel the pressure from the balls, you might be surprised at how strong the sensation is, but just give it some time. Let yourself settle, breathing slowly. Your arms can rest to your side on the floor, or you can stretch them overhead and on the floor.
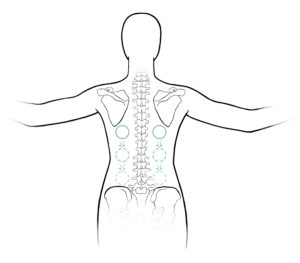 Now move your back very slowly to one side, just an inch or two. Try to move only that segment of your back where you feel the balls. Breathe as you go, and notice any sensations, strong or subtle. The balls are massaging your spinal muscles, of which there are many, and all the surrounding fascia which is richly innervated. Some areas will probably be sore, others not. Think of it as an exploration of your own self, your back body which you can never actually see, but you can deeply feel.
After moving slowly to one side, and lingering there for a few breaths to give the balls time to do their work, glide back to center again. Then do the same to the other side. After one pass to each side, you can decide to repeat, or move the balls down. I usually go from side to side at least three times at each level of the spine, and more if I have sore spots.
When you are ready, roll yourself to another spot by pushing with your feet, and the balls move down your back an inch or two. Then work this new spot in the same way, slowly moving to one side, back to center, and to the other side. The combination of your body weight and your movement is dissolving tension, encouraging better circulation, and bringing more sensory vitality to all the soft tissue of your back.
Continue to progress down your back one spot at a time, noting the differences in sensation in each spot as you go. Also notice any changes in your breathing, especially when the balls are near your lower ribs. If you’ve had chronic back pain, your breath has surely been affected since the fascia of the diaphragm and back muscles are connected, and the stress of chronic pain can also disturb your breath.
Once you reach the pelvic bones, you can move the balls onto the buttocks and choose any spot to work on. This might lead to another 15 minutes, since most of us carry tension in the buttocks! You can choose to work more thoroughly here, finding several spots to place the balls, or just do one spot to finish your journey down your spine.
When you’re ready to stop, remove the balls from under you, and lie flat. Notice what you feel: what changes have occurred? Is there more ease, a softer and fuller breath, more contact with the floor?
Bodymind Ballwork offers more than 30 techniques, with something for each part of the body.
This technique for the middle and lower back is good to combine with the technique for the shoulders, described in my blog “Release Shoulder Tension with Bodymind Ballwork”, from January 2016.
I have a book in progress that will provide all the instructions, but in the meantime, you can come to class if you’re in New York, or attend a workshop – the next one is at Tasha Yoga in Williamstown, MA, August 11-13, 2017.
Want to learn more? In November 2017 I’m offering a three day intensive where I teach ALL the Bodymind Ballwork techniques in three days (open to anyone, come for a half day, full day or several), and there’s an added 2-day teacher training portion (by application).
Enjoy the summer and take time to renew yourself with Bodymind Ballwork!
Meet your hard-working (and possibly under-appreciated) outer hip muscles
 The teams of muscles that support and move your hips are awesome. Even if you’re not an anatomy geek, they are worth getting to know. You have the flexors in the front (with the iliopsoas as the team leader) which bring your leg forward to take a step. Their counterpart is the extensors in the back – gluteus maximus and hamstrings – the push-off muscles for running. We also have teams that rotate the hip joint – external rotators (piriformis being the midget but strong team leader here) and the internal rotators, which I’ll talk about below. Another team is the adductors on the inner thighs, a group of five that stabilize the inner thighs, pulling toward the midline.
My favorite group is the abductor-medial rotators, a team of three multi-taskers on the outer hips. This group does both abduction (pulling the leg to the side) and medial rotation (turning the leg in toward the midline). Its role for stability is often ignored. Yoga students usually want to “open the hips” and I can understand that, but it’s easy to get fixated on flexibility and ignore our need for strength and stability. In that sense, we can do well to consider practicing some techniques from fitness trainers and physical therapists.
Here are the three muscles: gluteus medius, gluteus minimus, and tensor fascia lata.
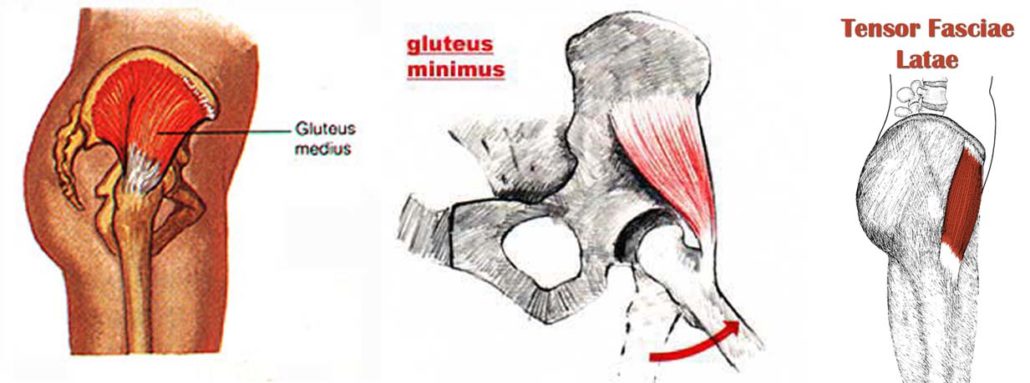
Because of their attachment on the bones above and below, these muscles have a variety of actions, depending on what part of the body is stable. If you put all your weight on one leg, the abductors will move the other leg to the side, and potentially also rotate it a bit. They’ll also be stabilizing your standing leg! Because the gluteus medius has such a wide attachment on the pelvic crest, it can either rotate the thigh externally or internally, as well as abduct it…the multi-tasker.
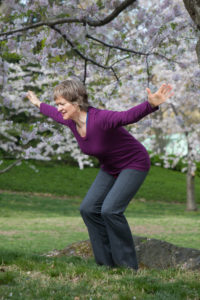
But if you have your weight on both feet, as in Tadasana or Uttanasana or Utkatasana, the abductors isometrically pull the upper thighs apart without affecting the lower legs, which adds to your stability and prevents compression in the hip joints and the sacro-iliac joint. I think it’s particularly good action in Utkatasana, the pose shown above.
You might say: I don’t want to strengthen my outer hips because they’re often achy and tired! Often when the outer hips are achy, it’s because the muscles are reacting to something we’re doing or not doing on a daily basis that causes all the teams to operate in a disorganized way. Perhaps we stand on one leg without realizing it, or we have some other slight imbalance or asymmetry that’s under the radar of ordinary awareness. Gradually over time, some muscles get a lot of stimulus and others not so much. This can be reinforced in our yoga practice or athletic activity like running, once the habits are established.
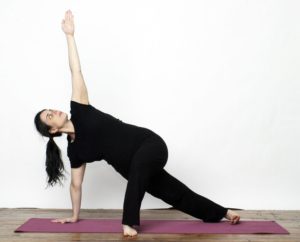
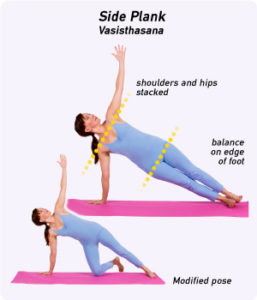
Here are some examples of good additions to your daily practice that highlight these abductor-rotator muscles, both for strength and stretch. First you can isolate them, and then focus on how they play a part in your favorite asanas. Practice these on both sides, of course.
1. Side leg lift from all fours: From hands and knees position, lift one leg to the side, at first with the knee bent, and then straighten the leg to the side, as in a slow karate kick with the heel raised slightly. This works the abductor-medial rotator team. Do 10 slow kicks on each side, and increase the number as you get stronger.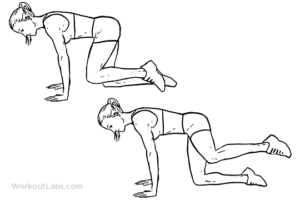
2. Side plank pose (Vasishtasana): In this pose, side body strength is emphasized, and the abductor team lifts up the hips. It’s a really good core strengthener. There are many good variations of this pose, and here are a few. Hold them for as long as you can, with your supporting shoulder pulled firmly back.
3. Outer hip and thigh stretch: A variation of Supta Padangusthasana, this crosses one leg over the midline, highlighting the outer hip and thigh. Keep your leg muscles strongly contracting as you hold the pose.
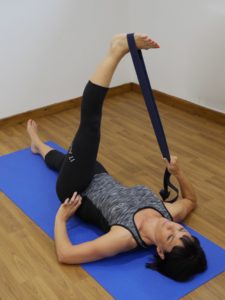
4. Another outer hip stretch, this time with bent knees. Be sure to keep the shoulders and pelvis flat on the floor, and adjust your distance from the wall as needed.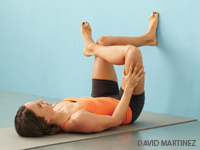
I hope this has peaked your interest in your hip muscles! You can appreciate the contribution of these multi-taskers in all standing poses, but especially in any balance pose, such as Vrksasana (Tree Pose), Trikonasana (Triangle Pose) and Ardha Chandrasana (Half-Moon Pose).
For more on the hip muscles, see my new book Anatomy and Yoga: A Guide for Teachers and Students, available online and in bookstores.